

Sailboat Hardware

Sailboat Parts Explained: Illustrated Guide (with Diagrams)
When you first get into sailing, there are a lot of sailboat parts to learn. Scouting for a good guide to all the parts, I couldn't find any, so I wrote one myself.
Below, I'll go over each different sailboat part. And I mean each and every one of them. I'll walk you through them one by one, and explain each part's function. I've also made sure to add good illustrations and clear diagrams.
This article is a great reference for beginners and experienced sailors alike. It's a great starting point, but also a great reference manual. Let's kick off with a quick general overview of the different sailboat parts.
General Overview
The different segments
You can divide up a sailboat in four general segments. These segments are arbitrary (I made them up) but it will help us to understand the parts more quickly. Some are super straightforward and some have a bit more ninja names.
Something like that. You can see the different segments highlighted in this diagram below:

The hull is what most people would consider 'the boat'. It's the part that provides buoyancy and carries everything else: sails, masts, rigging, and so on. Without the hull, there would be no boat. The hull can be divided into different parts: deck, keel, cabin, waterline, bilge, bow, stern, rudder, and many more.
I'll show you those specific parts later on. First, let's move on to the mast.

Sailboats Explained
The mast is the long, standing pole holding the sails. It is typically placed just off-center of a sailboat (a little bit to the front) and gives the sailboat its characteristic shape. The mast is crucial for any sailboat: without a mast, any sailboat would become just a regular boat.
I think this segment speaks mostly for itself. Most modern sailboats you see will have two sails up, but they can carry a variety of other specialty sails. And there are all kinds of sail plans out there, which determine the amount and shape of sails that are used.
The Rigging
This is probably the most complex category of all of them.
Rigging is the means with which the sails are attached to the mast. The rigging consists of all kinds of lines, cables, spars, and hardware. It's the segment with the most different parts.
The most important parts
If you learn anything from this article, here are the most important parts of any sailboat. You will find all of these parts in some shape or form on almost any sailboat.

Okay, we now have a good starting point and a good basic understanding of the different sailboat parts. It's time for the good stuff. We're going to dive into each segment in detail.
Below, I'll go over them one by one, pointing out its different parts on a diagram, listing them with a brief explanation, and showing you examples as well.
After reading this article, you'll recognize every single sailboat part and know them by name. And if you forget one, you're free to look it up in this guide.

On this page:
The hull is the heart of the boat. It's what carries everything: the mast, the sails, the rigging, the passengers. The hull is what provides the sailboat with its buoyancy, allowing it to stay afloat.
Sailboats mostly use displacement hulls, which is a shape that displaces water when moving through it. They are generally very round and use buoyancy to support its own weight. These two characteristics make sure it is a smooth ride.
There are different hull shapes that work and handle differently. If you want to learn more about them, here's the Illustrated Guide to Boat Hull Types (with 11 Examples ). But for now, all we need to know is that the hull is the rounded, floating part of any sailboat.
Instead of simply calling the different sides of a hull front, back, left and right , we use different names in sailing. Let's take a look at them.

The bow is the front part of the hull. It's simply the nautical word for 'front'. It's the pointy bit that cuts through the water. The shape of the bow determines partially how the boat handles.
The stern is the back part of the hull. It's simply the nautical word for 'back'. The shape of the stern partially determines the stability and speed of the boat. With motorboats, the stern lies deep inside the water, and the hull is flatter aft. Aft also means back. This allows it to plane, increasing the hull speed. For sailboats, stability is much more important, so the hull is rounded throughout, increasing its buoyancy and hydrodynamic properties.
The transom is the backplate of the boat's hull. It's the most aft (rear) part of the boat.
Port is the left side of a sailboat.
Starboard is the right side of a sailboat
The bilges are the part where the bottom and the sides of the hull meet. On sailboats, these are typically very round, which helps with hydrodynamics. On powerboats, they tend to have an angle.
The waterline is the point where the boat's hull meets the water. Generally, boat owners paint the waterline and use antifouling paint below it, to protect it from marine growth.
The deck is the top part of the boat's hull. In a way, it's the cap of the boat, and it holds the deck hardware and rigging.
Displacement hulls are very round and smooth, which makes them very efficient and comfortable. But it also makes them very easy to capsize: think of a canoe, for example.
The keel is a large fin that offsets the tendency to capsize by providing counterbalance. Typically, the keel carries ballast in the tip, creating a counterweight to the wind's force on the sails.
The rudder is the horizontal plate at the back of the boat that is used to steer by setting a course and maintaining it. It is connected to the helm or tiller.
Tiller or Helm
- The helm is simply the nautical term for the wheel.
- The tiller is simply the nautical term for the steering stick.
The tiller or helm is attached to the rudder and is used to steer the boat. Most smaller sailboats (below 30') have a tiller, most larger sailboats use a helm. Large ocean-going vessels tend to have two helms.
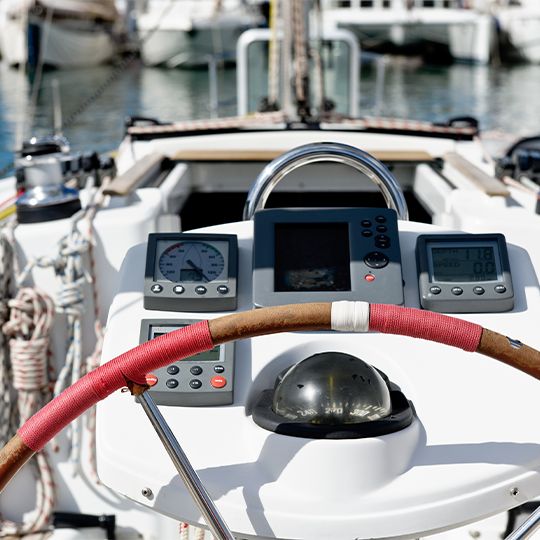
The cockpit is the recessed part in the deck where the helmsman sits or stands. It tends to have some benches. It houses the outside navigation and systems interfaces, like the compass, chartplotter, and so on. It also houses the mainsheet traveler and winches for the jib. Most boats are set up so that the entire vessel can be operated from the cockpit (hence the name). More on those different parts later.
Most larger boats have some sort of roofed part, which is called the cabin. The cabin is used as a shelter, and on cruising sailboats you'll find the galley for cooking, a bed, bath room, and so on.
The mast is the pole on a sailboat that holds the sails. Sailboats can have one or multiple masts, depending on the mast configuration. Most sailboats have only one or two masts. Three masts or more is less common.
The boom is the horizontal pole on the mast, that holds the mainsail in place.
The sails seem simple, but actually consist of many moving parts. The parts I list below work for most modern sailboats - I mean 90% of them. However, there are all sorts of specialty sails that are not included here, to keep things concise.

The mainsail is the largest sail on the largest mast. Most sailboats use a sloop rigging (just one mast with one bermuda mainsail). In that case, the main is easy to recognize. With other rig types, it gets more difficult, since there can be multiple tall masts and large sails.
If you want to take a look at the different sail plans and rig types that are out there, I suggest reading my previous guide on how to recognize any sailboat here (opens in new tab).
Sail sides:
- Leech - Leech is the name for the back side of the sail, running from the top to the bottom.
- Luff - Luff is the name for the front side of the sail, running from the top to the bottom.
- Foot - Foot is the name for the lower side of the sail, where it meets the boom.
Sail corners:
- Clew - The clew is the lower aft (back) corner of the mainsail, where the leech is connected to the foot. The clew is attached to the boom.
- Tack - The tack is the lower front corner of the mainsail
- Head - The head is the top corner of the mainsail
Battens are horizontal sail reinforcers that flatten and stiffen the sail.
Telltales are small strings that show you whether your sail trim is correct. You'll find telltales on both your jib and mainsail.
The jib is the standard sized headsail on a Bermuda Sloop rig (which is the sail plan most modern sailboats use).
As I mentioned: there are all kinds, types, and shapes of sails. For an overview of the most common sail types, check out my Guide on Sail Types here (with photos).
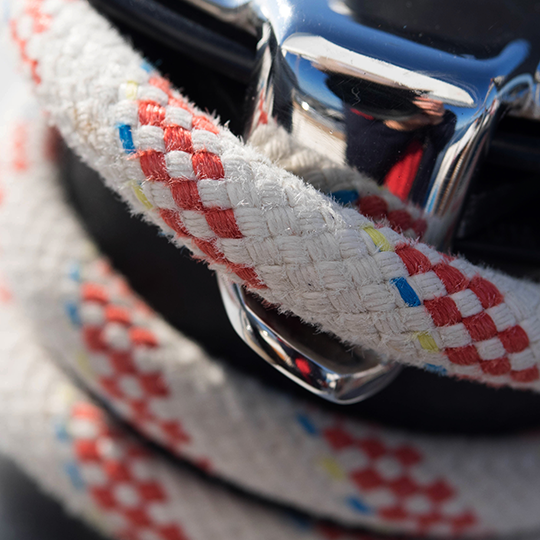
The rigging is what is used to attach your sails and mast to your boat. Rigging, in other words, mostly consists of all kinds of lines. Lines are just another word for ropes. Come to think of it, sailors really find all kinds of ways to complicate the word rope ...
Two types of rigging
There are two types of rigging: running and standing rigging. The difference between the two is very simple.
- The running rigging is the rigging on a sailboat that's used to operate the sails. For example, the halyard, which is used to lower and heave the mainsail.
- The standing rigging is the rigging that is used to support the mast and sail plan.
Standing Rigging

Here are the different parts that belong to the standing rigging:
- Forestay or Headstay - Line or cable that supports the mast and is attached to the bow of the boat. This is often a steel cable.
- Backstay - Line or cable that supports the mast and is attached to the stern of the boat. This is often a steel cable.
- Sidestay or Shroud - Line or cable that supports the mast from the sides of the boat. Most sailboats use at least two sidestays (one on each side).
- Spreader - The sidestays are spaced to steer clear from the mast using spreaders.
Running Rigging: different words for rope
Ropes play a big part in sailing, and especially in control over the sails. In sailboat jargon, we call ropes 'lines'. But there are some lines with a specific function that have a different name. I think this makes it easier to communicate with your crew: you don't have to define which line you mean. Instead, you simply shout 'mainsheet!'. Yeah, that works.
Running rigging consists of the lines, sheets, and hardware that are used to control, raise, lower, shape and manipulate the sails on a sailboat. Rigging varies for different rig types, but since most sailboats are use a sloop rig, nearly all sailboats use the following running rigging:

- Halyards -'Halyard' is simply the nautical name for lines or ropes that are used to raise and lower the mainsail. The halyard is attached to the top of the mainsail sheet, or the gaffer, which is a top spar that attaches to the mainsail. You'll find halyards on both the mainsail and jib.
- Sheets - 'Sheet' is simply the nautical term for lines or ropes that are used to set the angle of the sail.
- Mainsheet - The line, or sheet, that is used to set the angle of the mainsail. The mainsheet is attached to the Mainsheet traveler. More on that under hardware.
- Jib Sheet - The jib mostly comes with two sheets: one on each side of the mast. This prevents you from having to loosen your sheet, throwing it around the other side of the mast, and tightening it. The jib sheets are often controlled using winches (more on that under hardware).
- Cleats are small on-deck hooks that can be used to tie down sheets and lines after trimming them.
- Reefing lines - Lines that run through the mainsail, used to put a reef in the main.
- The Boom Topping Lift is a line that is attached to the aft (back) end of the boom and runs to the top of the mast. It supports the boom whenever you take down the mainsail.
- The Boom Vang is a line that places downward tension on the boom.
There are some more tensioning lines, but I'll leave them for now. I could probably do an entire guide on the different sheets on a sailboat. Who knows, perhaps I'll write it.
This is a new segment, that I didn't mention before. It's a bit of an odd duck, so I threw all sorts of stuff into this category. But they are just as important as all the other parts. Your hardware consists of cleats, winches, traveler and so on. If you don't know what all of this means, no worries: neither did I. Below, you'll find a complete overview of the different parts.
Deck Hardware

Just a brief mention of the different deck hardware parts:
- Pulpits are fenced platforms on the sailboat's stern and bow, which is why they are called the bow pulpit and stern pulpit here. They typically have a solid steel framing for safety.
- Stanchons are the standing poles supporting the lifeline , which combined for a sort of fencing around the sailboat's deck. On most sailboats, steel and steel cables are used for the stanchons and lifelines.
Mainsheet Traveler
The mainsheet traveler is a rail in the cockpit that is used to control the mainsheet. It helps to lock the mainsheet in place, fixing the mainsails angle to the wind.
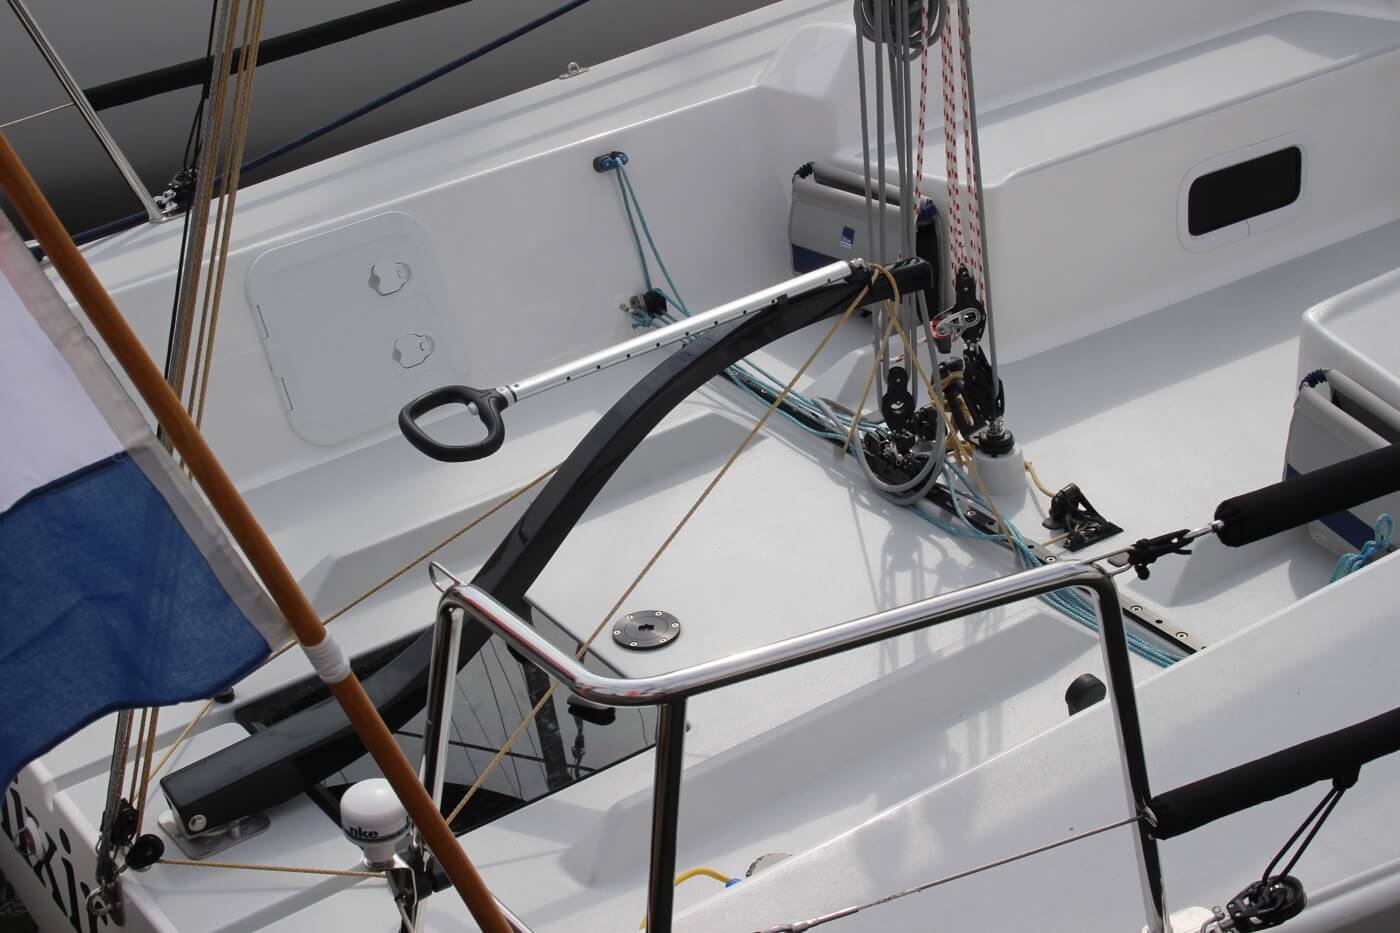
If you're interested in learning more about how to use the mainsheet traveler, Matej has written a great list of tips for using your mainsheet traveler the right way . It's a good starting point for beginners.
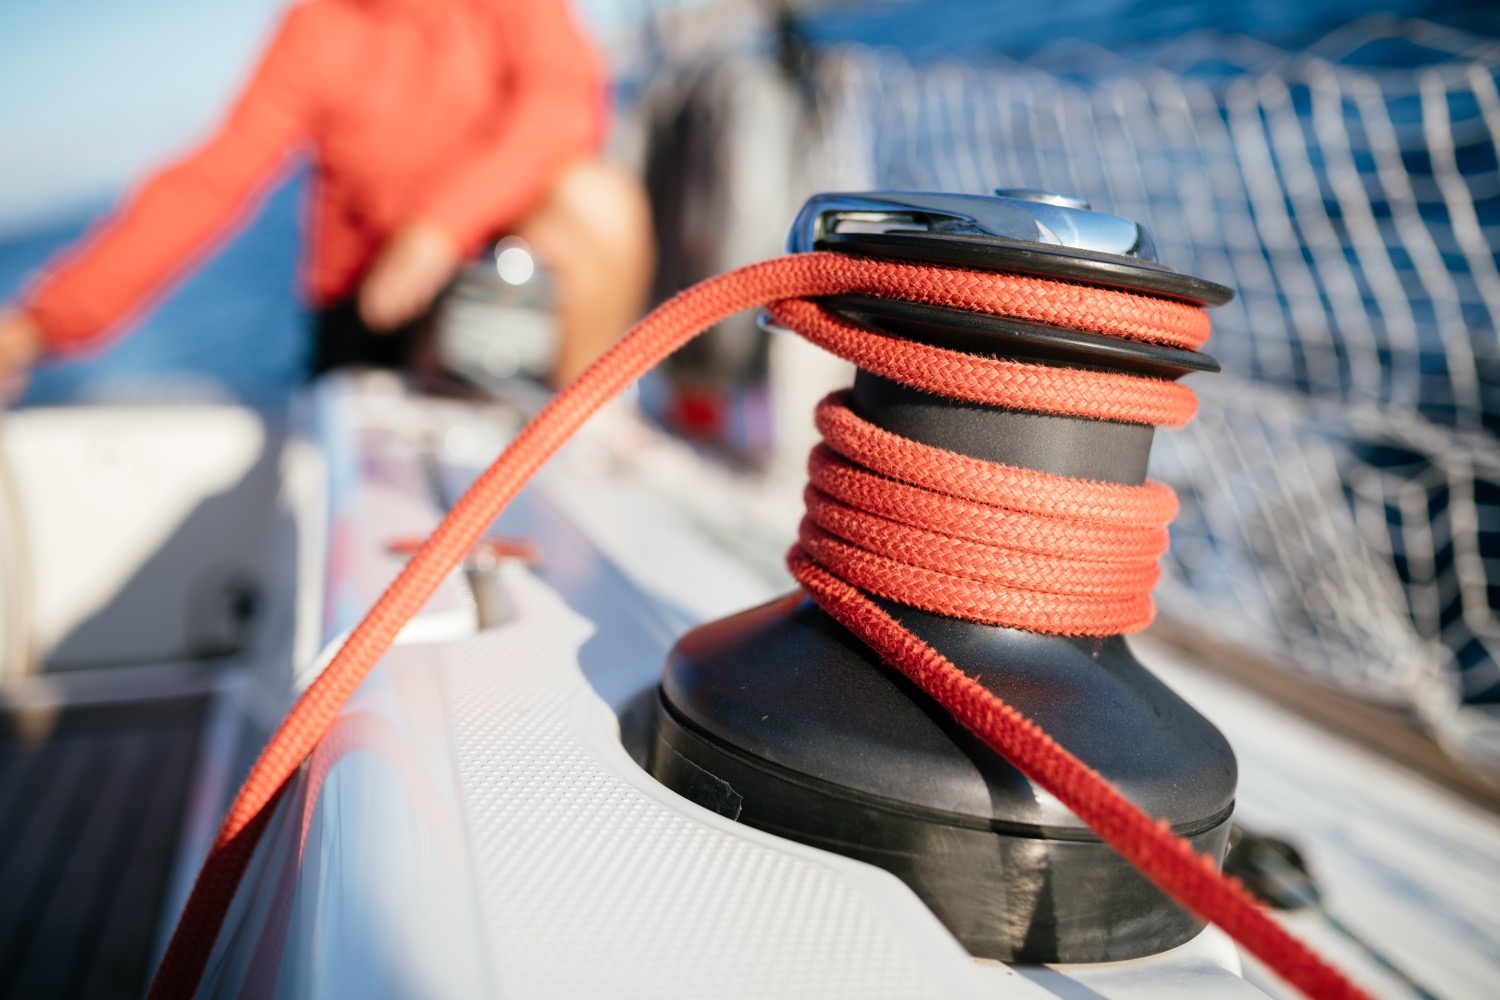
Winches are mechanical or electronic spools that are used to easily trim lines and sheets. Most sailboats use winches to control the jib sheets. Modern large sailing yachts use electronic winches for nearly all lines. This makes it incredibly easy to trim your lines.
You'll find the compass typically in the cockpit. It's the most old-skool navigation tool out there, but I'm convinced it's also one of the most reliable. In any way, it definitely is the most solid backup navigator you can get for the money.
Want to learn how to use a compass quickly and reliably? It's easy. Just read my step-by-step beginner guide on How To Use a Compass (opens in new tab .
Chartplotter
Most sailboats nowadays use, besides a compass and a map, a chartplotter. Chartplotters are GPS devices that show a map and a course. It's very similar to your normal car navigation.
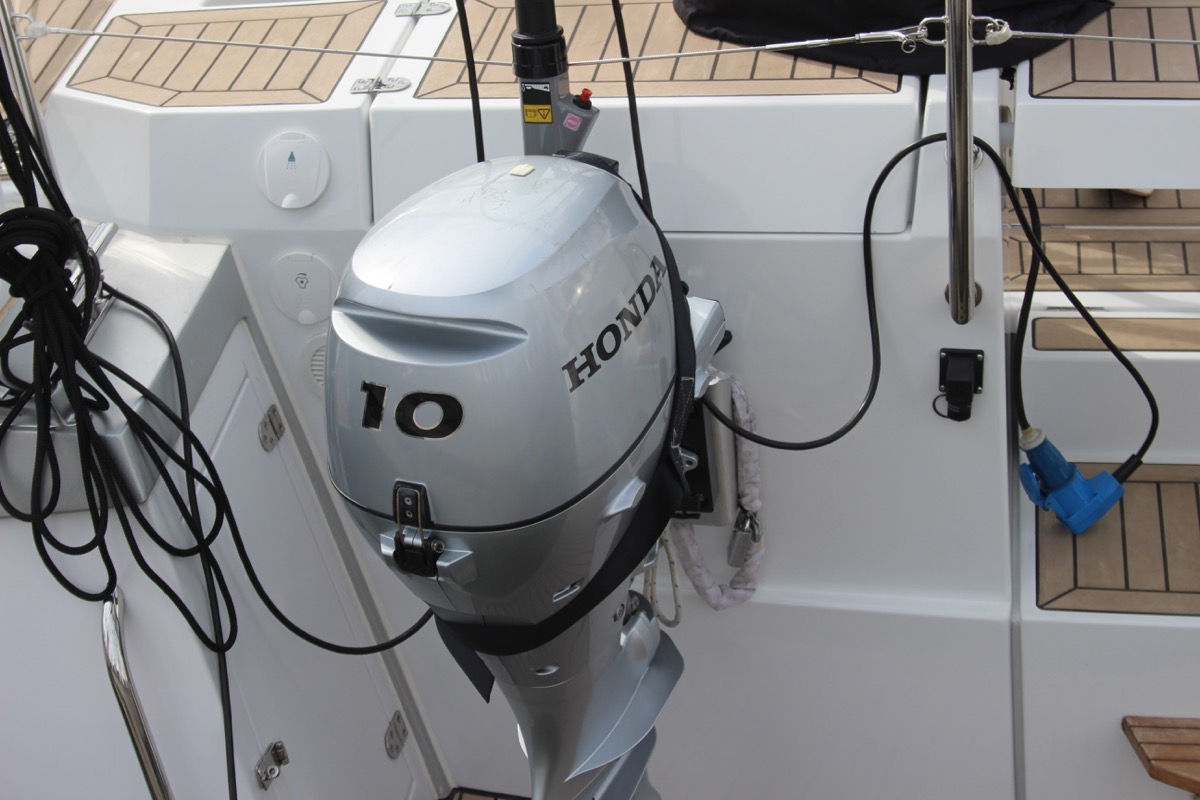
Outboard motor
Most sailboats have some sort of motor to help out when there's just the slightest breeze. These engines aren't very big or powerful, and most sailboats up to 32' use an outboard motor. You'll find these at the back of the boat.
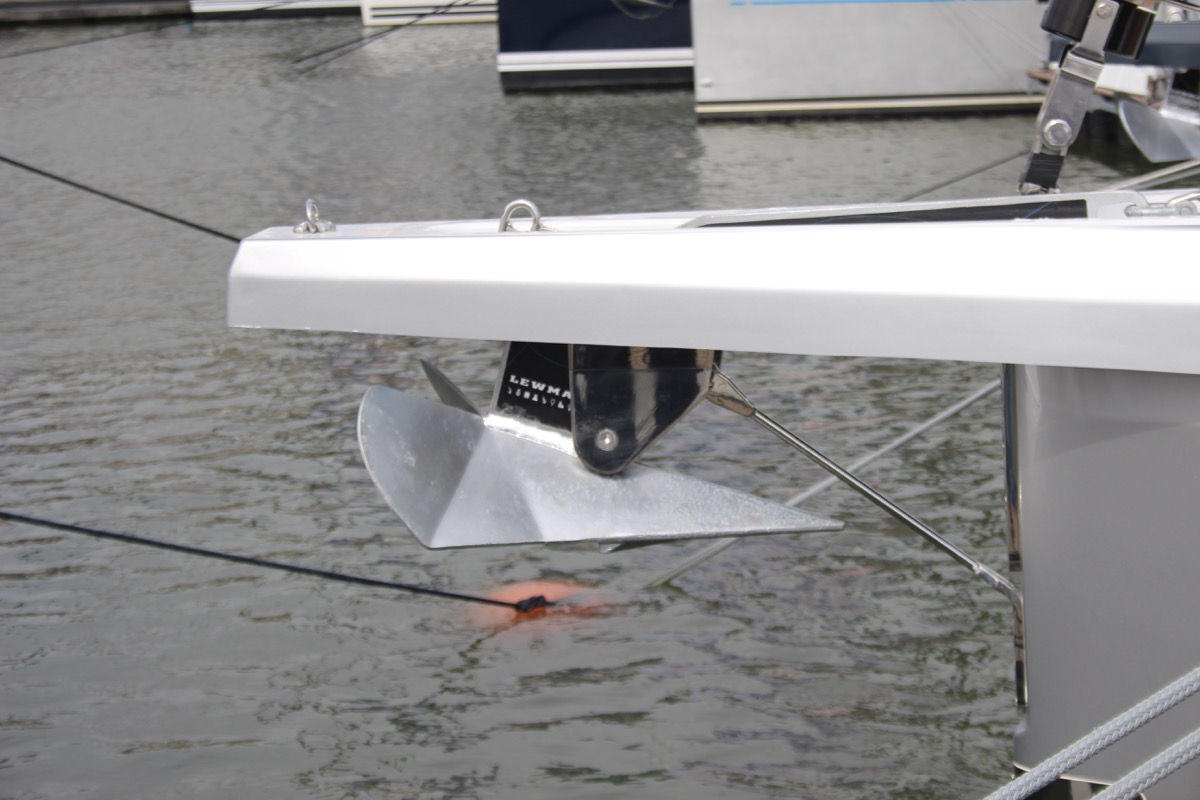
Most sailboats carry 1 - 3 anchors: one bow anchor (the main one) and two stern anchors. The last two are optional and are mostly used by bluewater cruisers.
I hope this was helpful, and that you've gained a good understanding of the different parts involved in sailing. I wanted to write a good walk-through instead of overwhelming you with lists and lists of nautical terms. I hope I've succeeded. If so, I appreciate any comments and tips below.
I've tried to be as comprehensive as possible, without getting into the real nitty gritty. That would make for a gigantic article. However, if you feel I've left something out that really should be in here, please let me know in the comments below, so I can update the article.
I own a small 20 foot yacht called a Red witch made locally back in the 70s here in Western Australia i found your article great and enjoyed reading it i know it will be a great help for me in my future leaning to sail regards John.
David Gardner
İ think this is a good explanation of the difference between a ”rope” and a ”line”:
Rope is unemployed cordage. In other words, when it is in a coil and has not been assigned a job, it is just a rope.
On the other hand, when you prepare a rope for a specific task, it becomes employed and is a line. The line is labeled by the job it performs; for example, anchor line, dock line, fender line, etc.
Hey Mr. Buckles
I am taking on new crew to race with me on my Flying Scot (19ft dingy). I find your Sailboat Parts Explained to be clear and concise. I believe it will help my new crew learn the language that we use on the boat quickly without being overwhelmed.
PS: my grandparents were from Friesland and emigrated to America.
Thank you Shawn for the well written, clear and easy to digest introductory article. Just after reading this first article I feel excited and ready to set sails and go!! LOL!! Cheers! Daniel.
steve Balog
well done, chap
Great intro. However, the overview diagram misidentifies the cockpit location. The cockpit is located aft of the helm. Your diagram points to a location to the fore of the helm.
William Thompson-Ambrose
An excellent introduction to the basic anatomy and function of the sailboat. Anyone who wants to start sailing should consider the above article before stepping aboard! Thank-you
James Huskisson
Thanks for you efforts mate. We’ve all got to start somewhere. Thanks for sharing. Hoping to my first yacht. 25ft Holland. Would love to cross the Bass Strait one day to Tasmania. 👌 Cheers mate
Alan Alexander Percy
thankyou ijust aquired my first sailboat at 66yrs of age its down at pelican point a beautifull place in virginia usa my sailboat is a redwing 30 if you are ever in the area i wouldnt mind your guidance and superior knowledge of how to sail but iam sure your fantastic article will help my sailboat is wings 30 ft
Thanks for quick refresher course. Having sailed in California for 20+ years I now live in Spain where I have to take a spanish exam for a sailboat license. Problem is, it’s only in spanish. So a lot to learn for an old guy like me.
Very comprehensive, thank you
Your article really brought all the pieces together for me today. I have been adventuring my first sailing voyage for 2 months from the Carolinas and am now in Eleuthera waiting on weather to make the Exumas!!! Great job and thanks
Helen Ballard
I’ve at last found something of an adventure to have in sailing, so I’m starting at the basics, I have done a little sailing but need more despite being over 60 life in the old dog etc, thanks for your information 😊
Barbara Scott
I don’t have a sailboat, neither do l plan to literally take to the waters. But for mental exercise, l have decided to take to sailing in my Bermuda sloop, learning what it takes to become a good sailor and run a tight ship, even if it’s just imaginary. Thank you for helping me on my journey to countless adventures and misadventures, just to keep it out of the doldrums! (I’m a 69 year old African American female who have rediscovered why l enjoyed reading The Adventures of Robert Louis Stevenson as well as his captivating description of sea, wind, sailboat,and sailor).
Great article and very good information source for a beginner like me. But I didn’t find out what I had hoped to, which is, what are all those noisy bits of kit on top of the mast? I know the one with the arrow is a weather vane, but the rest? Many thanks, Jay.
Louis Cohen
The main halyard is attached to the head of the mainsail, not the to the mainsheet. In the USA, we say gaff, not gaffer. The gaff often has its own halyard separate from the main halyard.
Other than that it’s a nice article with good diagrams.
A Girl Who Has an Open Sail Dream
Wow! That was a lot of great detail! Thank you, this is going to help me a lot on my project!
Hi, good info, do u know a book that explains all the systems on a candc 27,
Leave a comment
You may also like, guide to understanding sail rig types (with pictures).
There are a lot of different sail rig types and it can be difficult to remember what's what. So I've come up with a system. Let me explain it in this article.

The Ultimate Guide to Sail Types and Rigs (with Pictures)

The Illustrated Guide To Boat Hull Types (11 Examples)

How To Live On a Boat For Free: How I'd Do It

How To Live on a Sailboat: Consider These 5 Things
- New Sailboats
- Sailboats 21-30ft
- Sailboats 31-35ft
- Sailboats 36-40ft
- Sailboats Over 40ft
- Sailboats Under 21feet
- used_sailboats
- Apps and Computer Programs
- Communications
- Fishfinders
- Handheld Electronics
- Plotters MFDS Rradar
- Wind, Speed & Depth Instruments
- Anchoring Mooring
- Running Rigging
- Sails Canvas
- Standing Rigging
- Diesel Engines
- Off Grid Energy
- Cleaning Waxing
- DIY Projects
- Repair, Tools & Materials
- Spare Parts
- Tools & Gadgets
- Cabin Comfort
- Ventilation
- Footwear Apparel
- Foul Weather Gear
- Mailport & PS Advisor
- Inside Practical Sailor Blog
- Activate My Web Access
- Reset Password
- Customer Service

- Free Newsletter
Catalina 270 vs. The Beneteau First 265 Used Boat Match-Up

Ericson 41 Used Boat Review

Mason 33 Used Boat Review

Beneteau 311, Catalina 310 and Hunter 326 Used Boat Comparison

Tips From A First “Sail” on the ICW

Tillerpilot Tips and Safety Cautions

Best Crimpers and Strippers for Fixing Marine Electrical Connectors

Thinking Through a Solar Power Installation

Polyester vs. Nylon Rode

Getting the Most Out of Older Sails

How (Not) to Tie Your Boat to a Dock

Stopping Mainsheet Twist
Fuel Lift Pump: Easy DIY Diesel Fuel System Diagnostic and Repair

Ensuring Safe Shorepower

Sinking? Check Your Stuffing Box

The Rain Catcher’s Guide

What Do You Do With Old Fiberglass Boats?

Boat Repairs for the Technically Illiterate

Boat Maintenance for the Technically Illiterate: Part 1

Whats the Best Way to Restore Clear Plastic Windows?

Giving Bugs the Big Goodbye

Galley Gadgets for the Cruising Sailor

Those Extras you Don’t Need But Love to Have

What’s the Best Sunscreen?

UV Clothing: Is It Worth the Hype?

Preparing Yourself for Solo Sailing

How to Select Crew for a Passage or Delivery

R. Tucker Thompson Tall Ship Youth Voyage

On Watch: This 60-Year-Old Hinckley Pilot 35 is Also a Working…

On Watch: America’s Cup

On Watch: All Eyes on Europe Sail Racing

Dear Readers
- Boat Maintenance
Bulletproof Sailboat Deck Hardware

Rock-solid deck hardware installation begins with a tightly sealed core.
Installing new hardware on a cored deck means sealing the core around every penetration. Skip this step and water will eventually seep between the skins. Balsa will rot, and repeated freezing and thaw cycles can turn foam core to mush and cause delamination.
The typical solution is to drill an oversized hole, fill the cavity with epoxy, and redrill as needed. But this method is not without drawbacks and shortcomings:
• Some people have become sensitized to epoxy, with symptoms ranging from skin irritation to full-on shock.
• Epoxy has limited tolerance for moisture; yes, you should dry the core first, but that doesn’t always happen.
• If you use fast-curing epoxy in warm weather, it can exotherm and boil out.
• If you use slow-curing epoxy, it might not cure overnight.
And then there are practical problems with the traditional method. Working from the top, you must over-drill the hole to get enough room for the epoxy to enter and to allow air to escape. This requires removing more of the top skin, creating a larger scar to disguise should you decide to relocate the gear. Completely filling a hole on a vertical surface requires a bit of magic. And then there’s the nature of the epoxy plug, which can become brittle and crack over time. Unless the plug is fully supported by a backing plate, it can be pushed out of position, again exposing the core to moisture.
TRADITIONAL METHOD
Although epoxy is our “go-to” material, and the traditional method is well proven, we believe there are better ways.

In the traditional method, a hole is drilled through the top skin only, at least as large as the fastener and large enough to admit the core removal tool of your choice. The core is removed by moving a cutter up and down between the core skins and around the circumference of the hole until the core is dust. You need to pay special attention to the insides of the top and bottom skins, because that top-to-bottom bond is what helps maintain strength in the laminated structure.

We like to use a bent roofing nail. It removes chips, produces a deep cavity, and cuts smoothly. After blowing out the chips, the hole is filled with slow cure epoxy (in warm temperatures, fast-cure will exotherm, creating bubbles and a poor seal).

The hole is then re-drilled through both skins to fit the fastener, and the hardware bedded and installed (see “ Trouble Free Deck Hardware Installation ,” PS September 2013).
ADDING GLASS REINFORCEMENT
You can protect against cracking with reinforcing fiberglass. Adding glass fibers is particularly useful when installing or repairing screws or other self-tapping fasteners.
Inject about 50 percent of the epoxy first. This will help wet out the cloth. Using a large cable tie, stiff wire, or similar tool, push 3/4” x 2” strips of 6-ounce fiberglass cloth into the epoxy-saturated hole. You can fit 2-4 strips in the smallest holes and 3-6 strips into larger fastener holes. Only a few strips are needed for crack control, but for future screw holes, cram as many as you can. Don’t use fiberglass mat, roving, or biaxial cloth, these weaves don’t conform to the hole as easily as cloth, and they are harder to wet out. Follow up with more epoxy to fill the space, gently poking the glass to help the air release (see “ A Stronger Screw Hole Repair ,” PS May 2018”).
TECH GUIDE: CORE FILLER SPECIFICATIONS
| MANUFACTURER | PRODUCT* | TENSILE STRENGTH (PSI) | VISCOSITY AT 72°F IN CENTIPASCALS (CPA)* | COMMENTS |
|---|---|---|---|---|
| CORE SEALING | ||||
| SYSTEM 3 | General purpose 2-part epoxy | 7,500 psi | 950 cPA | Add high-density filler and/or cloth if needed. |
| WEST SYSTEMS | 105/205 2-part epoxy | 7,800 psi | 975 cPA | Add high-density filler and/or cloth if needed. |
| WEST SYSTEMS | G-Flex 2-part epoxy | 3,440 psi | 15000 cPA | Tougher, better with damp surfaces. |
| GENERIC PASTE EPOXY | Generic thickened epoxy | 1,500-2,500 psi | Paste cPA | Weakened by micro air bubbles. Tougher. |
| PETTIT | Splash Zone 2-part epoxy | 4,100 psi | Paste cPA | Will bond wet. Low exotherm. |
| CORE REPAIR BY INJECTION | ||||
| SYSTEM 3 | Clear 2-part epoxy | 7,800 psi | 380 cPA | Penetrates well, good bond. |
| SYSTEM 3 | Rot Fix 2-part epoxy | 7,800 psi | 325 cPA | Penetrates well, good bond. |
| WEST SYSTEMS | 105/205 +5% acetone 2-part epoxy | 2,800 psi | 310 cPA | Solvent must be able to evaporate. |
| GORILLA GLUE | Original 1-part polyurethane | 600-4,250 | 3000 (thins as foam) | Expands and foams in moisture. |
| *Epoxy adhesives thin with heat, but also gel faster. Slow hardeners delay exotherm in temperatures below 90°F, but slow hardeners are also more vulnerable to moisture. |
One wouldn’t naturally think that a fastener hole would be prone to exothem. The volume seems so small. The trouble is that the core insulates the hole, preventing the epoxy from shedding heat. Below 70°F and out of the sun, a fast-cure epoxy like West Systems 105/205 will work for this job. In warmer temperatures, or in the sun, the epoxy will become boiling, and the plug will be more foam than epoxy. Slow hardener (such as West Systems 206) is the standard recommendation, but in cool weather it may not be fully cured until the next day, delaying work.
Toughened epoxies, such as G-Flex, and underwater epoxies do not have the same tendency to exotherm in small holes. They cure more slowly and give off less heat in the process. They also have a reduced tendency to crack. When using the traditional, “core-carve” method for filling screw holes, G-Flex performed well in our bench tests. Field tests are still ongoing. Underwater epoxies are too thick to work with the traditional method, but we have tested them using what we call the inside-core method.
SPECS: BOND STRENGTH
| ADHESIVE | SECONDARY BOND TENSILE STRENGTH |
|---|---|
| VINYLESTER | 500 psi |
| POLYESTER | 350 psi |
| EPOXY | 2,000 psi |
POLYESTER AND VINYLESTER RESINS
Polyester and vinylester shrink during cure, and the secondary bond—the bond an already cured skin—with the outer skins is about 4-6 times weaker for polyester, and 2-4 time weaker for vinylester. This bond is insufficient, especially when compared to the advantages of epoxy.
RIGID POLYURETHANES (GORILLA GLUE, TITEBOND, ETC.)
The main advantage of rigid polyurethane glue is its moisture tolerance. Previously, we learned that a deteriorated deck can be stiffened by injecting adhesives or foam (see “ Can Glue Injection Save a Rotten Core? ” PS July 2020).
We continue to recommend complete core replacement as the best way to rebuild damaged decks (“ Step-by-Step Deck Core Repair ,” PS August 2020, and “ Deck Core Repair from Underneath ,” PS February 2022). However, while exploring the glue-injection method, we found the Original Gorilla Glue performed better than epoxy in some circumstances.
We’ve since become fans of the glue, using it for several small repairs and in situations where tearing the boat apart was either too complex or not warranted. We wondered if Gorilla Glue could do double duty when sealing new holes for fasteners. Could it seal the core against water intrusion and stiffen up a larger area of deck to resist compression loads?
The answer is yes—with limitations. Gorilla glue foams and expands when reacting with water, so you have to use it differently than you would epoxy. The foaming is inherent to this type of glue.
Assuming you’ve carved out the core using the traditional method, you pump or pour the glue slowly into the hole allowing air to bubble out. Within 5 to 10 minutes, the glue will begin to foam and expand.
Don’t let the foaming glue spill back out, force it back into the core by plugging the holes with wooden dowels. This will push the glue into voids. Leave the dowels in place until the glue has finished expanding, but pull them out with a set of pliers before the glue cures (2-4 hours). Later, use epoxy to fill the dowel’s impressions. This method works when stiffening soft spots in dry core.
However, the method did not fare as well during our test with damp core. For that test, we made a plug in a balsa core section that had been soaked in water for two weeks and then allowed to dry for 8 hours. In this case, the foaming was extensive and the resulting plug was porous and weak, much like the core material itself.
With dry balsa, however, the Gorilla Glue plugs had physical properties similar to epoxy plugs, with minimal foaming. As with epoxy, these plugs could also be reinforced with fiberglass.
There are other polyurethanes that foam less with moisture (Titebond III). However, foaming cannot be entirely avoided. For this reason, we’d avoid polyurethane glues for sealing fastener holes in core.
CONCLUSIONS
The traditional method remains our “go to” for routine fastener installations. If we’re going to be installing a large backing plate, the inside core method is faster, easier, and stronger, when the entire process is considered. It is perfect for winches and windlasses. If access is sufficient, we also like this method for repairing leaking fasteners (the old, failed plug is easily removed) and for installing new fasteners in deteriorated decks. We get a good look at the core, the reinforced plug is larger, and the backing plate can be oversized to firm things up.
If you have multiple deck holes to seal, have access to the inside of the holes, and will be installing backing plates, it may be best to tackle the whole job from inside. This method will also work from the outside if you are installing a mounting pad large enough to generously cover the hole you will make in the core. It is handy when placing fasteners through plywood core, since plywood core is difficult to remove with a bent nail.
We do not recommend this method for large through-hull fittings. Too much of the inside skin is removed.
• Drill a ¼-inch hole through from the top side to guide the hole saw. You will redrill to the fastener size later.

• Using a hole saw, drill a ¾-inch (or larger as needed) hole through the inside skin and core, using the initial hole as a guide. Use a depth stop to avoid damaging the top skin.

• Pop out the core and clean out the hole using a bent roofing nail or small chisel. You do not have to carve core from under the edge of the inside skin, just clean the edges of the hole and underside of the top skin.
• Make a backing plate with a ¼-inch center hole (the hole is optional but helpful). Round the corners at least 1-inch radius and taper. Center over the hole and mark the outline with a pencil.

• Fill the hole with thickened epoxy, leaving it slightly proud. Thinly butter the backing plate and the backing plate contact area, which should be marked in pencil.

• You can also reinforce the plug with glass fiber, but don’t try laying in glass cloth, roving, or mat; the thickened epoxy will never wet it out. Instead, just work in a small handful of chopped strands, adding them between layers. You don’t need much fiber to control cracks, so focus on even distribution.
• If the core is damp, let it dry. If this is impractical, consider using Pettit Splash Zone underwater epoxy. It bonds to damp surfaces, will cure underwater, and has suitable strength and hardness.
• Beware the exotherm. Thickened epoxies exotherm slower than straight epoxy, because of the mass added by the filler, but in warm conditions (over 80°F) use a slow hardener. Waterproof epoxies are already slow-cure formulas.

• Press the plate into place, securing with a waxed bolt (can be smaller than 1/4-inch) through the center. Remove this as soon as the epoxy gels. Using the epoxy that squeezes out, form a rounded fillet between the skin and the backing plate.

• After curing, redrill the center hole to fit the fastener.
The larger drilled hole is easier to clean out, the hole is easy to fill with epoxy putty, the plug is larger, better bonded and better supported, and the backing plate is now an integral part of the hull. Yes, you lose a small amount of skin on the inside, but that’s more than made up for by the increased efficiency of a well-bonded backing plate. We think this is a better method for sealing common through-bolts.
Core weakened or damaged by water intrusion—usually due to poor hardware installation practices—is a common problem in older boats. In recent years, we’ve conducted a series of related tests to determine effective repair and prevention methods.
• “Cored Hull Construction, Does High Tech Mean High Quality?” ( PS October 2007 )
• “Boat Clinic: Minor Repair to Cored Decks” ( PS Online March 2011 )
•“Through-bolting Fiberglass: An Inquiry into Failure Modes” ( PS June 2013 )
• “A Stronger Screw Hole Repair” ( PS May 2018 )
• “How Big Does a Backing Plate Need to Be?” ( PS August 2016 )
• ‘Step-by-Step Deck Core Repair” ( PS July 2020 )
• “Can Glue Injection Fix Rotten Core?” ( PS July 2020 )
•“Deck Core Repair, from Underneath” ( PS February 2022 )
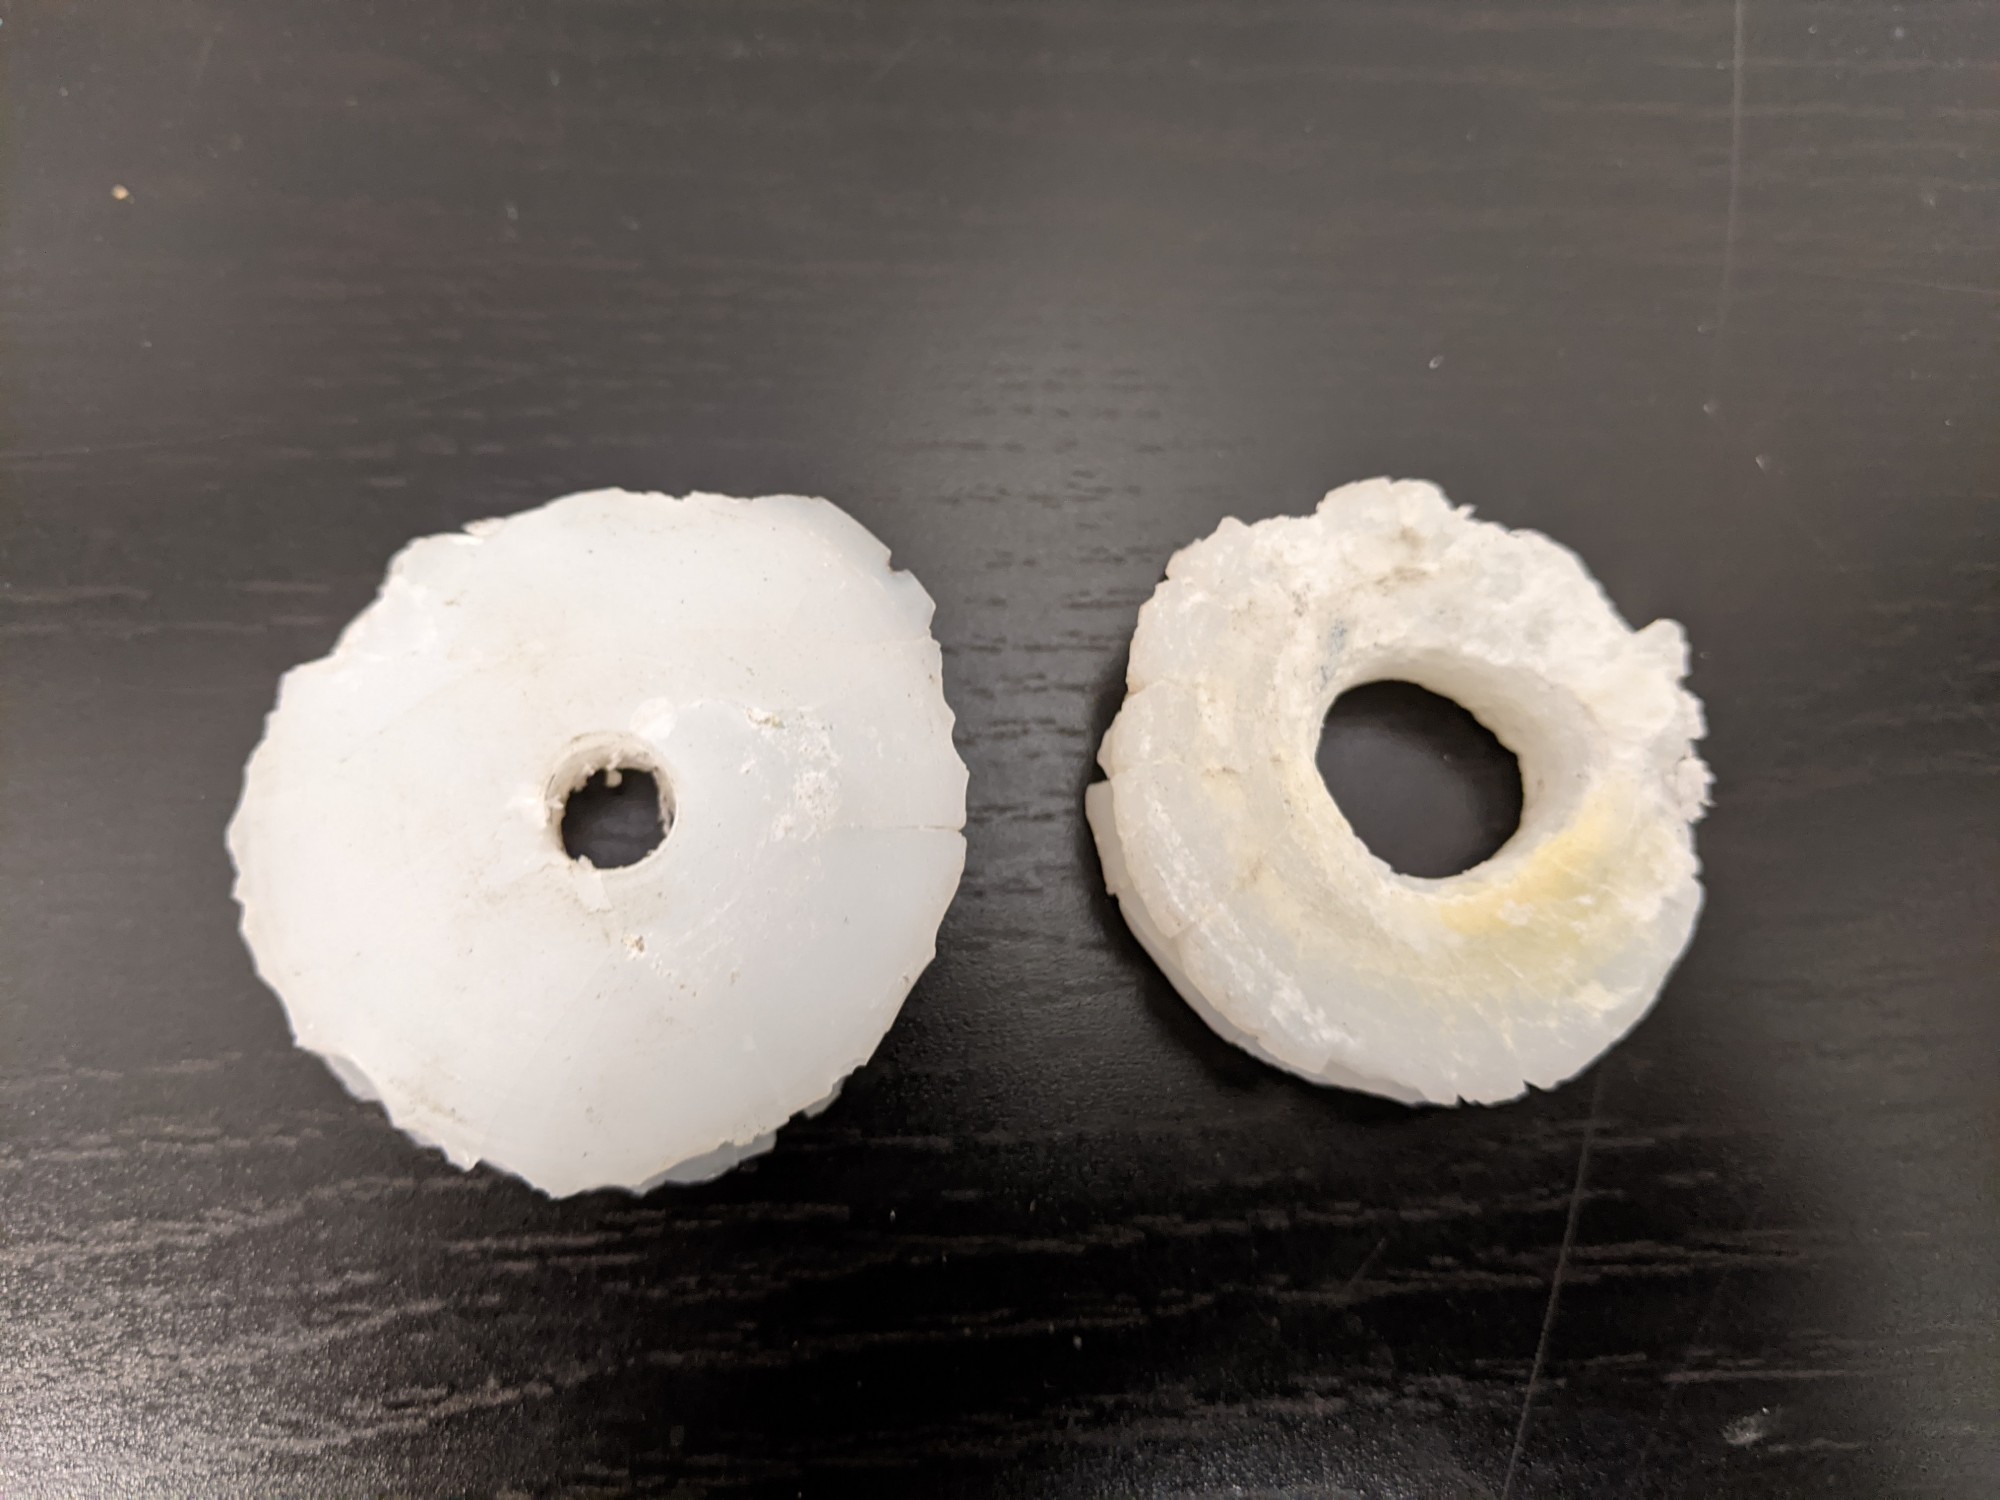
Here we compare filler materials used to seal core from water intrusion.

1.Gorilla glue fails to form a solid plug in damp core. The filler is porous and weak, similar to that of a foam core.

2.Dry balsa core sealed with 105/205 Epoxy is rock solid and well bonded.

3.1:1 pre-thickened epoxy was used here with foam core. It is okay to have a few isolated bubbles. The important thing is a good bond at the top and bottom.

4.General purpose two-part epoxy forms a tight bond in this photo of an epoxy plug in balsa.
RELATED ARTICLES MORE FROM AUTHOR
_An Allen Wrench to Remove Core_ When I installed my fittings on Prestissimo, a 42′ sloop, I drilled a hole sized for the bolt, down to, but not through, the interior skin. Then I used a Allen wrench, with the short end sharpened like a knife, and the long end in a drill, to chop up the foam core. I vacuumed out the foam pieces, and used a squeeze bottle with an aluminum tube sticking out of the nozzle to fill the void with epoxy from the bottom up. After drilling out the holes I installed the fittings, bedded the backing plates in epoxy, and tightened the bolts which were sprayed with mold release. Finally the fittings and bolts were removed, the holes were cleaned (if necessary), and everything was reinstalled with a generous coating of BoatLife under the fitting and all around the bolt. She has been sailing for 18 years and not a single fitting has leaked!
My preference for holes and fillets is milled glass fibers. In the jar/tub, it’s like lint. After it sets in epoxy you can beat on it with a 3# hammer for a long time before it starts to crack.
It stiffens the epoxy well enough that it can often be used vertically without sagging.
I thought we had put the ‘bent nail’ issue to bed decades ago. There are so many useful Dremel attachments out there, anything else is a crime against efficiency and pride in your work. Dremel 115, 196 or 199, Countersink, and bed with Butyl tape (isobutylene-isoprene, not mastic).
LEAVE A REPLY Cancel reply
Log in to leave a comment
Latest Videos

Super Shallow Draft Sailboat: The Leeboard Sharpie

Hans Christian 41T – Boat Review

Seven dead after superyacht sinks off Sicily. Was the crew at...

What’s the Best Sailboats for Beginners?
Latest sailboat review.

- Privacy Policy
- Do Not Sell My Personal Information
- Online Account Activation
- Privacy Manager
- Find A School
- Certifications
- North U Sail Trim
- Inside Sailing with Peter Isler
- Docking Made Easy
- Study Quizzes
- Bite-sized Lessons
- Fun Quizzes
- Sailing Challenge

Parts of a Sailboat – The Deck
By: Zeke Quezada, ASA Learn To Sail , Sailboats
Understanding the deck of a sailboat is all part of learning to sail. Essentially, the deck of a boat is both your office and your supply cabinet. This is because many of the tools required to sail a vessel are on the deck.
Sailboats come in many shapes, sizes, and forms to meet the needs of sailors with various desires and ambitions. They also reflect the styles and ideas of their designers and builders and are considered by some sailors to be an art form. The illustrations below depict a boat about 33 feet long of fairly typical design above and below deck and fitted with basic systems commonly found on cruising boats.
The boat we are describing is typical of a boat you may be using as part of ASA 103 Basic Coastal Cruising — it’s more involved and some parts may not be found on a smaller daysailing vessel. However, there’s a lot more to a cruising boat than a cockpit and cuddy cabin. You can walk around on it, on deck, and below. And it has a few more features for which you’ll have to learn the nautical names.

Parts of the Deck of a Sailboat - Cruising Vessel
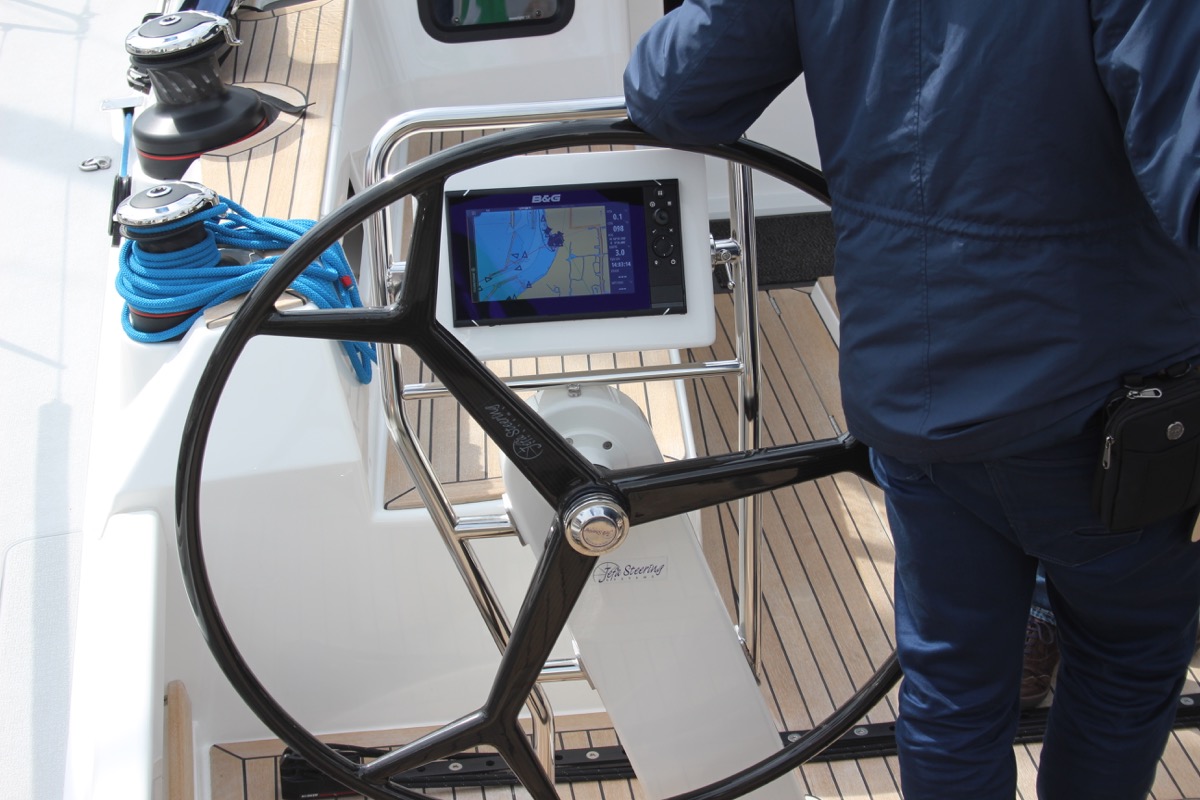
The Helm Smaller daysailers used for ASA Basic Keelboat courses often have a tiller; this boat has a steering wheel. While it’s possible to steer this big of a boat with a tiller, and many sailors prefer the feel and response it gives when sailing, the tiller needed to provide sufficient leverage would be quite long. The wheel offers the same or even more leverage while taking up much less space in the cockpit — much of the linkage system that connects it to the rudder is beneath the cockpit.
The Cockpit The cockpit of a cruising sailboat serves as the command center and focal point of activity while sailing. It is typically located in the recessed area of the deck where the helmsman sits or stands, and it often features storage lockers under the seats. The functionality of the cockpit is essential for helming, sail trimming, watchkeeping, and other sailing activities.
Modern boat designs have prioritized bigger, taller, and more comfortable living quarters over the functionality of the cockpit. As a result, cockpit ergonomics involve more than comfortable seating and coaming angles. Wide-beam boats benefit from a large diameter wheel, allowing the helmsman to steer on the windward rail where sight lines are unimpeded by a dodger, mast, or headsail.
Some boats have every sail-control line led to the cockpit, which requires additional blocks or sheaves to be added to the running rigging system.
The cockpit is self-bailing — it’s high enough above the waterline that any water that gets into it can drain overboard by gravity. Water drains through scuppers (they look like large bathtub drains) in the aft corners of the cockpit well.
Sailing is not all tacking and jibing; the cockpit also serves as the boat’s porch, lounge, and dining room. The seats are designed to provide support and comfort when sailing and at rest.
Cockpit Stowages Daysailers carry a fair amount of ancillary gear — dock lines, fenders, and safety gear — and a boat equipped for cruising carries a great deal more. All this stuff has to go somewhere so it’s not underfoot while the boat’s sailing, so a lot of it goes in the cockpit lockers.
A hatch in the cockpit seat typically opens to reveal a deep locker. Such a locker is large enough to hold lots of gear, including an extra sail or two. Keeping it organized can be challenging but necessary, not so that you can find a spare line in a hurry but because often the same locker also provides access to some critical fixed equipment. That equipment may include the engine and the steering gear. Another shallow locker may exist in the cockpit, but this one is shallow because the space below is used as part of the living quarters. Finally, at the helm, you may find a hatch or two that provide access to the steering gear and other systems.
Obstacles on the Deck Obstacles are inevitable on the deck of a sailboat. When navigating on the deck, make sure to always reserve a hand for the boat to ensure your safety, maintaining three points of contact. If sailing, the safest path forward is along the windward side. Always use the handrails to keep your body closer to the boat.
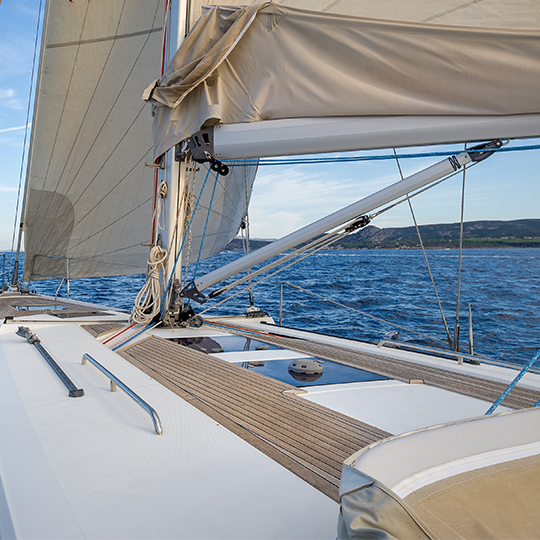
Sidedeck Your first obstacle when leaving the cockpit to go forward on the deck is the cockpit coaming, which extends aft of the trunk cabin, the area of the deck that’s raised to provide headroom in the cabin below.
Stepping over the cockpit coaming brings you onto the side deck, which runs between the trunk cabin and the outside edge of the deck (which is often referred to as the rail because of the toerail attached there to provide secure footing).
Just inside the toerail are the stanchions that support the lifelines.
As you move forward, you will encounter the shrouds, the wires that support the mast laterally. They attach to the deck at the chainplates which carry the forces generated by the sails into the structure of the hull.
Between the lower end of each wire shroud and its chainplate is a turnbuckle, which is used to tension the shroud by adjusting its length. A clevis pin connects the turnbuckle to the chainplate and a cotter pin passed through a hole on the end of the clevis pin prevents the clevis pin from backing out. Cotter pins are also fitted through the screws in the turnbuckles so they cannot unscrew and loosen.
Foredeck When you walk forward of the mast, you come to the foredeck. Most modern sailboats have roller-furling sails, so you will not be changing a headsail on the foredeck, but you will still utilize this space when anchoring and docking.
Fairleads on each side of the bow direct docklines to two large mooring cleats mounted on the deck.
The anchor can be found on the foredeck and is usually stowed on a stemhead fitting. This setup makes for a much easier deployment of the anchor. The stemhead fitting is a hefty stainless-steel fabrication that incorporates a roller fairlead for the anchor rode and the chainplate for the forestay. A hatch in the foredeck covers the anchor locker where the rode is stowed ready for use.
WANT TO LEARN MORE?
READ: Parts of a Sailboat — The Sails
READ: Parts of a Sailboat — The Keel
Related Posts:

- Learn To Sail
- Mobile Apps
- Online Courses
- Upcoming Courses
- Sailor Resources
- ASA Log Book
- Bite Sized Lessons
- Knots Made Easy
- Catamaran Challenge
- Sailing Vacations
- Sailing Cruises
- Charter Resources
- International Proficiency Certificate
- Find A Charter
- All Articles
- Sailing Tips
- Sailing Terms
- Destinations
- Environmental
- Initiatives
- Instructor Resources
- Become An Instructor
- Become An ASA School
- Member / Instructor Login
- Affiliate Login
× You are using an outdated browser. Please upgrade your browser to improve your experience.
We Ship Worldwide! | FREE SHIPPING! for US Continental orders over $99. Click for details.

Shopping Cart
Your cart is currently empty..
FREE SHIPPING! for US Continental orders over $99 click for details

Furlers & Headsail Foils
Sailboat Parts & Sailing Equipment

General Information
- Free Shipping Offer
- Frequently Asked Questions
- Price Matching
- Privacy Policy
- Shipping & Returns - USA Orders
- Shipping Info - International Orders
- Affiliate Program
- Gift Certificates
- WholeSAILPRO Program
- Brand Ambassadors
- Our Store: Henri-Lloyd North America
Corporate Address
- 2820 Scherer Dr. Ste 240 St. Petersburg, FL US, 33716
CONNECT WITH US
Copyright © 2024 mauripro sailing llc..
Standing Rigging (or ‘Name That Stay’)
Published by rigworks on november 19, 2019.
Question: When your riggers talk about standing rigging, they often use terms I don’t recognize. Can you break it down for me?
From the Rigger: Let’s play ‘Name that Stay’…

Forestay (1 or HS) – The forestay, or headstay, connects the mast to the front (bow) of the boat and keeps your mast from falling aft.
- Your forestay can be full length (masthead to deck) or fractional (1/8 to 1/4 from the top of the mast to the deck).
- Inner forestays, including staysail stays, solent stays and baby stays, connect to the mast below the main forestay and to the deck aft of the main forestay. Inner forestays allow you to hoist small inner headsails and/or provide additional stability to your rig.
Backstay (2 or BS) – The backstay runs from the mast to the back of the boat (transom) and is often adjustable to control forestay tension and the shape of the sails.
- A backstay can be either continuous (direct from mast to transom) or it may split in the lower section (7) with “legs” that ‘V’ out to the edges of the transom.
- Backstays often have hydraulic or manual tensioners built into them to increase forestay tension and bend the mast, which flattens your mainsail.
- Running backstays can be removable, adjustable, and provide additional support and tuning usually on fractional rigs. They run to the outer edges of the transom and are adjusted with each tack. The windward running back is in tension and the leeward is eased so as not to interfere with the boom and sails.
- Checkstays, useful on fractional rigs with bendy masts, are attached well below the backstay and provide aft tension to the mid panels of the mast to reduce mast bend and provide stabilization to reduce the mast from pumping.
Shrouds – Shrouds support the mast from side to side. Shrouds are either continuous or discontinuous .
Continuous rigging, common in production sailboats, means that each shroud (except the lowers) is a continuous piece of material that connects to the mast at some point, passes through the spreaders without terminating, and continues to the deck. There may be a number of continuous shrouds on your boat ( see Figure 1 ).
- Cap shrouds (3) , sometimes called uppers, extend from masthead to the chainplates at the deck.
- Intermediate shrouds (4) extend from mid-mast panel to deck.
- Lower shrouds extend from below the spreader-base to the chainplates. Fore- (5) and Aft-Lowers (6) connect to the deck either forward or aft of the cap shroud.
Discontinuous rigging, common on high performance sailboats, is a series of shorter lengths that terminate in tip cups at each spreader. The diameter of the wire/rod can be reduced in the upper sections where loads are lighter, reducing overall weight. These independent sections are referred to as V# and D# ( see Figure 2 ). For example, V1 is the lowest vertical shroud that extends from the deck to the outer tip of the first spreader. D1 is the lowest diagonal shroud that extends from the deck to the mast at the base of the first spreader. The highest section that extends from the upper spreader to the mast head may be labeled either V# or D#.
A sailboat’s standing rigging is generally built from wire rope, rod, or occasionally a super-strong synthetic fibered rope such as Dyneema ® , carbon fiber, kevlar or PBO.
- 1×19 316 grade stainless steel Wire Rope (1 group of 19 wires, very stiff with low stretch) is standard on most sailboats. Wire rope is sized/priced by its diameter which varies from boat to boat, 3/16” through 1/2″ being the most common range.
- 1×19 Compact Strand or Dyform wire, a more expensive alternative, is used to increase strength, reduce stretch, and minimize diameter on high performance boats such as catamarans. It is also the best alternative when replacing rod with wire.
- Rod rigging offers lower stretch, longer life expectancy, and higher breaking strength than wire. Unlike wire rope, rod is defined by its breaking strength, usually ranging from -10 to -40 (approx. 10k to 40k breaking strength), rather than diameter. So, for example, we refer to 7/16” wire (diameter) vs. -10 Rod (breaking strength).
- Composite Rigging is a popular option for racing boats. It offers comparable breaking strengths to wire and rod with a significant reduction in weight and often lower stretch.
Are your eyes crossing yet? This is probably enough for now, but stay tuned for our next ‘Ask the Rigger’. We will continue this discussion with some of the fittings/connections/hardware associated with your standing rigging.
Related Posts
Ask the Rigger
Do your masthead sheaves need replacing.
Question: My halyard is binding. What’s up? From the Rigger: Most boat owners do not climb their masts regularly, but our riggers spend a lot of time up there. And they often find badly damaged Read more…
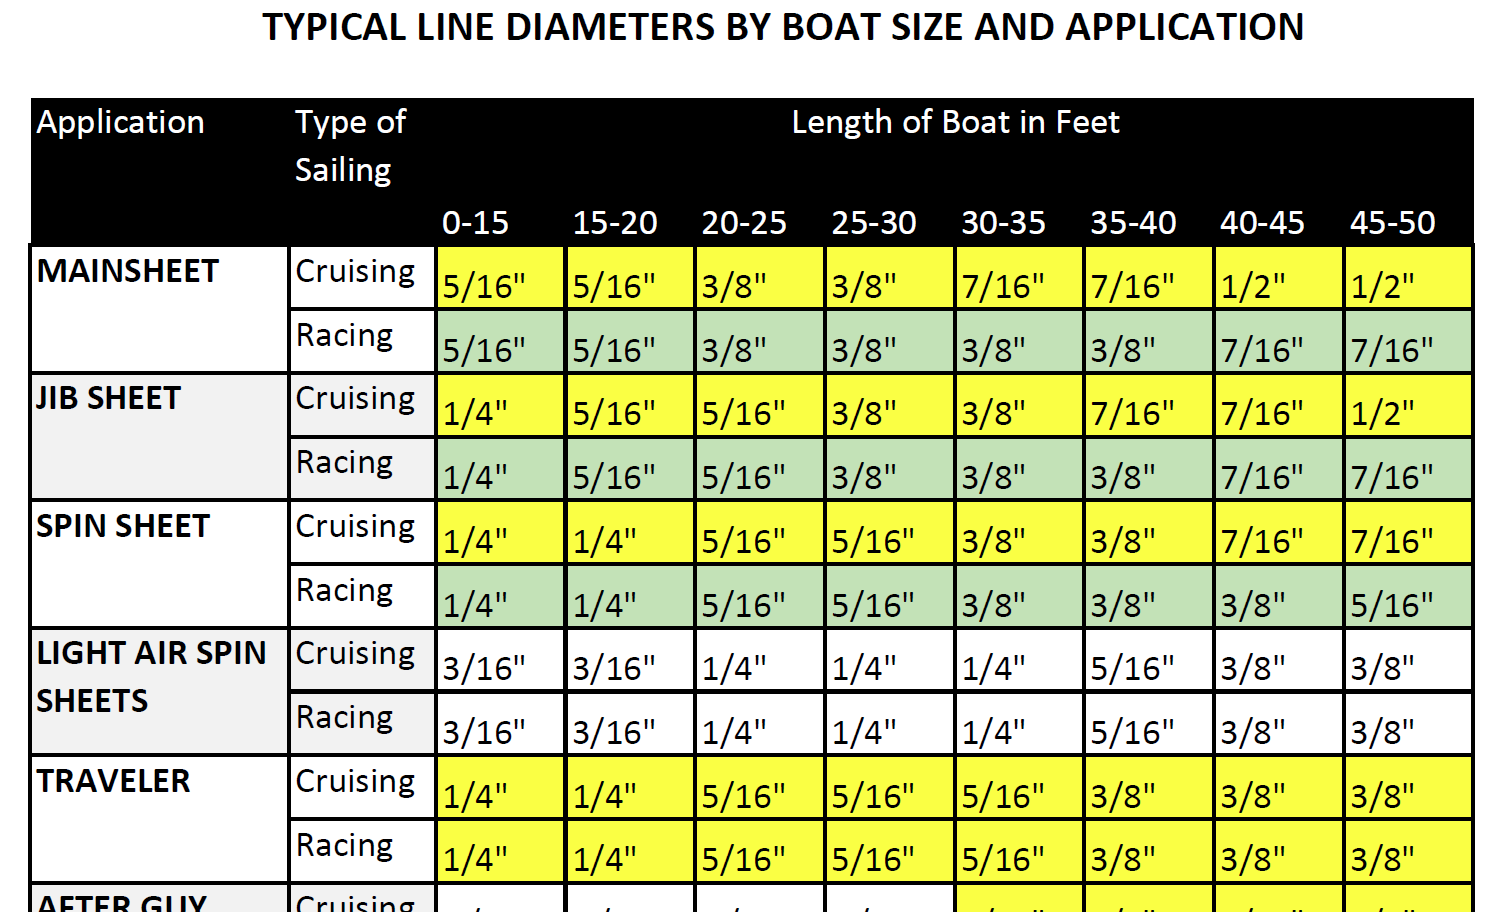
Selecting Rope – Length, Diameter, Type
Question: Do you have guidelines for selecting halyards, sheets, etc. for my sailboat? From the Rigger: First, if your old rope served its purpose but needs replacing, we recommend duplicating it as closely as possible Read more…
Spinlock Deckvest Maintenance
Question: What can I do to ensure that my Spinlock Deckvest is well-maintained and ready for the upcoming season? From the Rigger: We are so glad you asked! Deckvests need to be maintained so that Read more…
Pacific Sailboat Supply
- HARDWARE & RIGGING
- LINE & ROPE
ELECTRONICS
- APPAREL & GEAR
- ANCHORING & DOCKING
- DECK ORGANIZATION
FURLING SYSTEMS
SAIL HANDLING
- RIGGING & FITTINGS
- EMERGENCY RESCUE
- HARNESS & TETHERS
- RESCUE SUITS
- ANCHORING ROPE & CHAIN
- CRUISING LINE
- RACING & COMPETITION LINE
- INSTRUMENTS
- COMMUNICATION
- EPIRB & PLB
Your cart is empty
PACIFIC POINTS

OVER 10% OFF

UP TO 30% OFF

Over 15% off
DECK ORGANIZERS

UP TO 20% OFF

Up to 30% off

Featured Brands
Additional 10% off with promo code: LABORDAY2024
Harken Black Magic Blocks

Furling Systems

Deck Organizers

Sail Handling
Electronics
Mainsheet Systems
Safety Equipment

Anchoring & Docking

Apparel & Gear

Rigging & Fittings

Members automatically earn Pacific Points with every purchase. Simply log in, buy gear, and start accumulating points to cash in!
PRODUCT OF THE MONTH

Kong Roger Safety Harness
Kong Roger sailing and rescue harness is easy to adjust by the four special auto-locking buckles. Fitted with wide, comfortable and breathable paddings, one front belay loop, five gear loops arranged to avoid accidental snagging and a comfortable big rear loop for an easy handling of the operator during the different movement on the machine and on the ground.
High quality product, made in Italy! Tested at 150 kg (EN 813)
IN NEED OF TECHNICAL GUIDANCE?
Reach out with your question, and one of our staff members will get back to you shortly. Or, if you require immediate assistance, give us a call at 805-900-7282 during normal operating hours.

FEATURED CLASS
The 16′ skiff is a distinctly Australian high-performance dinghy, renowned for its three-person crew and impressive sailing capabilities. With a storied history spanning over a century, the class has evolved significantly over the years. Modern 16′ skiffs are equipped with two crew members on trapeze and feature large masthead asymmetrical spinnakers, enhancing their speed and agility. In Australia, the 16′ skiff is one of the most popular sailing boats, with active fleets in New South Wales and Queensland. There are currently over 80 boats registered across nine clubs, and regattas often see impressive turnouts of up to 45 boats. Many 16′ skiff clubs boast excellent facilities and are dedicated to supporting sailing across various smaller dinghy classes.
To contain costs and to provide closer racing, strict one design rules were introduced in 1997/98 for hull design and construction. A design by former skiff sailor, Craig Hughes, was accepted as being the most progressive and suitable to take the Class forward. The design rules also fixed the number of masts and sails which could be registered for the Australian Championship Series. Only two masts can be used and the number of sails is limited to three jibs, two main sails and two spinnakers. Boats utilise these sails in combinations to give different rig sizes which can be selected for optimal performance in different wind strengths.
16ft skiff specifications:
Hull Length: 4.88 m (16 ft)
Minimum Beam: 1520 mm
Maximum Beam: 1780 mm
Maximum Sail Area (Working): 22 m²
Sail Area (Spinnaker): Approx. 45 m²
Minimum Crew: 3

Pacific Sailboat Supply Gift Card
Set sail into adventure with the perfect gift for any sailing enthusiast! Our Pacific Sailboat Supply Gift Card is your gateway to a world of premium marine gear and accessories.
With access to over 300 top-tier brands, we’re dedicated to meeting all your maritime needs. Our site caters to racers and high-caliber sailors, so If you’re looking for something specific that’s not listed on our site, we’re more than happy to assist with custom orders at no extra service fee.
Give the gift of adventure, reliability, and maritime excellence with the Pacific Sailboat Supply Gift Card. It’s the ideal choice for birthdays, holidays, or any special event for the sailor in your life!

SUPPORT YOUTH SAILING
Click here to support junior programs
100% OF 2024 PROFIT FROM PACIFIC SAILBOAT SUPPLY BRANDED PRODUCT IS DONATED TO SUPPORT JUNIOR SAILING PROGRAMS.
KEEP ME UPDATED
Create an account to stay updated on new sailboat rigging, hardware, gear, and tech.
No products in the cart.
Sailing Ellidah is supported by our readers. Buying through our links may earn us an affiliate commission at no extra cost to you.
The Different Parts Of A Sailboat Explained
A sailboat consists of hundreds of parts, each with its specific term and function. From stern to bow, keel to mast, each part and its equipment plays a vital role in making the vessel seaworthy and able to sail.
In this guide, I’ll show you most of the components so you can better understand what they are and their function. We’ll begin with the main components, move to the basic features, and finish with our interior and equipment.
The main parts of a sailboat
The main parts of a sailboat are the key components that make it a vessel able to sail. You’ll notice that the structure has several distinct differences from powerboats.
We can categorize the main parts into the following:
- Hull: The main structure, or “body” part of a boat.
- Keel: The heavy fin at the bottom allows stability under sail.
- Rudder: The fin sticking down at the stern, allowing us to steer the vessel.
- Mast: The “spars” or “poles” holding the sails.
- Rigging: The standing rig is the wires that supports the mast. The running rigging is all the lines that control the sails.
- Boom: The horizontal spar supporting the bottom of the mainsail.
- Sails: The canvas used to harness the energy of the wind.
Let’s dig a bit deeper into each of the components.
Hull – The main structure
A sailboat’s hull is the vessel’s main body or structure. The shape is vital to the boat’s performance and stability, and you have probably seen boats in many different forms. Older vessels are typically narrow, with a rounded underbody and a small stern. Modern designs have a flatter belly and broad stern supporting dual helm stations.
One of the hull’s primary functions is to displace water and provide buoyancy to keep the boat afloat. The hull is also the structure that holds the vessel’s living compartments and all its equipment. The main structure must be strong enough to withstand the forces of the water and any rough weather conditions that Mother Nature might throw at it.
Fiberglass (GRP), steel, aluminum, and wood are the most commonly used hull materials, each with pros and cons.
You can learn more about hull materials and their strengths in this article .
A monohull is a type of sailboat that has a single hull. Monohulls are classified into two categories based on weight and shape: planing and displacement hulls.
Sailboats with more than one hull are called multihulls. There are two types of multihulls: catamarans, which have two, and trimarans, which have three. These boats are typically designed with planing hulls.
Keel – The fin under the boat
The keel of a sailboat is a structural fin that extends downward from the bottom of the hull. There are several types of keels, each with unique characteristics and advantages. They all serve the same fundamental purpose of stabilizing the boat when we sail by adding lateral resistance in the water and weight at the vessel’s bottom.
Standard keel designs include:
- Lifting Keel
Some sailboats have a retractable centerboard functioning as their keel, allowing them to take the boat into shallower areas.
Rudder – To steer the boat
The rudder is a flat surface that sits perpendicular to the waterline. It is connected to the boat by a pivot point, allowing it to swivel left and right. When the steering wheel or tiller is turned, the rudder moves, creating drag in the water causing the boat to turn. The size and shape of the rudder can vary depending on the size and type of boat.
The most commonly seen rudder designs:
- Full skeg-supported
- Semi skeg-supported
Skeg-supported rudders are structurally one of the most reliable and robust constructions, but they are less efficient than a balanced rudder performance-wise. Balanced rudders pivot around their vertical center, giving less drag in the water and higher maneuverability at the cost of being a more vulnerable construction.
Twin rudders are often seen on modern performance sailboats with a wide stern. When the sailboat heel over , the leeward rudder gets better track through the water than a single rudder placed at the vessel’s center line. Contrary to some misconceptions, they can’t be controlled individually, even if the boat has two steering wheels.
Mast and Rigging – Supporting the sails
The mast is the long vertical spar that extends upward from the deck of a sailboat and holds the sails. It is the tallest part of the boat and is typically made of wood, aluminum, or carbon fiber. The mast is held in place by stays and shrouds, which form the sailboat’s standing rigging.
Depending on the rig the boat is manufactured with, there are several different types of masts. For example, a sloop-rigged sailboat will have only one main mast, while a ketch-rigged vessel will have a smaller additional mizzen mast placed further aft from the main mast.
There are two types of rigging:
- The Standing rigging consists of the stays and shrouds that keep the mast or masts in place.
- The Running rigging is the lines we use to hoist, lower, and control the sails.
Pro Tip: “S par” is a general term for a pole made of a solid material like wood, metal, or composite and is used to support a boat’s sail. The mast, boom, spreaders, and poles are defined as spars.
Boom – Supporting the mainsail
The boom is a horizontal beam extending from the mast and supporting the mainsail’s tack and clew (bottom two corners). It is attached to the mast by a hinge called a Gooseneck .
We use the boom to control the shape and angle of the mainsail to optimize its efficiency and power. Some booms also have a Vang or Rod-Kicker installed to assist in trimming the mainsail.
Sails – The canvas used to harness the energy of the wind
Most vessels have at least two sails, depending on the rig type and boat setup.
The Mainsail flies behind the mast, on top of the boom. Although it may not always be the largest sail on the vessel, we commonly refer to it as “the main.”
The Headsail(s ), located in front of the mast, are often of different sizes and shapes, and many sailboats have more than one. The Jib and Genoa are two of the most common types.
Different types of sails are used for various sail plans and situations, and you can learn more about them in this guide .
Now that we had a look at the main parts of the boat, let us dive deeper and look at the rest of the vessel.
The starboard and port side of the boat
Learning about the boat’s components is very important, but we must also know how to orient ourselves on the vessel. Using the words “left and right” on onboard often leads to confusion.
If you refer to something on the left side of the boat, the person facing you will be confused. He won’t know if you are referring to his or your left. This is where the terms “Port” and “ Starboard ” make better sense.
When facing the front of the boat or the bow , your left side of the boat is the port side, and the right-hand side is the starboard . If you turn around and face the back of the boat or the stern , your right-hand side will be the port side.
- A red light identifies the port side of a vessel.
- A green light identifies the starboard side of a vessel.
Windward and Leeward
- The windward side of the boat is the side facing the wind. If the wind comes from your right-hand side while facing forward, the starboard side is windward. This will be the boat’s high side as the wind heels the boat over.
- The leeward side of the boat is the side opposite to the wind. This will be the lower side of the ship while sailing as the wind heels the boat over.
Windward and leeward are two of the most important aspects to understand when sailing and navigating. Not only to identify equipment and gear on each side of the boat but to avoid collisions when sailing close to other vessels. There are rules on the water dictating which boat is “Stand On” and which has to “Give Way” depending on whether you are the windward or the leeward vessel in the situation.
Read this article to access a free course on navigation rules .
Basic parts of a sailboat
The boat’s bow is the front part, typically shaped like a “V” to cut through the waves. Larger vessels often have a locker for their anchor chain in this section, holding the anchor at the front.
The midship section is the center of the boat. Some refer to this part as amidships.
The stern is the rear or back part of the boat. It is also referred to as the aft . I’ve had French crew calling the stern the butt of the vessel, which is funny but also correct!
The beam is the widest part of the boat. Also referred to as the sides on the middle.
The transom is a flat surface across the stern of the boat.
The waterline is the part where the hull (body) of the boat meets the water. Many vessels have a painted stripe to mark the waterline, indicating how loaded the ship is. If you have too much stuff on board, the waterline goes underwater, and it is time to do some housekeeping!
The freeboard is the vertical part of the ship side between the water and the deck. When you see a blue boat like Ellidah, the freeboard is the blue part.
The deck is the “floor” of the boat when you are outside. You have probably heard the term “All hands on deck!” The front deck is the deck space in front of the mast. Side decks are the decks on the boat’s sides.
The mid-deck is between the cockpit and the mast. The aft deck is the deck behind the cockpit. Sailboats with aft cockpits often don’t have any aft decks, but some have a swimming platform instead.
The cockpit is the boat’s steering position and where you will find the helm.
The helm is the position the helmsman uses to steer the boat. Smaller sailboats often use a tiller to navigate, while most bigger yachts have one or two steering wheels.
Main parts below deck (inside the boat)
Let us look at the interior to highlight and learn about the parts we have below the deck.
The Companionway
The companionway is the “front door” of the boat. This is where the steps lead from the cockpit or deck down below. It is usually opened and closed using a hatch, two doors, or a plate.
The Galley
The galley is the boat’s kitchen. This is where sailors prepare their delicious meals.
The Saloon
The saloon is basically the boat’s living room, usually where you find the settee and dinette. This is where delicious meals from the galley are served together with refreshing beverages in good company.
The settee is the sofa or couch in a boat. It is also used as a sea berth to sleep in when sailing.
The dinette is the area where you can sit down at a table and eat your dinner. It’s also perfect for consuming rum and a game of cards in good company.
A cabin is often used as a bedroom in a boat but is not necessarily where you sleep. Many boats have more than one cabin.
A berth is a place in the boat where you can sleep. This doesn’t necessarily have to be a bed and can often include the sleeping space in the saloon. Sea-berth usually refers to a sleeping position where you are tucked well in and can sleep when the boat is heeling over and moving around.
The head is the toilet on a boat. If your skipper tells you to go and clean the head, getting out the shampoo won’t do you any good!
Nav station
The navigation station is usually a chart table and a console with mysterious instruments like radios, switchboards, and complicated electronics. This is where adventures are planned and the skipper’s favorite seat onboard.
The bilge is a space in the bottom of the hull where water collects and sometimes a storage space for all sorts of things. It usually contains a bilge pump to pump out water that finds its way into the boat in various places.
A v-berth is a bed in the front cabin shaped like a V.
A bulkhead is a wall inside the boat, usually supporting the structure.
Hardware and Equipment
Sailboats come equipped with a variety of different hardware and equipment. While the specific items may vary from boat to boat, there are some essentials that nearly every sailboat has.
A winch is a metal drum that gives you a mechanical advantage and is used to control and tighten lines. These can be operated by turning a line around it and pulling manually or by a winch handle to get more force.
Most modern winches are so-called “self-tailing,” which means they lock the line on so you can winch the line without holding on to it. Some boats even have electrical winches operated by a button.
A cleat is a fitting used to fasten a rope. Most boats have at least 6 of these. One on each side on the bow, midship and stern. These are used to secure the boat to a mooring buoy or key. Many ships have more cleats than this for various lines and ropes, and they can be used for anything as they are strong points fitted to the hull.
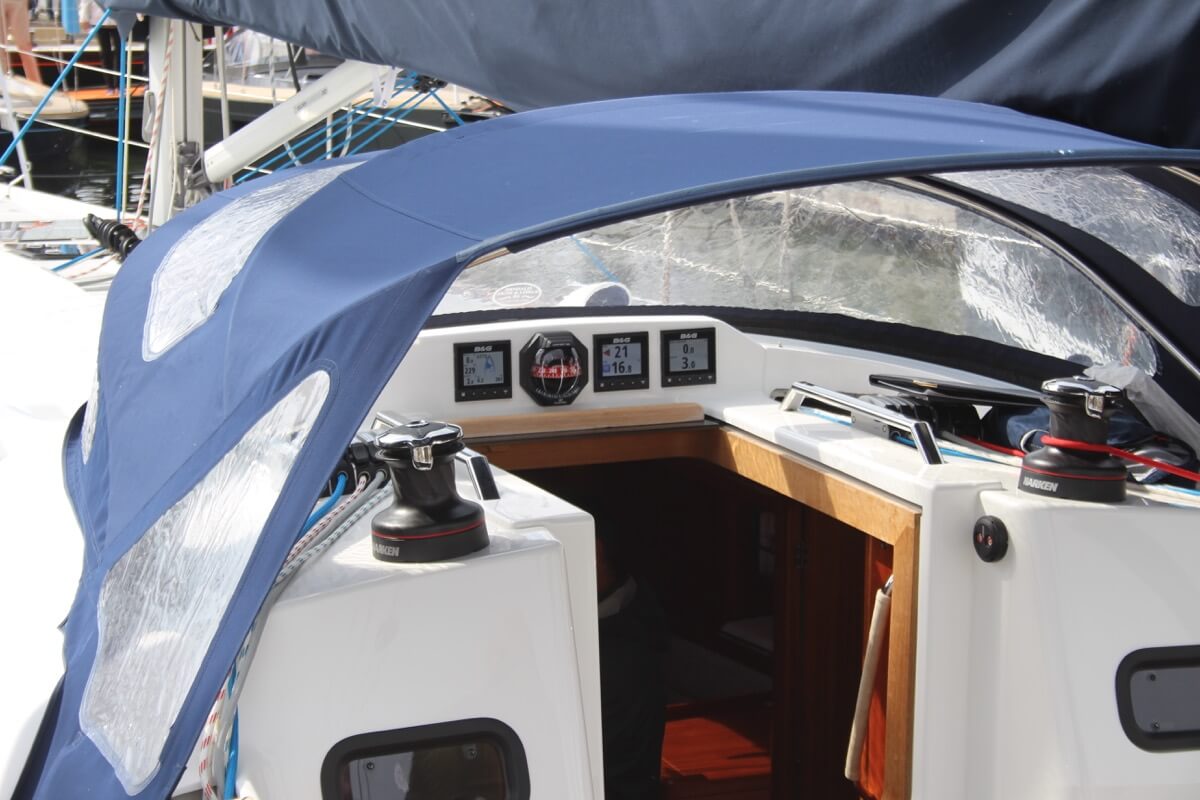
The sprayhood is the boat’s windshield that protects the people in the cockpit from sea spray. Some vessels have a canvas sprayhood that can be folded down or removed. Others have solid sprayhoods, often called a hard dodger or a doghouse .
The bimini is the cockpit’s “roof.” It protects you from the elements and shelters you from spray, rain, and burning sun rays! A bimini can be made of canvas or hard material. A hard bimini can also be called a hardtop .
Dinghy
A dinghy is a little boat you use to get from the mothership to shore when you are at anchor, also called a tender or annex . It can be everything from a small inflatable rubber kayak to a RIB or even a solid boat.
An essential and valuable piece of kit as it is the daily driver for most cruisers. It is like the car of a land crab, used for all commuting on the water and hauling important stuff like beer, rum, and food onboard. Dinghies often have electric or petrol engines, which we call outboards.
Dinghies are also great to use for watersports, such as wakeboarding!
Like Captain Ron said in the movie, fenders are the rubber bumper things you hang off your boat to prevent it from scratching against something like the pontoon or another ship. It is conveniently also used to sit on or as a backrest while relaxing on deck.
A boat hook is a long stick with a hook at the end. Used to grab lines, items, and stuff that is too far to reach by hand, like cushions flying overboard. It is also convenient as a tool to push the boat away from another craft or the key. Most vessels have them on board.
The guard rail can be a flexible wire or a solid metal rail surrounding the boat to prevent us from falling overboard. Some also use a net as an addition for increased safety.
The pushpit is a metal guard rail around the stern of the boat. This is where the guard rail is secured on the stern: a common place to mount the BBQ, life raft, and the outboard for the dinghy.
The pulpit is the metal guardrail on the bow. This is where the guard rail is secured onto the bow.
The stanchions are the metal bars that keep the guard rail in place around the boat between the pushpit and the pulpit.
An arch is a typical structure made of stainless steel on the back of a boat and is often used to mount a variety of items like antennas, radars, solar panels, wind generators, etc. It is also convenient to use for lifting the dinghy and its outboard.
Ground Tackle
The ground tackle consists of several things:
- Your anchor
- Your anchor chain
- The link between the two
- The connection between the chain and your boat
It includes all equipment holding your boat to the ground. Larger boats sometimes have two anchors on the bow.
A windlass is a winch that hoists and lowers the anchor and chain. Most boats have one on the bow and some on the stern. These incredible things can be electrical or manual (some are both) and are essential to anchor your boat when not in a port or marina.
VHF stands for “Very High-Frequency Radio.” It broadcasts on the VHF network and allows you to communicate with others around you. Sadly, you won’t be able to tune in to your favorite radio show on these.
Still, they are essential for contacting other boats and port authorities. It is also the radio you will transmit an emergency mayday over in case of emergency. VHF radios sometimes require a license, depending on the country you are in.
Chartplotter
A Chartplotter is a navigation computer that shows various information on a screen, like charts, routes, radar images, etc. It is another vital piece of equipment that helps you navigate and maneuver the boat.
Final words
I hope this guide has been helpful and not too overwhelming for you. We’ve covered many of the parts of a sailboat and its terms and functions, but this article only touches on the basics. If you want to keep learning about sailing, I have written several other guides to help you get started.
Now that you have a basic understanding of sailboats, it’s time to take the next step and dive into a sailboat’s standing rigging .
Sharing is caring!
Skipper, Electrician and ROV Pilot
Robin is the founder and owner of Sailing Ellidah and has been living on his sailboat since 2019. He is currently on a journey to sail around the world and is passionate about writing his story and helpful content to inspire others who share his interest in sailing.
Leave a Reply Cancel reply
Your email address will not be published. Required fields are marked *
Parts of a Sailboat

Sailboats share many parts with other boats, such as keels, decks, and sometimes engines. But parts like halyards, sheets, and blocks are unique to sailboats.
Sailboats require four main parts to operate: a hull, mast, sail, and rudder. The hull is the body of the boat, and all other parts are directly or indirectly connected to it. The mast is a long pole that serves as a guide and mounting point for the sail. The sail catches the wind and propels the boat, and the rudder directs the boat and acts as its steering.
Here are all the main parts of a typical cruising sailboat , including hardware, lines, controls, cabin items, and a rundown of common sailing terminology.
Table of contents
Port, Starboard, Bow, Stem, and Stern
Before we get into the parts of a sailboat, let’s get a handle on sailboat direction. The bow of the boat is the front (forward), and the stern is the rear (aft). The stem is the forward-most part of the bow and determines its shape. These words describe the general area of front and back.
When determining port and starboard, picture looking down on the boat with the bow oriented forward. The port side is the left side of the boat, and the starboard is the right side. Now picture yourself at the controls of your boat.
If your lookout sees an obstacle off the port bow, which direction should you look? That’s right—the obstacle is forward and to the left of you. Now, we’ll go over the basic parts of a sailboat.
Basic Parts of a Sailboat
What are the basic parts of a sailboat? These are items that are essential to the operation of the boat and universal across most sailing craft. Every sailor should know where these parts are and what they do. Here are nine fundamental sailboat parts, their function, and why they’re important.
The hull is the ‘boat’ itself. It comprises the frame of the boat, the skin that keeps the water out and serves as the mounting point for everything else on the boat (both directly and indirectly). Simply put, if you punch a hole in the hull, water will come into the boat. Sailboat hulls are constructed most commonly out of fiberglass or hardwood (such as white oak), but some boat hulls are made out of aluminum, steel, and even a material called ferrocement.
The deck is the platform that covers the hull. It’s the place where you walk when you’re not inside the boat. Most people would consider the deck as any place ‘on top’ of the hull. The deck serves as a mounting point for essential boat hardware such as the mast and winches. We’ll get into those later; just think of the deck as the visible top area of the vessel. Decks are often made of fiberglass as well, but traditional boats use teak wood planking in this area. You’ll often find abrasive anti-slip material on the deck, as sailors often walk across it in wet conditions.
The keel is the structural backbone of the boat. It’s located in the bottom of the hull and serves as a sort of ‘spine’ to which all frame members are mounted during construction. The keel is an essential part of the boat and cannot be broken or damaged. You’ll often hear the term ‘keelboat’ in the sailing community. This word describes a sailboat with a long and deep keel, which is like a thin fin that runs the length of the hull. Keelboats are seaworthy vessels, as the elongated hull adds stability and keeps the boat on a straight track.
Centerboard
Many sailboats don’t have a long, deep keel, but they still need some sort of fin to keep the boat tracking straight. To substitute a long keel, many boats utilize a dagger-like board called a centerboard . This plate protrudes underneath the center of the boat, usually between one and three feet below the bottom of the hull. Centerboards are often retractable, which is great for towing and beaching. Centerboards are most common on small sailboats designed for inland or coastal cruising.
The cockpit is usually located in the rear of the boat. It features seating for the crew and controls for the steering, sails, and engine. The cockpit is the command center of the sailboat and often features storage lockers under the seats. Many cockpits are self-draining, which means they’re located above the water line and clear themselves of water accumulation. Some sailboats have enclosed cockpits for off-shore sailing. In a typical cruising sailboat , the cockpit usually takes up ⅓ of the total length of the boat or less.
The mast is the big pole extending from the deck of the sailboat. It connects the sail to the boat and serves as a frame for all sails carried by the vessel. The mast is a key part of the sail plan and helps determine what kind of boat you’re looking at. Most sailboats have just one mast, but others have numerous masts. A schooner, for example, has two masts and a specific sail plan. A yawl also has two, but each mast serves a separate function.
The rudder steers the boat and is located on or under the stern of the vessel. Rudders are an essential part of the boat, and they’re particularly sensitive to impact or misalignment. On some boats, the rudder is completely invisible when in the water. Other boats have retractable rudders for beaching or towing. Fundamentally, a rudder is just a plate that’s hinged to move side to side. It’s connected to the tiller or the helm, which we’ll cover in a bit.
The sail is what propels the boat, and most boats have more than one. The aft (rear) sail on a single-masted boat is called the mainsail , and it’s the largest of the two primary sails. The triangular forward (front) sail is called the jib, and it’s generally smaller than the mainsail. Other sails include the spinnaker, which is like a loosely-mounted parachute that flies in front of the boat during conditions of low wind.
The boom is a hinged rod that extends perpendicular to the mast. It’s mounted on the lower part of the mast, and it controls the side-to-side position of the mainsail. The best way to remember the boom is to consider what happens when it swings side to side. If you’re not paying attention, a swinging boom could give you a nice crack on the head. Think of the boom as the throttle of the boat. If you’re properly pointed relative to the wind, pulling in the boom will increase the speed of the boat. This is where the bottom of the sail connects to the mast. The boom is also connected to the deck and adjustable using a winch and a crank.
Here is some of the hardware you’ll find on a typical sailboat. These items are usually mounted to the hull, on the deck, or to the mast. Boat hardware consists of control systems and other items that are essential to the operation or integrity of the boat.
Cleats are the universal mounting points for ropes on the deck. Cleats are used for tying up to the dock, securing lines, and tethering important items that can’t fall overboard. There’s a special kind of knot called a ‘cleat knot,’ which is essential to learn before sailing. A properly tied cleat will stay secure in almost all conditions, and it’ll be easy to untie if the need arises. An important distinction must be made for clam cleats, which are spring-loaded sets of jaws that secure rigging lines that need to be adjusted frequently.
Block is a nautical word for a pulley. Blocks (pulleys) are everywhere on a sailboat, and they’re an essential part of the rigging system. Blocks distribute and regulate force. For example, a deck-mounted block can change the direction of a line from vertical to horizontal, allowing you to apply a horizontal force to lift something vertically. Blocks also reduce the force required to lift heavy loads and help make adjustments more precise.
Winches are cylindrical mechanical devices that transmit force. Winches are often located on either side of the boat. They’re multi-directional like a socket wrench and feature one-way locking mechanisms for raising, lowering, tightening, and loosening lines. Winches have a hole in the top for a crank, which makes it easy to wind rope in and out. Winches are present on almost every medium to large sailboat. They’re either manual or electrically-powered.
A hatch is a watertight or water-resistant door used to enter the cabin or storage compartment of a boat. Hatches can be flush with the deck and hinged, threaded like a large screw, or they can slide back and forth. The purpose of a hatch is to keep water out when closed and allow easy access to the interior parts of the boat.
Tiller and Helm
The tiller and helm are used to control the direction of the rudder and steer the boat. Usually, a boat has either a tiller or a helm. The tiller is the most basic steering control and consists of a simple rod connected to the rudder or rudder shaft. Tillers move side to side and point in the opposite direction that the boat steers. The helm is essentially a steering wheel, and it operates the same way that a car steering wheel does. The helm is connected to the rudder by complex mechanical or hydraulic linkage.
Mast and Sail Components
Mast and sail components are referred to as ‘rigging’ in most cases. These items are part of the wind-powered propulsion system of the boat. You’ll operate these systems to control the speed of the boat. Here are three common sail components that you’ll need to understand before hitting the water.
Stays are the lines that secure the mast to the boat. Usually, the mast is bolted or tied to the deck of the boat; but much of the load and pressure created by the wind is transferred to the stays. Stays are usually made of strong stainless steel cable. Losing a stay at sea is a serious problem, as these small cables keep the mast from collapsing.
Halyards are the ropes used to hoist and lower the sail on the mast. They also hoist flags, spars, and other components that need to be raised and lowered. Halyards are usually found on the mast and are fixed to cleats or winches around the boat.
Sheets and halyards are often confused, but they serve a very different function. Sheets are the control lines of the sail. These ropes control how far in or out the sail is, and they’re usually found connected to the jib (jib sheet) and the mainsail (mainsheet). Sheets are controlled by winches and blocks and secured onto cleats or clam cleats on the deck. Sheets can be controlled from the cockpit of the boat.
Navigation components are the parts of the sailboat used to find direction and alert other boats of your position. These four items aren’t the only navigation items found on sailboats, but they’re the most common.
This item should be self-explanatory, but it’s essential nonetheless. A compass is arguably the most basic and important marine navigation item. It shows you what direction you’re heading. Sailboat compasses are precise instruments designed to display an accurate heading no matter how much the boat rolls up and down or side to side. Compasses are usually mounted in the cockpit, in clear view of the captain.
Charts are old-fashioned navigational tools and indicate important information such as water depth and the location of ship channels. Learning to read and purchasing charts is essential, even in the age of modern GPS navigation. When all else fails, a chart can help guide you and your vessel to safety and away from hazardous areas. No electricity is required.
Navigation Lights
Navigation lights are mandatory beacons located around the boat. These lights help other boats figure out where you are and where you’re going. Sailboats are required to have red and green bow lights. Red indicates port, and green indicates starboard. This is how boats determine if they’re looking at your bow or stern. Other lights, such as a white stern light, a mast light, are also necessary during specific circumstances. Check your state requirements for lighting.
VHF radios are the standard marine over-the-air communication system. You can use a VHF radio to communicate with the coast guard, other boats, harbors, towing services, and drawbridges. It’s important to learn and write down the specific channels and call signs for each situation, as you need to be able to properly communicate on the radio.
The cabin is the ‘below decks’ area of the sailboat and usually contains living quarters for the captain and crew. Not all boats have cabins, and cabin size varies widely. Some sailboats have rudimentary cabins with basic sleeping accommodations and sitting headroom. Other boats have full standing headroom, shower and wash facilities, full-size kitchens, and separate staterooms for sleeping and sitting. The cabin is usually located forward of the cockpit. Here are some common sailboat parts located within the cabin.
The berth is the sleeping area of a boat. Berths are often convertible, which means they fold or rearrange into a table and seating area. There are numerous kinds of berths. The ‘V’ or ‘vee’ berth is a triangle-shaped sleeping area located in the bow of the boat. Side berths typically convert into couches or settees, and pole berths are essentially cots that roll up and stow away easily.
The bilge is the bottommost interior part of the boat. It’s usually located under the floor in the cabin. When water finds its way into the boat, it drains down to the bilge and gets pumped out by bilge pumps. Bilge pumps are an essential piece of hardware, as they keep the boat dry and prevent sinking. Some boats have a wet bilge, which means it’s always full of water (and supposed to be). Most boats have a dry bilge.
Portlights are watertight windows located in the upper part of the cabin. They can usually be opened or secured using threaded latches. Portlights are generally smaller than traditional portholes and offer a watertight barrier between the inside and outside of the cabin. They’re also useful for ventilation.
Gimballed Utilities
A gimbal is a special type of hinge that keeps an item vertical when the boat rolls. Oil lamps are commonly fitted to gimbals, so they stay upright when the boat bobs around. Stoves are also gimballed, which is extremely useful for cooking or boiling water when the weather gets rough.
Head is the nautical term for a toilet. Most medium-sized sailboats have compact wash facilities that sailors refer to as the ‘head,’ or a porta-potty at the bare minimum. A sailboat’s bathroom usually consists of a marine toilet, a sink, and often a shower with a drain in the floor.
Related Articles
Daniel Wade
I've personally had thousands of questions about sailing and sailboats over the years. As I learn and experience sailing, and the community, I share the answers that work and make sense to me, here on Life of Sailing.
by this author
Sailboat Parts
Learn About Sailboats
Most Recent

What Does "Sailing By The Lee" Mean?
October 3, 2023

The Best Sailing Schools And Programs: Reviews & Ratings
September 26, 2023
Important Legal Info
Lifeofsailing.com is a participant in the Amazon Services LLC Associates Program, an affiliate advertising program designed to provide a means for sites to earn advertising fees by advertising and linking to Amazon. This site also participates in other affiliate programs and is compensated for referring traffic and business to these companies.
Similar Posts

Affordable Sailboats You Can Build at Home
September 13, 2023

Best Small Sailboat Ornaments
September 12, 2023

Discover the Magic of Hydrofoil Sailboats
December 11, 2023
Popular Posts

Best Liveaboard Catamaran Sailboats
December 28, 2023

Can a Novice Sail Around the World?
Elizabeth O'Malley
June 15, 2022

4 Best Electric Outboard Motors

How Long Did It Take The Vikings To Sail To England?

10 Best Sailboat Brands (And Why)
December 20, 2023

7 Best Places To Liveaboard A Sailboat
Get the best sailing content.
Top Rated Posts
© 2024 Life of Sailing Email: [email protected] Address: 11816 Inwood Rd #3024 Dallas, TX 75244 Disclaimer Privacy Policy
|
| |
| |
| | |
| - Replacement Sheaves for Blocks and Spar Applications. . - Cleats by Type, Size, & Manufacturer. - Line Stoppers & Replacement Parts by Manufacturer. - Quick-release, High load Shackles. . | |
| - Primarily used for Mainsail Halyards. - Primarily used for Jib & Spinnaker Halyards. | |
| , Fixed | |
| - for leading Halyards & other lines aft. - Flat mounted Turning Blocks for Deck & Spar Applications. - Deck mounted Turning Blocks for Jib & Spinnaker Sheets. - Deck mounted Stand Up Blocks.
- for Spar & Deck Applications. | |
| - Hanging Blocks for Halyards, Lifts, Mainsheets, etc. - Jib/ Genoa Blocks with integral Track slides. - Jiffy Reefing Blocks on Track slides. - for & Masts. | |
| - in and . - in Stainless Steel. - in and . - One-Handed, Quick-release SS Pins. | |
| - T-Track, , misc. Tracks, & related Hardware. T-Track & Fittings --- - - Extruded Toerails for Hull and Deck joint Applications. , & - For Lifelines & Pulpits. - Rigging to Hull Attachment Points. - Deck mounted Tank Fillers for Water, Waste, & Fuel. - Hatches, Ports, Portlights and related Parts & Hardware. - SS, Aluminum & Cast Bronze. - Traditional Cast Bronze Stemheads & Chocks. - For use stowing an Inner Forestay. | |
| - Pintles, Gudgeons, Rudder & Tiller Heads, Rudder Bushings. - Hull mounted Bailers for Small Keel Boats & Dingys. - Winches & Parts by Manufacturer, and related Hardware. | |
- BOAT OF THE YEAR
- Newsletters
- Sailboat Reviews
- Boating Safety
- Sails and Rigging
- Maintenance
- Sailing Totem
- Sailor & Galley
- Living Aboard
- Destinations
- Gear & Electronics
- Charter Resources
- Ultimate Boating Giveaway
Rebedding Sailboat Deck Hardware
- By Steve D'Antonio
- Updated: April 16, 2020

Let’s look at the matter of bedding deck hardware from the simplest way possible: I’ve lost count of the number of times I’ve been dripped on while lying in a berth. Because it’s both annoying and completely avoidable, it’s doubly frustrating. Of course, there are plenty of other very important reasons for keeping leaks from developing, including maintaining the integrity of the decks through which they pass. Follow these steps to keep the water on the right side of the cabin and decks.
Bedding Compounds
Bedding compound, also referred to as sealant or caulk, serves as a flexible gasket of sorts between deck hardware—from cleats, stanchion bases, chainplates and sail tracks to pedestals, pulpits, winches and clutches. The bedding you select should be easy to apply, long-lasting and elastic. Its primary use, when sealing hardware, is as a gap filler, with the aim of preventing water from passing between the hardware and deck/cabin surface. Options include polyurethane, polysulfide and silicone. Each has its own strengths and weaknesses.

Polyurethane is by far the most popular bedding compound, starting decades ago with the introduction of 3M’s now ubiquitous 5200. Originally developed for use with timber hulls, it has all the attributes one could ask for in a sealing formula—and then some. With some exceptions, PU sealants are also adhesives, which can make hardware removal a chore and even destructive in some cases. It can be affected by some teak and other cleaners, as well as fuel. Unless otherwise noted, many PU sealants lack UV stability, although that’s less of an issue where the sealant is primarily protected from the sun’s rays by the hardware. If it’s employed in an application where an exposed radius is necessary, make certain the sealant that’s used includes a UV inhibitor.
Polysulfide is an unsung hero among bedding compounds and my personal preference. Unlike PU, it is not an adhesive; its mission is to seal, and it does so very well, filling gaps readily while remaining resilient and flexible for many years, if not decades. It’s also UV-stable and immune to most harsh chemicals and fuel.

For years, silicone has been considered taboo by boatyards, builders and yards, although not because of performance issues. The aversion is due to its side effects. Unlike PU and PS, which can be painted—though it’s not recommended—SI will not accept paint; in fact, it repels it, and therein lies the problem. The slightest SI residue contaminating any surface that might ever be painted or varnished will drive coating applicators crazy with “islands” of paint/varnish rejection. These are known as “fish eyes” because of their oblong shape, and they can remain present for years.
In spite of that liability, SI remains a very credible and reliable bedding compound, one that is flexible and long-lasting, and it’s available in several colors too. I have successfully used SI in boatbuilding applications, specifically for aluminum-frame hatch installations, where no other compound could be made to work reliably for the long term. Furthermore, manufacturers of some plastic components (such as access and inspection ports) specifically prohibit the use of PU sealants, leaving PS and SI as the only viable options. If you opt for SI, remember the paint/varnish incompatibility issue, to mask carefully, use rubber gloves and not touch varnished surfaces while working with it.
As with paint and varnish application, preparation is vitally important where bedding is concerned. In many cases of bedding failures, especially those that occur shortly after installation, they are the result of improper or incomplete preparation (or no prep work whatsoever). Based on tests I’ve conducted, virtually all deck hardware—whether stainless, aluminum or even plastic—is contaminated with waxes or oils, and this includes the fasteners used to secure this hardware.

Here’s why: When boatbuilders and repair pros want to prevent fiberglass resin from adhering to something (like molds or hardware), they apply wax to those surfaces, which acts as an effective release agent. When metallic hardware is finished or polished, it’s often coated (i.e., contaminated) with polishing wax or cutting oil, which has the same effect; this includes factory-fresh components straight out of the box.
If you are skeptical about this, conduct this test: Wet a clean white rag with mineral spirits, and then wipe down a new piece of hardware or fastener, nut or bolt. (For bedding prep, “clean” means the rag has been rinsed in hot water, wrung out and then allowed to dry. Doing so removes contaminants such as detergent residue, surfactants and scents from even new rags.) The gray or black shading that will almost certainly appear on the rag is your residue, and it will hinder the adhesion of any bedding compound, regardless of its chemical composition.

Holes drilled in fiberglass and timber substrates, through which fasteners are to be installed to secure hardware, should have their edges chamfered. The recess created by this practice will allow a “reservoir” of sealant to accumulate here, creating an O-ring of sorts, thereby improving sealing ability.
There are plenty of good reasons to prevent leaks from developing, including maintaining the integrity of the decks.
Surfaces that are to be bedded must be scrupulously clean and free of all contamination. If remnants of previous bedding or loose paint are present, the surface should be cleaned with a putty knife or gasket scraper. While it’s acceptable to bed over glass-smooth surfaces, slightly profiling the surface with 180-grit sandpaper will provide a “tooth” to which bedding can adhere; this goes for gelcoat, fiberglass, polished stainless steel and aluminum. The surface should be cleaned, and dewaxed/de-oiled, before sanding to avoid grinding contaminants into the surface.

Using clean, pre-rinsed rags, wipe down all hardware, fasteners and surfaces that are to receive bedding with a solvent (I prefer mineral spirits). As rags become discolored, they should be replaced so as to avoid distributing, rather than removing, any contaminants. I eschew the use of harsher chemicals, such as denatured alcohol and acetone, as unnecessary overkill; mineral spirits are friendlier to users (you should wear chemical-resistant rubber gloves and eye protection) and will emulsify and remove oils, waxes and most other contaminants without harming most plastic, paint, varnish or cured caulk—provided it is not left in contact for an extended period (i.e., never leave a solvent-soaked rag on any painted or varnished surface).
Depending on the location, you may choose to mask the perimeter of the hardware footprint to minimize cleanup; this is particularly true on teak or nonskid.
Installation
Once the surfaces are clean and prepared for application of sealant, make certain you do not touch them with your bare hands (or soiled gloves) because even oil from fingers can contaminate these surfaces.
Sealant should be applied uniformly to the entire hardware surface, not just around fastener penetrations. Don’t skimp. The goal is to achieve what’s known as “squeeze-out,” which is a bead of sealant pressed out from under the hardware as it’s set onto the mounting surface. Fastener shanks, as well as the underside of heads, should also be coated in sealant.
No sealant, however, should be applied to backing plates, washers, nuts, etc. that are installed on the underside of the deck/cabin. The reason for leaving these unsealed is to ensure water is not trapped in the fastener bore holes. If water is trapped here, it can lead to two undesirable side effects: 1. For stainless steel fasteners, it establishes the ideal environment for crevice corrosion. 2. For cored composite structures (nearly every deck and cabin), even when properly closed out (more on this in a moment), standing water in this area only increases the likelihood of penetration into the core. If the weather-deck bedding fails, it’s better that it leak into the cabin—as an alert that it’s time to re-bed—than retain water and cause damage.

Once the hardware is set in place, evenly tighten the fasteners to achieve the aforementioned squeeze-out. Any place where squeeze-out is not achieved is an indication of a void or gap that might exist between the hardware and the bedding surface, a gap into which water can migrate and be retained. Even if this does not lead to a leak, water trapped by stainless steel nearly always leads to unsightly rust-colored “tea staining.”
Fasteners should be fully torqued at this point. The practice of leaving sealant to cure, before fully tightening, is not one to which I subscribe. Sealant, even when fully cured, is not designed to bear the heavy loads imparted by stanchions, cleats and tracks; it’s designed to fill irregularities and small gaps.
Initial removal of bulk sealant squeeze-out can be achieved using a putty knife and then solvent-soaked rags (be ready with a container or bag to dispose of these), one that is approved by the sealant manufacturer. Use of the incorrect solvent can inhibit the sealant from fully curing.
No discussion of hardware installation would be complete without mention of core closeout. In short, no penetration—in a cored composite deck, cabin or hull—should rely on sealant alone to keep water from migrating into the core, where it can wreak untold havoc. Instead, the core must be fully isolated from penetrations by a permanent annulus, and not just a paper-thin coating, but one made using fiberglass resin, or epoxy, and a reinforcing or thickening agent. This approach provides resistance to water penetration, as well as crushing, when through bolts are torqued.
Following these practices should keep hardware secure and the water on the deck, rather than your head.
Steve D’Antonio is a former boatyard manager who travels the world assisting clients with all manner of refits and technical issues ( stevedmarineconsulting.com ). He is also the author of CW ’s Monthly Maintenance column.
- More: deck hardware , How To , print april 2020
- More How To

Grease the Wheels of Your Boat: A Guide to Proper Lubrication

A Bowsprit Reborn: A DIY Renovation Story

Rigging Redo: Our Switch to Synthetic

Top Tools for Sailboat Cruising: Must-Have Gear for 2024

Galápagos: A Paradise Worth the Paperwork

Around Alone

- Digital Edition
- Customer Service
- Privacy Policy
- Terms of Use
- Email Newsletters
- Cruising World
- Sailing World
- Salt Water Sportsman
- Sport Fishing
- Wakeboarding
Attainable Adventure Cruising
The Offshore Voyaging Reference Site
- Sailboat Deck Layouts
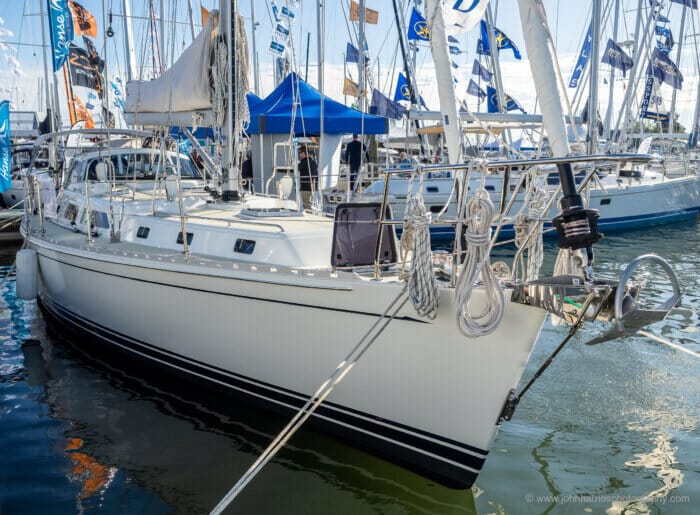
I’m going to use the Outbound 46 as a base to write about optimal deck layouts for sailboats. Information that will help anyone to either select a good deck layout when buying a boat, or fix a screwed-up one on a boat they already have.
Good Deck Layouts Are Rare
That last sentence may surprise many since it would be logical to expect cruising sailboats to have good and functional deck layouts, but as an ex-sailmaker and longterm racer, the thing that never ceases to amaze me is that most boats, particularly those marketed as cruisers, come out of the yard with the rig and deck gear set up so poorly that actually sailing them is nothing but a huge chore, and it takes years for even a knowledgeable owner to sort things out—just read Colin’s trials and tribulations with the rig on his Ovni 435 to see what I mean.
This is so bad that I’m pretty sure that the popularity of in-mast and in-boom mainsail furling systems is in large part because most boats are so poorly set up for reefing that owners have been scared off simple and robust systems and toward complex, fragile, and expensive ones.
I will also write, once more, about speed. I know, we are cruisers, so why do we care? Well, up to you, but to me if we are going to really cruise under sail, rather than just motor around with an oversized flag pole and occasionally unroll a sail attached to it as we see so often these days, we might as well do it properly.
Seriously, a well set-up boat, efficiently reeling off the miles under wind power alone, is one of life’s sublime pleasures, and knowing that we can control the rig and shorten sail quickly and efficiently without automation or brute strength is the cherry on top.
Let’s look at how to do that:
Login to continue reading (scroll down)
Please Share a Link:
More Articles From Online Book: Sail Handling and Rigging Made Easy:
- Six Reasons To Leave The Cockpit Often
- Don’t Forget About The Sails
- Your Mainsail Is Your Friend
- Hoisting the Mainsail Made Easy—Simplicity in Action
- Reefs: How Many and How Deep
- Reefing Made Easy
- Reefing From The Cockpit 2.0—Thinking Things Through
- Reefing Questions and Answers
- A Dangerous Myth about Reefing
- Mainsail Handling Made Easy with Lazyjacks
- Topping Lift Tips and a Hack
- 12 Reasons The Cutter Is A Great Offshore Voyaging Rig
- Cutter Rig—Should You Buy or Convert?
- Cutter Rig—Optimizing and/or Converting
- Cruising Rigs—Sloop, Cutter, or Solent?
- The Case For Roller-Furling Headsails
- The Case For Hank On Headsails
- UV Protection For Roller Furling Sails
- In-Mast, In-Boom, or Slab Reefing—Convenience and Reliability
- In-Mast, In-Boom, or Slab Reefing —Performance, Cost and Safety
- Making Life Easier—Roller Reefing/Furling
- Making Life Easier—Storm Jib
- Swept-Back Spreaders—We Just Don’t Get It!
- Q&A: Staysail Stay: Roller Furling And Fixed Vs Hanks And Removable
- Rigid Vangs
- Building A Safe Boom Preventer, Part 1—Forces and Angles
- Downwind Sailing, Tips and Tricks
- Downwind Sailing—Poling Out The Jib
- Setting and Striking a Spinnaker Made Easy and Safe
- Ten Tips To Fix Weather Helm
- Running Rigging Recommendations—Part 1
- Running Rigging Recommendations—Part 2
- Two Dangerous Rigging Mistakes
- Rig Tuning, Part 1—Preparation
- Rig Tuning, Part 2—Understanding Rake and Bend
- Rig Tuning, Part 3—6 Steps to a Great Tune
- Rig Tuning, Part 4—Mast Blocking, Stay Tension, and Spreaders
- Rig Tuning, Part 5—Sailing Tune
- 12 Great Rigging Hacks
- 9 Tips To Make Unstepping a Sailboat Mast Easier
- Cruising Sailboat Spar Inspection
- Cruising Sailboat Standing Rigging Inspection
- Cruising Sailboat Running Rigging Inspection
- Cruising Sailboat Rig Wiring and Lighting Inspection
- Cruising Sailboat Roller Furler and Track Inspection
- Download Cruising Sailboat Rig Checklist

Hi John I could not agree with you more about how frequently boats with conventional mains are poorly set up for easy reefing and eventual dousing. It is another area where the maritime media/boatbuilders etc. have dropped the ball at educating owners how best to have their boat set up. Too many sailors (and their crew) get put off by a poor and difficult reefing set-up which likely means they have put off reefing and been over-canvased needlessly: always a lousy thing. Enough of that and they are buying a cabin in New Hampshire. I urge those looking at in-mast or in-boom furling to consider that reefing and dousing the main can be easy and fairly fast and with a minimum of effort on a boat that is well set up for it. I then enumerate the myriad down-sides of particularly, in-mast reefing/furling and the benefits of a conventionally rigged main. I am in no way a speed demon, but I like to sail and I like to sail well. You mention sublime pleasure in cranking out miles: my sublime pleasure often comes at watching superbly shaped sails at work; especially when in challenging weather, the third reef is in and working and that small sail is perfectly shaped to do its job and as bulletproof in functioning as can be devised. My best, Dick Stevenson, s/v Alchemy

I agree completely, particularly on the pleasure of looking at really good mainsail shape when reefed.

Hi John, I totally get your “simplicity” approach and at mast mainsail handling preference. It just wouldn’t work for us and I suspect for many other cruising couples. I think I can see at least one hatch in the Outbound 46 hard-dodger top, which means adjusting the halyard / reefing lines and setting the mainsail / twist, should be simple enough from the cockpit, if (big “IF” I know) the reefing lines are well set-up. And I personally like this set-up for short-handing. Our safety process requires a second crew to be in support, if someone leaves the cockpit (day or night, coastal or offshore). I would guess we could reef / shakeout a reef on the Outbound 46, without calling the off-watch crew – a real-plus in our book as we mostly sail two-up. Our first mate would not cruise with me if I left the cockpit every time we needed to take a reef in rough conditions. It’s that simple. And if something happened to me, there is no way she would go forward to the mast and handle the sail on her own. Whereas she can, and does, reef single handedly on our boat, and I would guess she could on the Outbound 46 set-up, which is almost identical to our boat – the difference is we have in-boom furling which simplifies operations further. Likewise, the outbound 46 set-up would be easy and safe to hoist / lower / reef the mainsail when single-handing. I see so many single-handing yachts sailing just with their headsails, I suspect because on-mast mainsail handling leaves no one in the cockpit, if something happens. I often single hand our yacht with no loss of efficiency and really enjoy it. Br. Rob
I just can’t see that twisting ones head to look up out of a small hatch to see the mainsail while simultaneously grinding a winch and operating clutches is ever going to provide the visibility and situation awareness of looking directly at the part of the sail you are tensioning while standing at the mast while right next to the luff where any hang ups can be quickly seen and dealt with. So yes, for sail trim the hatches may help a bit, but not for reefing. Also at night on the Outbound a headlamp will reflect off the hatch glass making visibility of the main effectively zero.
I agree that being able to reef and shake out without calling the off watch is vital, but we do that fine at the mast too. Phyllis and I are also not fans of the idea of calling the off watch every time someone leaves the cockpit since we feel that the disruption of rest outweighs and added benefit of so doing.
I guess that relates to our basic thinking that the deck, particularly as far as the mast is not an intrinsically hazardous place to be avoided, but simply part of the working area of the boat, just as the cockpit is. We feel that regularly visiting the mast in all weathers is vital since it will be required anyway for functions like setting a proper preventer, setting the pole, and moving the runners forward, not to speak of clearing any kind of SNAFU.
We also differ in that we evaluated in boom furling/reefing and rejected it as too fragile, difficult to fix at sea, and expensive for our needs. That was based on experience in that the boat I did was on for six weeks as guide on a trip to Greenland had one.
So, in summary, I guess we just see things in a fundamentally different way.

Like you I mostly sail singlehanded or effectively singlehanded and I don’t really regard going forward in a rising wind as a pleasurable experience, especially in the dark. I’d like to add granny bars at the mast but worry that they would be extra deck clutter and spoil “the look”. But I’ve got to say I’m with John on this one. There’s quite enough string in the cockpit already without adding seven more bits. And, while in boom furling does look attractive, for me its too reminiscent of the appalling old rotating boom mainsail furling system I had on my first yacht, a Folkboat. The sail shape one got on that in any but perfect conditions was sad to see.
The sailor who puts in an early reef is a happy sailor. And probably longer living. How often is one surprised at the improved performance that results from under-pressing the rig ? And, while there is a lot that can lengthen the time at the mast putting in a reef, shaking an unnecessary one out really is a matter of seconds.
In defence of modern in boom furling, the set is way better than it was in the bad old days of roller reefing mainsails. That said, my big problem with them is complexity and fragility. Probably fine for inshore sailing where if they break you can just take the main down and head for somewhere to wait for parts and with smooth water where you can fix it, but I would never take one offshore, and particularly not to the high latitudes. All this based on taking a yacht to Greenland with one.

I own a Outbound 46 hull#50. Would add the following. The hydraulic backstay is quite helpful reefing the Genoa. Put tension on that stay and she rolls up more easily. Unless you tune the rig with more tension on the solent stay then the Genoa stay when the backstay is untensioned you get headstay sag on the solent. You lose nothing upwind using the solent instead of the Genoa going upwind so the need to roll up the Genoa before tacking is a non issue as it ends up being a reaching or running sail. We stand single watches. I love having both the primaries (powered) and the headsail reefing lines an arms length away from the wheel. I can reef under control, by myself with no engine nor AP. Then go forward and deal with reefing the main. I can do it under Hydrovane. Not needing to bring anybody up from below is wonderful. I hate single line reefing on any boat. It better than in boom or in mast but not by much. If done get a Dutchman as well. That makes it easier to inch the main down and have both ends of the sail tension correctly as you can see what’s going on and the sail has no choice but to fold correctly. Outbound come single for first two and double for the third. Would think to get just two very deep reefs and make both double. I have the survey being done on Tuesday. Then she’s gone as we transition to a Norhavn. The Outbound is the best mom and pop blue water cruising boat there is imho.
I too am not a fan of single line reefing so I think your recommendation to go with two deef reefs each with two separate reefing lines would be a good one.

That’s how we went, but then as a comparatively heavy motorsailer, we tend to leave the full main up a little longer than some just to make the boat go. We have separate reefing lines, as well and have all halyards and related lines at the mast. We have preventers, staysail sheets, yankee jib sheets and occasionally, spinnaker sheets back to the winches (three pairs) in the aft cockpit position, where there is also end-boom mainsheeting (6:1) and a strong Garhauer traveller (3:1). Works for us to date. I have over the years become a touch suspicious about “convenience” unless the sea first makes its case.

I agree was many of your points and know by your article I am not going to convince you, but we love being able to put in and take out reefs in from the cockpit. We can easily put a reef in or shake a reef out in less than a minute on our 37 foot cruising boat. I have read Colin’s article and I think a single line for each reef is way too much friction. We use a second line to pull the tack into the right position at the goose neck. These lines on our boat are only 5/16. Each one is led from the reefing hook, through the reef tack crinkle to a carefully placed bullseye on the mast, through a pulley at the mast base and then back to a harken cam cleat next to my jammers. You never need to put this on a winch – the idea is to get the bullseye position such that you end up with the reef crinkle pulled into the goose neck at just the right position when the halyard is re-tensioned. The clew end is conventional – from a bowline positioned about 6 inches aft of where you could stretch out the foot of the sail at the reef point up through the reef clew cringle to pulleys at each end of the boom through a good block at the base of the mast and then to a jammer and winch at the cockpit. When putting in a reef we pull down on the tack line while easing the halyard. Don’t allow slack in the halyard – the jammer is cast off but the halyard is restrained by hand with a single turn around the winch. 2 or 3 times we will pause in this operation by locking the halyard jammer and pulling the slack out of all the other tack and clew reefing lines by hand. We have found that this is the secret to being able to complete the whole operation from the cockpit since minimizing slack loops prevents them getting caught up anywhere. We continue until the halyard is just past a mark on the halyard line and then put the tack line in the cam cleat. At night we shine a flashlight on the tack to make sure it is neatly pulled into the gooseneck and then tension the halyard on the winch. Once again take the time to take all the slack out of the other reef lines by hand. Put the clew reefing line on a winch and crank until you are happy with the foot and leach tension – you need to check this with a flashlight at night.
Our reefs can be put in in way less time than it takes to write about it quickly and safely from the cockpit without even having to put your jacket on. Because we can put in or shake out reefs in the main easily we do not procrastinate for a moment about reducing or increasing mainsail. Our record is 11 changes in a single 3 hour shift as a series or 20 minute squalls rolled through at night close to the equator on a passage from San Francisco to the Marquesas and the lone watchkeeper was busier than a one armed paper hanger reacting as the wind went up and down from 8 to 30 knots!
Sounds like a good system. And I agree that taking the slack out of the non-loaded reefing lines as you reef is important. We do the same at the mast.

Really glad to see you giving the Outbound a thorough look, John!
Having cruised full-time aboard an Outbound 46 from 2017–2019 (we no longer own the boat), I can report that the main halyard and reefing setup works exceptionally well. The only annoyance was, as you pointed out, somewhat poor ergonomics crouching under the dodger (I’m 6’3″). The dodger hatches are perfectly positioned (like everything else on the Outbound) so you can actually see the main while hoisting, reefing, and trimming.
I saw your response to Rob about working at the mast. I agree that the side decks and mast are “part of the working area of the boat”. On balance, considering all the factors, reefing from the cockpit gave us (my wife and me) more flexibility and more peace-of-mind than reefing at the mast, which we did on our previous boat (a Sabre 38).
Aside: I also appreciated how cockpit reefing lowered the behavioral “friction” of making the decision to reef. Leaving the cockpit (with all associated precautions) just feels… harder than staying in the cockpit. Reducing sail at the right time is one of the most critical components of safe and comfortable cruising, and I was glad I never had to “think twice” because I didn’t want to deal with leaving the cockpit. Perhaps that’s irrational, but so are we all 🙂 I think of it as behavioral systems engineering.
Interesting point on “behavioural” friction. It’s not a problem we have ever suffered from, probably because I actually like “ deck sports ” and as a ex-racer and sailmaker I can’t stand being under or over canvased, but I can certainly see that it could be an issue, particularly for people who have been subjected to poor deck layouts and therefore regard reefing as a huge chore, no matter how they do it.
That said, I think that this “behavioural friction” is something we should all work on overcoming and not give into or modify our boats to pander to it. In my experience, not getting out on deck regularly can lead to all kinds of problems, particularly being lazy about rigging proper preventers and generally checking things over from bow to stern at least twice a day, more often in heavy weather.
Don’t get me wrong, if you find in cockpit reefing works for you, that’s fine, it’s your boat, but if that leads to rarely leaving the cockpit for other vital functions, then I think it’s a mistake.

Perfect timing John.
After six weeks of hard work my right now my deck is a perfectly clear expanse of white. Almost literally a clean sheet of paper. (So far 60 litres of Jotun epoxies with another 16L of Hardtop AX to go.)
Up until this point I my general for the deck layout was heavily influenced by the majority opinion I kept encountering locally which was to run all the mainsail controls back to the cockpit. But because there is a major step in our coachroof which forces two 30 deg turns in all the lines, I was always a little apprehensive on friction. So after reading this article (and a similar one from Peter Smith) I’m inclined to follow your advice.
All my halyards can readily stay at the mast, but moving all the other mainsail lines, the reefs, topping lift, outhaul, cunningham and vang back to the mast creates quite a traffic jam around the base of the mast. Any hints on how best to organise particular brew of spaghetti?
The key to keeping that spaghetti organized is to keep all the reefing and outhaul lines on the boom, rather than lead them down to the deck. We have an article on that with photos here: https://www.morganscloud.com/2010/11/19/reefing-a-sailboat/
Note that since I wrote that, we changed from jammers to clutches.
The vang control is the exception to my rule, and should be lead aft to the cockpit. Or, on boats over about 30,000 lbs a hydraulic vang with control in the cockpit is a good solution.
Hi John and all, I was not going to wade in on this, but wish to underline a couple of points and make a suggestion. In my estimation, getting rid of friction is a safety issue and not merely convenience, in part because friction (among other things) causes skippers to hesitate doing the right thing. This is the case for a racing boat with strong crew, but far more the case for a cruising couple. Also, friction might mean that a job does not get done well: say a sloppy reef that hurts the sail and degrades sail shape and sailing efficiency. Finally, to often I suspect the push for electric winches etc. is a result of poor design and unnecessary friction in the system. An example is the retrofit of an electric main halyard winch before one installs slippery mainsail track (as well as adding low friction blocks that may be in the system). Getting rid of friction has a good start with slippery mainsail track and low friction blocks and wise design. Few boats are offshore ready as built/designed which is a shame as it is a subsequent expense in $$ and time that is not necessary. And we all like to think our boat is good-to-go from the get-go so it is hard to immediately replace new items. It would not be hard for manufacturers to get it right from the get-go at little additional expense. Slippery track allows one to raise the main almost the whole way from the mast if design allows for full body stretch to get your whole weight into play. This changes a few minutes winching “ordeal” into a few seconds exertion followed by a few turns by winch handle to tension: easily done whether at the mast or under the dodger. This is convenient and fast, but not necessarily a safety issue. The safety aspect comes when reefing is done easily and without hang-up, when reefing/dousing is accomplished going downwind in a breeze, and when dropping the main and it comes down like an express train. My boat came with in-cockpit reefing (1st 2 reefs with the third reef downhaul done at the mast) and we have made it work and like it: in part because either of us can quickly and efficiently do the first 2 reefs alone from the cockpit whereas going on deck at night in boisterous conditions, we wake the off-watch. (We do “deck tour” inspections at change of watch when both of us are awake and kitted up.) Reefing from the cockpit, for us, takes a good deal of prior preparation at the onset of the season: mainly ensuring that line markers are in the correct place on all reef lines and halyard for each reef. This gets us very close to a good reef, but sometimes takes a bit of fine-tuning as things settle down and stretch out as the sail fills. This is easily seen from the cockpit and is accomplished by tweaking the reef/halyard lines from the cockpit. As to the spaghetti that is so often mentioned as the major downside of in-cockpit reefing, our solution is to snake all “tails” down the companionway. This is only done when reefed down and accumulating lines. On Alchemy, this could be (when deeply reefed and using all lines for adjustment) up to nine lines: 2 reef downhauls, 3 reef outhauls, 1 halyard, 1 main sheet, and 2 traveler lines. (Sounds terrible, doesn’t it!) These tails then reside comfortably on our engine box ½ way down to the floor or, at times, on the floor next to the bottom step. Lines, stored in this manner, are always good to go without tangles or the need to uncoil and ensure they run free. The lines, being lead next to and held to the sides of the ladder, never interfere with safe access to the steps. There are times, of course, where we wish to close up and when that occurs, we can do so with the washboards in and the hatch mostly closed. Those fortunately rare times where we wish to be fully closed up, securing the tails in the cockpit so they are not in the way, but ready to be worked takes a bit of work, but is no big deal. I suspect not all companionway designs lend themselves to this solution, but it has worked a peach for us for decades, and may help with the “spaghetti” mess for some boats where cockpit reefing is chosen. My best, Dick Stevenson, s/v Alchemy Ps. It has not been mentioned, I believe, but I would guess that the size of one’s boat may play a part in the choice/comfort level of going on deck in boisterous conditions. Bigger boats are just a lot more stable and predictable in their motion, smaller boats livelier and quicker to react to a wave slap or wind burp.
I totally agree on adding a slippery mainsail luff track. Adding ours a few years after we bought the boat is definitely the change we have made with the largest benefit.
Great. I’ll implement that. I hadn’t thought of double ending the reefing lines so that you can work from both sides.
I’ve also had a good yarn with a local with a very similar boat and 30 years of continuous live on the boat experience. He made an interesting observation on the lines led aft vs at the mast debate; his decision point is ‘if you an offshore sailor then reef at the mast’. His reasoning is that the longer passage the more likely something will go wrong, the more important it is you are well accustomed to leaving the cockpit in adverse conditions. And that applies to the whole crew. At the same time he acknowledges there is no absolute answer, that like everything else the decision is a compromise, and others will lead the lines aft for reasons that work for them.
He backs this up with good lifelines and a solid mast pulpit. Both of which I’m going to implement as well as per your articles in the past.
Thats an interesting way to look at the decision. But the more I think about it the more I worry that the trend to aft lines combined with cockpit enclosures is producing a generation of sailors who regard the deck as a scary place to be avoided, which I think is a very worrying trend. I have an article brewing on that.
That said, I’m sure there are sailors who are comfortable on deck and have the lines lead aft, which is all good.
Point being that I’m pretty sure that not going out on deck regularly is actually more dangerous than doing so.
Hi John, You write: “Point being that I’m pretty sure that not going out on deck regularly is actually more dangerous…” Good point. Take, for example, the learning curve for working the boat with harnesses attached so as to not get tangled or so frustrated as to unclip. If this is not done with regularity, such as during regular deck tours, then it will be more difficult when it comes to needing to work the boat in boisterous conditions. Or using the deck tour time to find handholds when heeled over 15-20 degrees so that your hand knows instinctively where they are at night with spray in your face. My best, Dick Stevenson, s/v Alchemy

The cockpit enclosures bother me. Particularly in our tight, high-traffic waters, I think they take away too much visibility and too much situational awareness. Three times out of four, if I have to take evasive action despite being the stand-on vessel, I’ll notice a full cockpit enclosure on the boat (power or sail) that didn’t see me.
We actually took our soft dodger down entirely last week and are finding that, in our local conditions (where waves do *not* break over the deck), the extra visibility is way more valuable than the shelter.
All lines led aft often makes for a real mess of spaghetti (read: tripping hazard) around the companionway. Trip-and-fall is, IMHO, likely a bigger risk than slipping overboard from the deck. I’m surprised by how many designers & builders think that a line just ends at the winch, and forget about the 50 feet hanging off beyond that. (It’s an issue at the mast, too; a lot of boats seem to have no good place to put coils of excess halyard, reefing line, etc. once the lines are tensioned.) I also see a lot of boats with no good places to clip a harness tether or rig a jackline, and am starting to think that this particular issue needs to be addressed at the “textbooks and engineering design standards” level.
I agree on the dangers of cockpit enclosures. The boat that nearly hit me last summer was being run from a totally buttoned up cockpit enclosure: https://www.morganscloud.com/2019/08/24/dont-alter-course-to-port/
That said, I think that cockpit enclosures can be used safely, like most things, as long as we keep them open when we should so we can see and hear.
Bottom line, buttoned up cockpit enclosures are just another manifestation of the fundamental problem: putting comfort ahead of safety.

I wonder if it’s partly related to the boat’s seakindliness. A large, long-for-its-displacement yacht like MC has a much gentler action at sea than a lightweight, beamy, modern, race-inspired, accomodation-maximised-for-LOA “cruiser.” Leaving the cockpit in a small light boat is a lot scarier than doing it on a large heavy one.
You might be right, but the Outbound 46 would not fall into that class.
Also, my thinking would be don’t own a boat, at least for offshore sailing, that scares you so much that you don’t want to leave the cockpit.

Regarding backstay tensioners – I am pondering my head how to handle twin (not split) backstays. For split backstays you might use a tensioner car as you had linked to, but this will not be possible for twins. I notice that MC has twin backstays, how did you set it up to allow symmetric tensioning/slacking them?
The best solution is two hydraulic rams plumbed to the same pump. Set up this way, they automatically equalize tension between the two stays.

John, thank you for teaching us North Americans a new phrase today “poor diddums”,I like that.
As a retired rigger, if is even possible to be one, I could not agree with you more on not leading everything back to the cockpit. Very expensive and all that hardware sends friction through the roof. Just leave it on the mast where it belongs. My customers would say, but it’s not safe to go out of the cockpit at night or when the wind starts kicking up. If it’s not safe to leave the cockpit, you need to make it safe to leave the cockpit. You need a good Jack line system such as the one you described. You need a good hand holds so no matter where you are on deck there is something to hold onto. Solid hand rails rather than stanchions and wire. Best if you don’t have to bend over to find them. Handrails that when you stick your hand out that’s where they are. At the very minimum some kind of a deck edge so you don’t go sliding off the deck, bulwarks are even better. Mast bars that allow you to wrap a leg around to free up both hands are a great addition.
When it comes to hoisting the mainsail, or reefing it. A low friction system is the only way to go.. Finally broke down put a Harken bat car system on including bearings on the intermediate slides. Easy to raise the main, very easy to reef. Does not matter what the wind direction it is when reefing. Mark the reef points on the halyard with whippings so that you can feel them in the dark. It’s always a chore when you drop the sail a lot farther than you needed to. Only to have to winch it back up when it’s full of wind.
The photo of the mast base turning blocks illustrates one of my little pet peeves. The shackles are not safety wired. After having the main sheet blocks, come adrift from the traveler one day, thankfully in light air. I safety wire every shackle not taken on and off on a regular basis. Including roller furling headsail shackles.
I could not agree more!
And I agree on shackles too. That said, for roller furlers and the like I have had good luck with the self locking shackles that have little flats on the non-threaded side of the pin hole that stop the pin backing out.
Hi David and John, And I have had good luck with a little dab of silicone on the threads. I don’t like sharp wire ends about near sails or where line can be dragged over them like at the base of the mast. It is arguable that my skill at tucking them out of trouble could use improvement. Dick Stevenson, s/v Alchemy

Hello John! I have enjoyed reading your many articles over the past few years. This deck layout one is an excellent discussion and observations. I went through the same process several years ago before purchasing a new boat. I settled on an X-Yacht Xc38 with a John Mast. It has an outstanding deck layout whereby we sail short handed all the time and I have sailed in several long distance single handed races with some horrible weather. I have added inboard jacklines which increases safety when going to the mast (very infrequently) or the foredeck when hoisting the asymmetrical spinnaker or Code 0. I installed a rope clutch on the mast for single handed hoisting of the spinnaker and Code 0 sails. We did put an electric winch for the mainsail halyard! It is a well made offshore cruiser/racer.
Hi Stanley,
I have long been a fan of X-Yacht. Looks like a really fun boat.

I do like lines and halyards at the mast for many reasons explained here. My vintage Tartan 40 has everything except jib halyard led to cockpit. A tides marine track allows me to hoist main to nearly masthead from cockpit. And better yet, a clam cleat installed on mast a few feet below the main halyard exit allows me to even more easily hoist main from the mast, place halyard in clam cleat, and then pull in slack and tension from cockpit. Clam cleat releases and stays well clear once line is led through sheaves. For my use this is enough of a “best of both worlds“ compromise that I won’t go through trouble of moving winches and lines. And I do like being able to drop main from behind dodger in a squall into the cradle cover. I recommend everyone with aft led main halyard at minimum install the clam cleat as it greatly improves ease of raising main particularly with lazy jacks.
Hi Michael,
That sounds like a good idea.

The debate of cockpit versus mast based reefing is an interesting one. In the compromises of boats, our boat came with everything done from the cockpit and it would be very difficult to retrofit to mast based reefing so I have never really considered it. This works okay for us as the loads are relatively light due to being a smaller boat and we do not have a big enclosure so vision is not overly impaired (the boat came with a full cockpit enclosure that didn’t even feel safe for motoring so it has never been used). Like Dick mentions above, we send reef line tails down the companionway in most conditions and it works well. To me, the best part about this setup is that it is safe and easy to reef with a single person on deck when there are lobster pots around preventing long absences from the autopilot controls. I suppose that you could get an autopilot remote and bring it to the mast but in the cockpit, it is easy to hit a course change on the autopilot in the middle of reefing. One other thing that I like is that I can get the jib down (hank-on) into a position where it is secure enough for a little bit while steering simply using a downhaul that is led aft, this is super helpful coming into harbors.
If we had our boat setup as a primarily offshore boat, I suspect that I would prefer to do everything at the mast and of boats that I have sailed on, generally the ones done at the mast are better. The issue with pot buoys would go away and the clutter in the cockpit would be a bigger deal. Similarly, the position of the primaries may well be dictated by what the boat is being used for. Offshore, most people don’t hand steer and there tend to be very few people on the boat making forward in the cockpit a good option. Coastal, many more people will be hand steering and there are often people sitting in the way of winches that are further forward. Our boat actually has the winches further forward and when sailing solo, I would strongly prefer having them aft. It is especially the case when short tacking somewhere when I end up steering with 1 foot so that I can reach both the wheel and the winch, otherwise I would need to use the autopilot which is not my preference (I know that I am weird on this one, even offshore I hand-steer whenever we are sailing and there aren’t other things requiring attention, I suspect this comes from growing up on boats without windvanes or autopilots).
One thing I didn’t see discussed with lines led aft is what it does to winch ergonomics. I find that I have no problem hand hauling up the main most of the way on up to mid 40’ers with lines led aft assuming that you can stand back behind the dodger and not be hunched over. The problem comes once the winch gets involved. The ergonomics under a dodger tend to be terrible and in many cases where the dodger was not part of the original design, you can’t even get a full rotation on the winch handle. If you were able to raise the sail most of the way by hand, then this isn’t a huge deal. After one of the discussions on this site in the last year, we procured a ratcheting winch handle and it makes this much better, thanks for pointing those out. Where it gets really bad is sending someone up the mast. I have sailed on boats where cranking a 125lb person to the top of the mast completely wears out a big grinder type due to the poor ergonomics. On our own boat, if my wife is going up, I use the halyard winch as a turn of direction and crank her up with a primary. If I am going up, jumaring is the name of the game provided that we are in a calm enough spot. With halyards at the mast, I find all of this a ton easier.
And I agree with all of the other parts of the article too.
A good analysis, as usual. By the way, I did mention the problem of winch ergonomics in the post, although not as clearly as you did:
Worse still, on the Outbound we will be forced to bend down by the hard dodger—this is an ergonomic nightmare. The result of all this inefficiency is that the main must be ground most of the way up on a winch, which makes an electric halyard winch near-mandatory.
As to winch position, as you say it depends on how often you steer. That said the Outbound does not make sense to me since when steering the mainsheet is way too far to reach (under the dodger), and when not steering the jib winches are a ways from both the mainsheet and the dodger. To me an idea short handed set up is so that one can reach both main and jib sheet winches from whatever our preferred position is. Been thinking about this a lot for our next boat which we will be sailed inshore a lot, steering more, and quite often single handed.
Hi John, Sorry, I had missed that your statement included winch ergonomics the first time around.
If you are short tacking up a channel, then having the main winch less accessible is fine but for other changes, you are right that having the mainsheet nearby is helpful. What we do which isn’t perfect is to play the traveler which I can control from behind the helm thanks to long tails but this requires a long traveler with low loads and even then, once you get to broad reaching, you need to use the sheet and you need to use the sheet if you want to change twist. The other thing to keep in mind that I can think of is what you are doing during a chicken gybe where having a single person handling all sheets can sometimes be problematic. On smaller boats, I often find myself standing at the wheel, mainsheet in hand with 1-2 turns on the winch. Once you practice a bit, you can get really reliable at flicking a turn off from 10′ away provided there isn’t too much load on the line, putting another on is also doable but I find it sometimes takes multiple tries.
I could not agree more about having two sets of tracks for headsails. We have inboard and reaching tracks for our working jib, staysail and storm jib. The one thing that has always had me see the dollar’s flying off the sails was when changing from one track to the other or when adjusting our pin cars.
While building our steel boat, I really wanted to use the adjustable cars, but they were too expensive at the time. All of this while working full time and raising a family. Then there was the epiphany one day a month ago. I took a piece of 6mm spectra cored double braid 2 m long. Stripped off 60 cm of cover off. Spliced in a 6 cm eye in. Whip the other end and that’s all you need. To use, pass the eye around something good and strong that is within a short distance from the loaded car. Examples, stantions welded to the deck, perforated toe rails, other sheeting cars even if the are in use. Pass the end through the eye. Take the other end to the loaded sheet forward of the car and tie it to the sheet using a rolling hitch. Snug it up, ease the sheet to get the load off the car. Adjust the car, move from one track to another, whatever you need to do. Sheet her home. You might have a bit of leech flutter, but absolutely no flogging! It’s only been a few weeks since I put this together. And have found many uses well beyond my original application. To store it while keeping it handy. I fold it in half twice then luggage tag it to a cabin top handrail. Just makes you wonder sometimes why did it take me 18 years to figure something so simple and cost effective to make and use.
Good way to save the sails. As you say, flogging is terrible for them.
We used to do something very like it back in the day when changing headsails while racing. Called it a “changing sheet”.

It seems to me that it is much more important how the lines are lead and how friction is minimized than whether the lines are lead aft. That means good hardware – blocks and sailtracks, and having only one 90 degree-bend at the mast-foot. A 30 or 45 degree redirection well executed doesn’t add that much friction. That also means avoiding single-line reefing and having a winch setup that is ergonomically sound.
TP 60ies that go around the world non-stop have everything led aft and it clearly works single-handed in very rough conditions. So do Class 40ies, though these “only” do 20 to 30 days non-stop. So do the (Volvo) Ocean race boats and the line-handling works like a charm (taking advantage of multi-person grinders, though).
Even so, I would go forward twice a day and check everything thoroughly, but I would do so during the day when I chose the time, not when I have to – possibly in the worst of times.

Hi John, Great article as always.
Curious about your take on the mainsheet routing on certain Amel Ketches where the traveler is forward of the dodger and the sheet is run aft over the dodger and enclosure to the mizen mast. (links/image below)
Also, are the effects of a traveler greatly affected when raised? Say, if the Boreal in your example had a flat dodger with traveler or like the arch mounted traveler seen on certain Hunters.
https://2.bp.blogspot.com/-BhQCF6mH238/W_8EN5MTOPI/AAAAAAABZqw/KSNjlEqzaQUVeBfzAbHCsLkTBMn65-lIwCLcBGAs/s1600/2017.10%2BGrenade%2BMartinique%2B%25289%2529.JPG
https://itboat.com/uploads/ae64/f5e25fdb8353.jpg

It seems a pity to have a nice safe traveler position like that and then lead the mainsheet in such a way as it can garrotte a crew member. If it were me designing the system I would go with a “German Mainsheet system” with the track where it is and the mainsheet double ended and lead back from blocks below the gooseneck to winches either side of the cockpit.
And yes, raising the mainsheet traveler closer to the boom enables windward sheeting with a shorter track.

Hey John, New to AAC, loving it so far, trying to soak up as much as I can. I am looking to re-rig my 1980 Ingrid 38 ketch, following the simple is best approach you teach here. We are preparing to sail her from San Diego to Japan (where we live) across the south pacific. Do you know any good riggers in the Southern California area? Boat is in San Diego.

Early this year I did a major refit of my Islander 36 with the excellent support of the Ventura Harbor Boatyard. Work completed included a rebuilt mast step, new cap/intermediate shroud chain plates, and new standing rigging. The boatyard recommended a local rigger, Kim Weir, and I was extremely pleased with his work. Without hesitation, I recommend the services of VHBY and Kim Weir.
Thanks for coming up on that.
Sorry, I have never sailed on the west coast, so don’t have any experience with riggers there. That said, Brian Toss’s old shop is still in business run by guys Brian taught, so that might be an option, although a ways from you: http://briontoss.com
Also see Steve’s comment.

No one has mentioned self-tacking jibs. Having owned two boats with them the thought of going back to winching every time you tack -particularly when singlehanded- fills me with horror. Huge genoas are, in any case, only a relic from ancient rating rules. Whether a jib boom ( particularly the internal boom as used on Freedom sloops) or jib traveller is used, short tacking becomes an effortless exercise. A small jib on a traveller can be trimmed more easily and efficiently than a Genoa. The mainsail is always the prime driver; the performance gain from oversized headsails is less than you think, and in these days of easily deployed offwind headsails is not a consideration off the wind.
I agree with most all you say, except I have never been a fan of jib booms, probably something to do with being naturally clumsy so I don’t need anything else to trip over on the foredeck!
Anyway, just loving sailing our J/109 with her big mainsail and blade jib.
On an otherwise good boat would you recommend moving the lines from the cockpit to the mast if you were going to have an e-wincher anyway, which would presumably overcome the extra friction while still giving the operator enough feel to know if something was going wrong?
Way too many variables to answer that: boat, usage, crew, how well the boat is set up with lines aft, and on it goes. That said, my 109 is lines aft and the wincher makes all the difference to practicality so I have no plans to change. That reminds me, I should do a tip on why.
High School and College Sailors - 15% Off Apparel & Accessories - LEARN MORE
- Call Us +1-503-285-5536
- Sign in & Register
- Recently Viewed
General Parts
General Parts, Fittings, and Accessories for Small Sailboats. We offer a full range of sailboat hardware, blocks, cleats, shackles, dollies and trailers, accessories, and more. These parts are not necessarily specific to any one model of sailboat, but rather are general fittings that often work on a variety of boats for a variety of applications.

- Qty in Cart

Ronstan Horn Cleat 6-1/2 Inch

Ronstan Horn Cleat 5 Inch

Ronstan Horn Cleat 4 Inch

Fabric Guard Waterproofing Spray

Dynamic Dollies Dock Cradle

Dynamic Combo Rail System Rack Over and Spar Deck Double Tongue Dolly

Dynamic Combo Rail System Rack Over and Spar Deck Single Tongue Dolly

Dynamic Combo Rail System Rack Over Double Tongue Dolly

Dynamic Combo Rail System Rack Over Single Tongue Dolly

Dynamic Combo Rail System Double Tongue Dolly

Dynamic Combo Rail System Single Tongue Dolly

Gill Marine Tool

Gill Harness Rescue Tool

ILCA Cunningham / Outhaul Upgrade Kit Harken

ILCA Laser Vang Upgrade Harken

Rooster Carbon Laser Tiller
- Total: items /
- Add all to cart
Adding your products to cart
Subscribe to our newsletter.
Sign up for our newsletter to receive exclusive discounts, new product announcements, and upcoming sales.
Currency: GBP
- Worldwide Delivery
Mooring Warps and Mooring Lines
- LIROS 3 Strand Polyester Mooring Warps
- LIROS Green Wave 3 Strand Mooring Warps
- LIROS Braided Dockline Mooring Warps
- LIROS Handy Elastic Mooring Warps
- Marlow Blue Ocean Dockline
- LIROS Super Yacht Mooring Polyester Docklines
- 50 metre / 100 metre Rates - Mooring
Mooring Accessories
- Mooring Compensators
Mooring Strops and Bridles
- V shape Mooring Bridles
- Y shape Mooring Bridles
- Small Boat and RIB Mooring Strops
- Mooring Strops
- Mooring Strops with Chain Centre Section
Mooring Assistance
- Coastline Bow Thruster Accessories
- Max Power Bow Thrusters
- Bonomi Mooring Cleats
- Majoni Fenders
- Polyform Norway Fenders
- Ocean Inflatable Fenders
- Dock Fenders
- Fender Ropes and Accessories
Mooring Components
- Mooring Swivels
- Mooring Shackles
- Mooring Cleats and Fairleads
- Mooring Buoys
Mooring Information
- Mooring Warps Size Guide
- Mooring Lines - LIROS Recommended Diameters
- Mooring Rope Selection Guide
- Mooring Warp Length and Configuration Guide
- How to estimate the length of a single line Mooring Strop
- Mooring Ropes - Break Load Chart
- Mooring Compensator Advisory
- Rope Cockling Information
- Fender Size Guide
- Majoni Fender Guide
- Polyform Norway Fender Inflation Guide
- More Article and Guides >
Anchor Warps Spliced to Chain
- LIROS 3 Strand Nylon Spliced to Chain
- LIROS Anchorplait Nylon Spliced to Chain
Anchor Warps
- LIROS Anchorplait Nylon Anchor Warps
- LIROS 3 Strand Nylon Anchor Warps
- Leaded Anchor Warp
- Drogue Warps and Bridles
- 50 / 100 metre Rates - Anchoring
- Aluminium Anchors
- Galvanised Anchors
- Stainless Steel Anchors
Calibrated Anchor Chain
- Cromox G6 Stainless Steel Chain
- G4 Calibrated Stainless Steel Anchor Chain
- Lofrans Grade 40
- MF DAMS Grade 70
- MF Grade 40
- Titan Grade 43
- Lewmar Windlasses
- Lofrans Windlasses
- Maxwell Windlasses
- Quick Windlasses
- Windlass Accessories and Spares
Chain Snubbers
- Chain Hooks, Grabs and Grippers
- Chain Snubbing Bridles
- Chain Snubbing Strops
Anchoring Accessories
- Anchor Connectors
- Anchor Trip Hooks and Rings
- Anchoring Shackles
- Bow Rollers and Fittings
- Chain and Anchor Stoppers
- Chain Links and Markers
Anchoring Information
- How To Choose A Main Anchor
- Anchoring System Assessment
- Anchor Chain and Rope Size Guide
- The Jimmy Green Guide to the Best Anchor Ropes
- What Size Anchor Do I Need?
- Anchor to Chain Connection Guide
- How to Choose Your Anchor Chain
- How to Establish the Correct Anchor Chain Calibration?
- Calibrated Anchor Chain - General Information
- Calibrated Anchor Chain Quality Control
- Calibrated Chain - Break Load and Weight Guide
- Galvanising - Managing Performance and Endurance expectation
- Can Galvanised Steel be used with Stainless Steel?
- Windlass Selection Guide
- More Articles and Guides
Stainless Steel Wire Rigging and Wire Rope
- 1x19 Wire Rigging
- 50 / 100 metre Rates - Wire and Fibre
- 7x19 Flexible Wire Rigging
- Compacted Strand Wire Rigging
Dinghy Rigging
- Stainless Steel Dinghy Rigging
- Dinghy Rigging Fittings
Fibre Rigging
- LIROS D-Pro Static Rigging
- LIROS D-Pro-XTR Fibre Rigging
- DynIce Dux Fibre Rigging
- Fibre Rigging Fittings
Wire Terminals
- Cones, Formers, Wedges, Ferrules, Rigging Spares
- Hi-Mod Swageless Terminals
- Sta-Lok Swageless Terminals
- Swage Terminals
Wire Rigging Fittings
- Turnbuckle Components
Rigging Accessories
- Rigging Chafe Protection
- Headsail Reefing Furlers
- Plastimo Jib Reefing
- Selden Furlex Reefing Gear
Furling Systems
- Anti-torsion Stays
- Straight Luff Furlers
- Top Down Furlers
Guard Wires, Rails and Fittings
- Guard Rail Fittings
- Guard Rails in Fibre and Webbing
- Guard Wire Accessories
- Guard Wires
Standing Rigging Assistance
- Replacing your Furling Line
- Fibre Rigging Break Load Comparison Guide
- More Articles and Guides >
- Cruising Halyards
- Performance Halyards
- Dinghy Halyards
Rigging Shackles
- Captive and Key Pin Shackles
- hamma™ Snap Shackles
- Soft Shackles
- Standard Snap Shackles
- Wichard Snap Shackles
Classic Ropes
- Classic Control Lines
- Classic Halyards
- Classic Sheets
- Cruising Sheets
- Performance Sheets
- Dinghy Sheets
Sail Handling
- Boom Brakes and Preventers
- Lazy Jack Sail Handling
- Rodkickers, Boomstruts
- Sail Handling Accessories
50 / 100 metre Rates - Running Rigging
- 50 / 100 metres - Cruising Ropes
- 50 / 100 metres - Dinghy Ropes
- 50 / 100 metres - Performance Ropes
Control Lines
- Cruising Control Lines
- Performance Control Lines
- Dinghy Control Lines
- Continuous Control Lines
Running Rigging Accessories
- Anti-Chafe Rope Protection
- Lashing, Lacing and Lanyards
- Mast and Boom Fittings
- Rope Stowage
- Sail Ties and Sail Stowage
- Shock Cord and Fittings
- LIROS Ropes
- Marlow Ropes
Running Rigging Resources
- Running Rigging Rope Fibres and Construction Explained
- How to Select a Suitable Halyard Rope
- How to select Sheets and Guys
- Dyneema Rope - Cruising and Racing Comparison
- Dinghy Rope Selection Guide
- Rope Measurement Information
- Running Rigging - LIROS Recommended Line Diameters
- Running Rigging Break Load Comparison Chart
- Colour Coding for Running Rigging
- Selecting the right type of block, plain, roller or ball bearing
- Recycling Rope
Running Rigging Glossary
Plain bearing blocks.
- Barton Blocks
- Harken Element Blocks
- Low Friction Rings
- Selden Yacht Blocks
- Wichard MXEvo Blocks
- Wooden Yacht Blocks
Control Systems
- Ratchet Blocks
- Stanchion Blocks and Fairleads
- Snatch Blocks
- Genoa Car Systems
- Traveller Systems
- Block and Tackle Purchase Systems
Ball Bearing Blocks
- Harken Ball Bearing Blocks
- Selden Ball Bearing Blocks
Roller Bearing Blocks
- Harken Black Magic Blocks
- Selden Roller Bearing Blocks
Deck Fittings
- Bungs and Hatches
- Bushes and Fairleads
- Deck Eyes, Straps and Hooks
- Pad Eyes, U Bolts and Eye Bolts
- Pintles and Gudgeons
- Tiller Extensions and Joints
- Harken Winches, Handles and Accessories
- Barton Winches, Snubbers and Winchers
- Lewmar Winches, Handles and Accessories
- Winch Servicing and Accessories
Clutches and Organisers
- Barton Clutches and Organisers
- Spinlock Clutches and Organisers
- Lewmar Clutches
- Harken Ball Bearing Cam Cleats
- Barton K Cam Cleats
Deck Hardware Support
- Blocks and Pulleys Selection Guide
- Barton High Load Eyes
- Dyneema Low Friction Rings Comparison
- Seldén Block Selection Guide
- Barton Track Selection Guide
- Barton Traveller Systems Selection Guide
- Harken Winch Selection Guide
- Karver Winch Comparison Chart
- Lewmar Winch Selection Guide - PDF
- Winch Servicing Guide
Sailing Flags
- Courtesy Flags
- Red Ensigns
- Blue Ensigns
- Signal Code Flags
- Flag Staffs and Sockets
- Flag Accessories
- Flag Making and Repair
- Webbing only
- Webbing Soft Shackles
- Webbing Restraint Straps
- Webbing Sail Ties
- Sail Sewing
- PROtect Tape
Fixings and Fastenings
- Screws, Bolts, Nuts and Washers
- Monel Rivets
Hatches and Portlights
- Lewmar Hatches
- Lewmar Portlights
- Fids and Tools
- Knives and Scissors
General Chandlery
- Carabiners and Hooks
- Antifouling
Flag Articles
- Flag Size Guide
- Bending and Hoisting Methods for Sailing Flags
- Courtesy Flags Identification, Labelling and Stowage
- Courtesy Flag Map
- Flag Etiquette and Information
- Glossary of Flag Terms and Parts of a Flag
- Making and Repairing Flags
- Signal Code Message Definitions
Other Chandlery Articles
- Anchorplait Splicing Instructions
- Antifoul Coverage Information
- Hawk Wind Indicator Selection Guide
- Petersen Stainless - Upset Forging Information
- Speedy Stitcher Sewing Instructions
- Thimble Dimensions and Compatible Shackles
Jackstays and Jacklines
- Webbing Jackstays
- Stainless Steel Wire Jackstay Lifelines
- Fibre Jackstay Lifelines
- Jackstay and Lifeline Accessories
Lifejackets
- Crewsaver Lifejackets
- Seago Lifejackets
- Spinlock Lifejackets
- Children's Life Jackets
- Buoyancy Aids
Floating Rope
- LIROS Multifilament Polypropylene
- LIROS Yellow Floating Safety Rope
Guard Wires, Guardrails and Guardrail Webbing
Lifejacket accessories.
- Lifejacket Lights
- Lifejacket Rearming Kits
- Lifejacket Spray Hoods
- Safety Lines
Seago Liferafts
- Grab Bag Contents
- Grab Bags and Polybottles
- Liferaft Accessories
- Danbuoy Accessories
- Jimmy Green Danbuoys
- Jonbuoy Danbuoys
- Seago Danbuoys
Overboard Recovery
- Lifebuoy Accessories
- Purchase Systems
- Slings and Throwlines
Safety Accessories
- Fire Safety
- Sea Anchors and Drogues
Safety Resources
- Guard Wires - Inspection and Replacement Guidance
- Guard Wire Stud Terminal Dimensions
- Webbing Jackstays Guidance
- Webbing Jackstays - Custom Build Instructions
- Danbuoy Selection Guide
- Danbuoy Instructions - 3 piece Telescopic - Offshore
- Liferaft Selection Guide
- Liferaft Servicing
- Man Overboard Equipment - World Sailing Compliance
- Marine Safety Information Links
- Safety Marine Equipment List for UK Pleasure Vessels
Sailing Clothing
- Sailing Jackets
- Sailing Trousers
- Thermal Layers
Leisure Wear
- Accessories
- Rain Jackets
- Sweatshirts
Sailing Footwear
- Dinghy Boots and Shoes
- Sailing Wellies
Leisure Footwear
- Walking Shoes
Sailing Accessories
- Sailing Bags and Holdalls
- Sailing Gloves
- Sailing Kneepads
Clothing Clearance
Clothing guide.
- What to wear Sailing
- Helly Hansen Mens Jacket and Pant Size Guide
- Helly Hansen Womens Sailing Jacket and Pant Size Guide
- Lazy Jacks Mens and Womens Size Charts
- Musto Men's and Women's Size Charts
- Old Guys Rule Size Guide
- Sailing Gloves Size Guides
- Weird Fish Clothing Size Charts
The Jimmy Green Clothing Store
Lower Fore St, Beer, East Devon, EX12 3EG
- Adria Bandiere
- Anchor Marine
- Anchor Right
- August Race
- Barton Marine
- Blue Performance
- Brierley Lifting
- Brook International
- Brookes & Adams
- Captain Currey
- Chaineries Limousines
- Coastline Technology
- Colligo Marine
- Cyclops Marine
- Douglas Marine
- Ecoworks Marine
- Exposure OLAS
- Fire Safety Stick
- Fortress Marine Anchors
- Hawk Marine Products
- Helly Hansen
- International
- Jimmy Green Marine
- Maillon Rapide
- Mantus Marine
- Marling Leek
- Meridian Zero
- MF Catenificio
- Ocean Fenders
- Ocean Safety
- Old Guys Rule
- Petersen Stainless
- Polyform Norway
- PSP Marine Tape
- Sidermarine
- Stewart Manufacturing Inc
- Team McLube
- Technical Marine Supplies
- Titan Marine (CMP)
- Ultramarine
- Waterline Design
- William Hackett
Clearance LIROS Racer Dyneema £55.08
Clearance Folding Stock Anchor £123.25
Clearance Sarca Excel Anchors £294.00
Clearance LIROS Herkules £0.00
Clearance Barton Size 0 Ball Bearing Blocks - 5mm £0.00
Clearance Marlow Blue Ocean® Doublebraid £18.48
Mooring Clearance
Anchoring clearance, standing rigging clearance, running rigging clearance, deck hardware clearance, chandlery clearance, safety clearance, sailboat rigging can be divided in to 2 categories:.
Standing Rigging - the wires and ropes that hold up the mast, also known as shrouds or stays.
Running Rigging - the ropes (and wires) that control the sails on a yacht.
There are a large number of different terms that cover the use for which each rope is employed.
The most common generic terms are sheets and halyards.
Normally attached to the clew of the sail and control the shape and angle to the wind - each individual sheet is identified by the name of the sail as a prefix e.g. Jib sheets, genoa sheets, yankee sheets, staysail sheets, code zero sheets, gennaker sheets, cruising chute sheets, mainsheets, mizzen sheets - where these are a pair, they may also be classified as port or starboard. Spinnaker Sheets are used in conjunction with Spinnaker Guys and a spinnaker pole to control the shape of the spinnaker on either gybe.
Attached to the head of a sail and used to haul a sail up the mast - in the same way as sheets, each halyard is identified by the name of the sail as a prefix e.g. main halyard.
Sheets and halyards are part of a more generic category: Control Lines or a little more obscurely, Preventers. Control Lines include sheets and halyards and all the other ropes and wires that contribute to the efficient mangement of a yacht's sail area. A rope that stops an accidental gybe is commonly referred to as a preventer. However, most of the ropes that comprise a yacht's running rigging can be described as preventers i.e. a rope that is preventing something or control lines i.e. a rope that is controlling something.
Control Lines:
Tack Line - attached to the tack of a sail to make the length of the luff adjustable - common on loose footed reaching/running headsails e.g. gennakers but also used on more traditional rigs e.g. dipping lugsails
In Hauler or Tweaker - attached to a headsail (jib/genoa/yankee/code zero) sheet and used to bring the angle of the lead nearer to the centreline than the normal setting.
Barber Hauler - attached to a headsail sheet and used to create more downward pressure and generally from a point further outboard than the normal fairlead setting.
Downhaul or Cunningham - attached to the tack of a mainsail and used to create tension in the luff.
Kicker or Vang - diagonal line or purchase system (block and tackle) from base of mast to a point on the underside of the boom - used to create downward tension on the boom and subsequently the leach of the sail.
Outhaul - generally attached to the clew of a mainsail to adjust the foot tension.
Reefing Line or Reefing Pennant - Lines reeved through the boom and the mainsail to facilitate a reduction in mainsail area.
Lazyjack Line - used for guiding and controlling the mainsail as it is dropped.
Running Backstays or Checkstays - adjustable version of the backstay, generally consisting of a very low stretch standing part (single line) attached to a purchase system for adjusting the tension.
Preventer - line deployed to prevent the mainsail boom from accidentally gybing or control the speed of the boom's transition during a gybe.
COMMENTS
Melges 24 Parts and Deck Hardware. Melges 24 Running Rigging. Melges 24 Standing Rigging. Optimist Sailboat Parts. Santana 20 Sailboat Parts. Santana 20 Adjustable Backstay Components. Santana 20 Adjustable Checkstay Components. Santana 20 Genoa & Jib Sheeting Systems. Santana 20 Mainsheet Traveler.
The hull is what most people would consider 'the boat'. It's the part that provides buoyancy and carries everything else: sails, masts, rigging, and so on. Without the hull, there would be no boat. The hull can be divided into different parts: deck, keel, cabin, waterline, bilge, bow, stern, rudder, and many more.
Inject about 50 percent of the epoxy first. This will help wet out the cloth. Using a large cable tie, stiff wire, or similar tool, push 3/4" x 2" strips of 6-ounce fiberglass cloth into the epoxy-saturated hole. You can fit 2-4 strips in the smallest holes and 3-6 strips into larger fastener holes.
When it's time to upgrade deck hardware, cruising sailors can reap the benefits of sailhandling gear developed for high-powered racing sailboats. As a lifelong racing sailor, I'm well familiar with the go-fast, lightweight sailhandling hardware and line favored by serious buoy chasers. These come in myriad sizes and setups, but they often ...
asa 103 education Sailing Made Easy. Understanding the deck of a sailboat is all part of learning to sail. Essentially, the deck of a boat is both your office and your supply cabinet, from the helm, to the cockpit and stowages, the sidedeck, foredeck where the anchor is stored, and obstacles on the deck that need to be navigated as you sail.
Know How: Deck hardware. SAIL Editors. Updated: Aug 2, 2017. Original: Dec 14, 2016. Whether you enjoy cruising or racing, friction is never your friend. Fortunately, the marine industry offers an incredible variety of low-friction hardware to make your time afloat more enjoyable. Blocks—the age-old friend to sailors the world over—are one ...
Our experienced representatives can assist you in finding the perfect products for your boat. They are here to help whether you are a seasoned sailor or just starting out. Can't find what you're looking for? Let us help. 206-632-4462. Email. Shop sailboat parts and hardware from Fisheries Supply, including gudgeon pintle sets, Harken blocks ...
At MAURIPRO Sailing we strive to be your ultimate source for sailboat hardware. Whether you are looking for Sailboat blocks, Boom Vangs, cam cleats, or other deck hardware, you can find it here. We offer technical assistance to help you outfit your boat with the right hardware to match your sailing needs. Selecting Replacement Sailboat Hardware.
A sailboat's standing rigging is generally built from wire rope, rod, or occasionally a super-strong synthetic fibered rope such as Dyneema ®, carbon fiber, kevlar or PBO. 1×19 316 grade stainless steel Wire Rope (1 group of 19 wires, very stiff with low stretch) is standard on most sailboats. Wire rope is sized/priced by its diameter which ...
Pacific Sailboat Supply is a family-owned sailboat rigging and hardware supplier of only the top brands in sailing. Featuring Harken, Lewmar, Ronstan, and Schaefer blocks, self-tailing winches, jib reefing furling systems, mainsheet boom vang systems, and more. ... DECK ORGANIZERS. UP TO 20% OFF. FURLING SYSTEMS. Up to 30% off. ELECTRONICS ...
Hull - The main structure. Keel - The fin under the boat. Rudder - To steer the boat. Mast and Rigging - Supporting the sails. Boom - Supporting the mainsail. Sails - The canvas used to harness the energy of the wind. The starboard and port side of the boat. Windward and Leeward. Basic parts of a sailboat.
Stainless steel rigging hardware is essential for marine applications due to its superior corrosion resistance. At Fisheries Supply, we offer both Type 304 and Type 316 stainless steel options: Type 304: Contains 18% chromium, suitable for general outdoor use. Type 316: Contains 16% chromium and molybdenum, ideal for saltwater environments.
Sailboats require four main parts to operate: a hull, mast, sail, and rudder. The hull is the body of the boat, and all other parts are directly or indirectly connected to it. The mast is a long pole that serves as a guide and mounting point for the sail. The sail catches the wind and propels the boat, and the rudder directs the boat and acts ...
Sailboat Hardware
Its primary use, when sealing hardware, is as a gap filler, with the aim of preventing water from passing between the hardware and deck/cabin surface. Options include polyurethane, polysulfide and silicone. Each has its own strengths and weaknesses. If your caulk bead will be exposed, make certain it is a UV-stabilized variety.
Rooster Carbon Tiller Extension. Rooster Sailing. $145.00. Find out why these extensions are used by top Laser sailors around the world. Pair with a Rooster Carbon Laser Tiller for the ultimate Laser tiller and extension set up. 49" Length - Available in 19mm, 22mm, and 25mm DiametersThe Rooster Carbon Tiller...
Sailboat Deck Layouts. John Harries. Aug 28, 2020. 49 Comments Reading Time: 10 minutes. I'm going to use the Outbound 46 as a base to write about optimal deck layouts for sailboats. Information that will help anyone to either select a good deck layout when buying a boat, or fix a screwed-up one on a boat they already have.
General Parts. General Parts, Fittings, and Accessories for Small Sailboats. We offer a full range of sailboat hardware, blocks, cleats, shackles, dollies and trailers, accessories, and more. These parts are not necessarily specific to any one model of sailboat, but rather are general fittings that often work on a variety of boats for a variety ...
With more than 4000 name-brand items in our marine hardware supplies category, we're confident we can provide virtually any type of boat deck hardware and boat hardware accessories you require from top-name manufacturers like Garmin hardware at the lowest discount prices you're likely to find anywhere. You can also count on us for fast and ...
Sailboat Rigging can be divided in to 2 categories: Standing Rigging - the wires and ropes that hold up the mast, also known as shrouds or stays. Running Rigging - the ropes (and wires) that control the sails on a yacht. There are a large number of different terms that cover the use for which each rope is employed.
Marine hardware is specifically manufactured from materials designed to weather the elements and stand up to heavy use. Boat deck hardware is hard working equipment, but if you want beauty and brawn you can have it with polished brass, aluminum, and quality stainless steel deck fittings. Deck fittings like cleats and chocks come in all sizes ...
Taco Marine is another quality hardware manufacturer. Other established brands like Sea-Dog Line and Seachoice offer huge selections of price-point hardware. Find and buy exact-match marine hardware and supplies for your boat. OEM parts, factory direct prices - shop hinges, latches, gas shocks, and more!
Allen Sailboat Performance Hardware celebrated 60 years in 2016 and continues to produce high-performance dinghy hardware developing new products to keep up with the demands of today's high-performance foilers and Skiffs. Antal's range comprises of over 350 items of deck hardware ... You may provide basic contact information such as your name ...