

How To Draw A Yacht | a Step-by-Step Guide
Here are eight easy steps designed to teach you how to draw a yacht in only thirty minutes. The best part? You only need regular drawing materials and techniques to execute the design!
A yacht is a medium-sized sailing or powered boat used for recreational sailing, cruising or racing. Its purpose is rather similar to a speedboat , sailboat and ski boat , but do not be fooled.
The main thing that sets a yacht apart from those oceanic vehicles are the cabins found onboard intended for overnight use. Yachts can also vary in size, with some models featuring swimming pools on deck. Pretty cool, right?
What You Will Need
- A4 sheet of paper
- Pencils (HB, 2h, 3b and 5b)
- Coloring kit
How To Draw A Yacht
I personally like to use a heavier lead of pencil while drawing water vessels. They come in handy when outlining the main components of the drawing, like the hull, deck and cabin.
For the smaller details, I normally use a softer lead. These are differentiated by the terms H (hard leads) and B (soft leads). HB is the common ground, great for soft strokes and lines, and possibly this yacht drawing.
If, however, you’re going for a more dramatic and detailed drawing, be sure to grab a selection of grades. 2h, 3b and even 5b should do perfectly!

Step 1: Draw the Hull
First things first, flip your drawing paper in a landscape orientation to ensure you have enough room to capture each and every detail of the yacht.
Then, lightly sketch a long horizontal rectangle across the bottom half of your paper using the freehand method or a ruler. This shape will represent the yacht’s hull, which is the structural base and foundation of the vessel.
You want this feature to appear as realistic as possible, so erase both sides of the rectangle, and replace them with diagonal lines instead.
- Flip your paper in a landscape orientation
- Draw a long horizontal rectangle for the hull
- Erase the sides and replace them with diagonal lines

Step 2: Draw the Deck and Cabin
With the hull complete, it’s time to add the deck and cabin onto your drawing. Since it rests above the hull, let’s start with the deck. The deck is basically the main floor of the yacht which acts as a platform for people to walk on.
Simply draw a curved line above the hull for the deck. You want this line to start out against the hull, and slowly rise as it spans out in length. Cap it off with a small vertical line to connect the back of the deck to the hull.
Once you’re done, draw a curved horizontal line above the deck for the cabin. Similar to the deck, ensure the line slowly rises as it stretches. Add another curved line above it to polish off the look!
- Draw a curved horizontal line for the deck
- Draw two curved horizontal lines for the cabin
- Ensure that each shape becomes smaller in size

Step 3: Draw the Windows
What would a yacht be without a few windows? Draw a small horizontal rectangle inside the width of each cabin fixture to resemble windows. You want to ensure that the left sides of these rectangles seamlessly connect with the sides of the cabin.
- Draw a small horizontal rectangle inside the first cabin
- Draw a small horizontal rectangle inside the second cabin
- Ensure the sides of the rectangles smoothly connect with the sides of the cabin

Step 4: Draw the railing
Every yacht has a railing as a safety feature for the tourists, so let’s include one on your drawing as well. First, draw a long horizontal rectangle above the hull for the outline of the railing.
The shape ought to overlap with the deck, however it should not be larger in size than the deck, so pay careful attention to the proportions. Then, add a series of small vertical lines within the rectangle for the railing’s bars.
- Draw a long horizontal rectangle above the hull
- Make sure the shape does not reach above the deck
- Add a series of vertical lines inside the rectangle

Step 5: Draw a light and wind tower
Adding a wind tower and a light is a fantastic way to heighten the depth and realism of your drawing. First, draw a small square on the right side of the upper cabin for the base of the light, then add a semicircle above it for the light bulb.
Next, draw a thin vertical rectangle on the left side of the upper cabin for the base of the window, and add a thin horizontal rectangle directly above it. In the end, you should be left with a large “T” shape for the wind tower.
- Draw a small square and semicircle for the light
- Draw a thin vertical rectangle for the wind tower’s base
- Draw a thin horizontal rectangle for the upper part of the wind tower

Step 6: Draw windows on the hull
Your yacht is nearly complete, although it needs a little extra detailing to seal everything together. While the hull comes into contact with water a lot, it provides a scenic view of the ocean from down below.
To add the windows, draw several small rectangles across the length of the hull. Give the yacht an organized look by sectioning them off in pairs of four, and ensuring each shape is exactly the same size.
- Draw a series of small rectangles on the hull
- Section them off in pairs of four
- Ensure each shape is the same size

Congratulations! Your yacht Drawing is complete
If you followed along with each step and completed your yacht drawing in one go, well done! Give your drawing hand a well-deserved break and assess the outcome of your drawing.
Refine any possible inconsistencies with the use of your eraser, pencil and the image below. When you’re ready, check out the rest of the tutorial. Trust me, you don’t wanna miss out these steps!

Taking your yacht drawing to the next level
The outline of your drawing is all set, but still it needs a little…something. A few crucial details that can take your drawing from a bland piece to a lively masterpiece in a matter of seconds!
Step 7: Adding a background
Adding a background will instantly broaden the scope of your drawing. It will add an aspect of storytelling to your design by leaving room for the imagination to fill in the blanks.
There are quite a few ideas to choose from for a yacht drawing, however the most obvious one would be to include the ocean in the surrounding, wouldn’t you agree?
Whether your yacht is currently docked next to a cruise ship or rowboat , or out on the ocean, add water by drawing a few wavy lines around the bottom part of the yacht.

Step 8: Adding color
Set aside your drawing tools and pick up your coloring kit! Select a range of your favorite colors for the outline of the yacht and a series of blue shades for the water. When coloring in the yacht, remember to use different colors for different elements to compliment and provide contrast to each step.

You can add some extra items to your drawing to make the yacht more unique, like a flag or banner with your name on it.
What about some fish? You could draw a bunch of fish in the sea surrounding your yacht to improve the details and visualization.
Connect with other budding artists on YouTube or Pinterest to get some more ideas for your drawing or to simply share your experience.
Conclusion
In this tutorial, you learned how to effectively draw a yacht. From the hull to the deck, cabin, windows, railing, wind tower and light, you have learned how to draw these elements and gained some insight into what they’re used for.
As we wrap up this yacht drawing tutorial, I encourage you to keep exploring your artistic abilities. Trying out other drawing tutorials can expand your skills and open up new possibilities, so keep experimenting, keep learning, and most importantly, keep drawing!

Thanks for reading & feel free to check out more of our articles !
Author Rating
Overall rating.
This guide explains how to draw a yacht. You will also learn a few interesting facts about it.
Check out how the rating system works
Useful Links

Hey there, I'm Maria and I am an author at Edits 101. Art, fantasy and sports are my life.
Feel free to check the About Us section for more info :) @storybutter.com
Similar Posts

How to Draw an Ambulance | in 10 Easy Steps
This engaging tutorial will not only teach you how to draw an ambulance, but how…

How to Draw a Fire Truck – Easy Step-By-Step Guide
Have you ever seen a fire truck? If you live in a big town, you…

How To Draw A Red Arrow Plane | A Simple Guide
We are back with another drawing. Are you guys ready to soar in the sky…

How to Draw a Rowboat | a Step-by-Step Guide
Here are eight easy steps that will teach you how to draw a realistic depiction…

How to Draw a Vintage Car | Simple Tutorial
You know a lot about cars, but do you know what a vintage car is?…

How To Draw A Rugby Mouthguard | An Easy Tutorial
A rugby mouthguard is vital protective equipment designed to safeguard players against potential oral injuries…

How to Draw a Boat – An Easy and Realistic Boat Drawing Tutorial
Ahoy there! You are invited on an exciting voyage of artistic discovery today as we learn how to draw a ship, much like those used for the first around-the-world trips. We break this quite complex boat down into very easy-to-follow steps, making this tutorial suitable for artists of any level. If you are ready to set sail, gather your supplies and let us jump right in!
Table of Contents
- 1.1 Step 1: Shape the Main Body of the Boat Sketch
- 1.2 Step 2: Outline Some Details
- 1.3 Step 3: Draw the Sails
- 1.4 Step 4: Add In the Railing and Ropes
- 1.5 Step 5: Draw the Ocean and the Oars
- 1.6 Step 6: Create Texture Within Your Realistic Boat Drawing
- 1.7 Step 7: Add Some Light Texture to the Waves
- 1.8 Step 8: Begin Coloring the Wood of Your Boat Sketch
- 1.9 Step 9: Color the Sails
- 1.10 Step 10: Add Some Color to the Ocean
- 1.11 Step 11: Start Contouring Your Boat Drawing
- 1.12 Step 12: Continue Shading Your Boat Sketch
- 1.13 Step 13: Start Shading the Sails
- 1.14 Step 14: Darken the Shading on the Sails
- 1.15 Step 15: Apply Highlights To Your Drawing of a Boat
- 1.16 Step 16: Create Three-Dimensions in the Water
- 1.17 Step 17: Highlight the Ocean Waves
- 1.18 Step 18: Finishing Your Boat Drawing
- 2.1 How to Make Boat Drawing Easy?
- 2.2 What Colors Do You Need for a Drawing of a Boat?
Step-by-Step Realistic Boat Drawing Tutorial
You can see from the main image that the boat sketch we are going to do today is quite complex. There are many small details and tricky elements, but we have tried to make boat drawing easy for all artists. We begin the tutorial with several simple steps that help us to build up the final shape of the boat drawing. We then begin to add the smaller details, before using color to bring our boat drawing to life.
You can see an outline of the different steps in the collage below.

Most of the realism in our drawing of a boat comes from the coloring steps. Whenever you begin learning how to draw a new subject, we find it best to use a coloring medium that you feel most comfortable with. Whether you are a digital artist or prefer physical mediums, you can simply adjust the instructions to suit your needs. If you are using a physical medium, like paint, we suggest using a light pencil for the initial construction and outlining steps. For digital mediums, use a separate layer for these steps.
If you are ready to dive right in, find somewhere comfortable to sit, and let us begin!
Step 1: Shape the Main Body of the Boat Sketch
We are going to begin our boat drawing by creating the basic shape of the hull. Start by finding the central point of your drawing area, and begin drawing the long curved shape. The shape is like a canoe, with a curve up and in on either end.

Step 2: Outline Some Details
We are now going to begin adding some smaller details. Begin on the far left end of the boat sketch, drawing a curving canopy shape. Add a small narrow band around the base of the boat drawing below this canopy, and then add a small tear-drop shape in the front point of the boat.
You can also add a small rope-like protrusion from the front (right side).

Step 3: Draw the Sails
In this step, we are going to draw the main sail and the front sail of our boat sketch. Begin with the main sail, a large curving rectangle above the middle part of the boat. You can then draw a long mast behind this sail, extending from the base of the boat and up above the top of the sail. You can then draw a smaller and more angled sail above the front bow of the boat.
Again, you can draw the mast which should be angled towards the right side of your canvas and extend slightly above the sail.

Step 4: Add In the Railing and Ropes
There are two main objectives for this step. Firstly, we are going to draw the railing of the deck, and then we are going to add the sail ropes. Let us begin with the barrier, starting with a curving shape that extends along most of the length of the boat. Then, using equally spaced lines, create several support beams. To complete this step, you are going to add the ropes for the sail. Begin by adding a bar along the top of each sail, and then draw several ropes that extend from the top of the masts to each corner of the sails.
You can also draw some ropes that join the sails to the deck of the boat.

Step 5: Draw the Ocean and the Oars
We are now going to add some context to your boat drawing. Begin by creating some gentle ocean waves around the base of the boat drawing. You can then draw some oars that extend from the side of the ship down into these waves. Generally, the oars should be facing backward, but you can create some variation in their angles for additional realism.

Step 6: Create Texture Within Your Realistic Boat Drawing
Things are starting to get exciting now. At this stage, we have the basic elements of our boat drawing complete, and we also have some of the finer details. We are now going to add some textural details to the sails and bow. Let us begin with the sails, using some fine horizontal and vertical lines to create a series of blocks.
Within these blocks, add some fine texture lines to emphasize the three-dimensionality.
Next, using fine and long strokes that follow the shape of the bow, create some wooden plank details. Create texture within these planks, and use fine lines to add more texture where you think it is necessary. As a final detailed touch, draw a wooden eye on the front of the boat sketch.

Step 7: Add Some Light Texture to the Waves
We are now going to add some final texture to our sketch before we begin using color. Within the shape of the waves, create some fine arched lines that represent a realistic ocean wave texture.

Step 8: Begin Coloring the Wood of Your Boat Sketch
In order to create our realistic boat drawing, we are going to build the color up gradually. In this step, we are going to add a base coat of color to the wooden parts of our boat sketch. Use a regular paintbrush and a light brown shade of paint for this.
Fill the base of the boat with an even coat of color, and then move on to the masts.

Step 9: Color the Sails
We are now going to complete our base color coat by coloring the sails. Use a regular paintbrush and a light shade of cream paint to carefully color the main sail and the front sail.

Step 10: Add Some Color to the Ocean
Let us now move on to the ocean, using some light blue paint to fill in the waves surrounding the base of your boat drawing.

Step 11: Start Contouring Your Boat Drawing
Now that we have the base colors down, we are going to begin adding more structure. For this step, you are going to need a small blending brush and a touch of black paint. Begin to add some definitions between the panels of wood on the side of your boat drawing. You can also add some shading to the masts, the oars, and the back curve of your ship.
Tip: When using black for contouring or shading, always begin very lightly and darken as you need to. Black is almost impossible to remove once you have applied it.

Step 12: Continue Shading Your Boat Sketch
We are now going to continue shading our drawing of a boat with a slightly finer tough. Use a sharp detailing brush and some black paint to add some fine shading along the details on the side of your boat. This will include things like shading around the eye, between each of the planks of wood, and within the canopy.

Step 13: Start Shading the Sails
Let us now move on to the sails. With a blending brush and the same brown that you used as the base coat for the boat, create a gentle blend of color up the sails. The bottom and sides of the sails should be slightly darker, and blend smoothly into the lighter cream color at the top.
Tip: For an extra smooth transition, you can use a clean blending brush to carefully all of these colors together.

Step 14: Darken the Shading on the Sails
As we did with the body of our boat drawing, we are now going to add more detailed shadows to the sails. With a small blending brush and some dark grey paint, add shadows on top of the textured areas. The grey shading should mostly be focused around the pleats in the sails, around the edges, and above the texture lines.

Step 15: Apply Highlights To Your Drawing of a Boat
The last few steps have focused on creating darkness within our boat drawing. We are now going to begin to contrast these shadows with a touch of highlighting. With a blending brush and some white paint, begin by creating a faded highlight on the lightest areas of the sails. Then, with a more detailed brush and white paint, apply highlights to the areas of the boat that are most likely to catch the light. These areas include the top of the canopy, the top of the masts, the railing, and on top of the ores.
Tip: When creating highlights, it is easiest to pick a light source. You can then imagine where the light would hit from that angle.

Step 16: Create Three-Dimensions in the Water
We are now going to shift our focus to creating structure within the waves. With a small blending brush and a touch of black paint, apply some light shading along the edges of the water. You can shade beneath the wave lines that you drew previously, giving the impression of moving water.

Step 17: Highlight the Ocean Waves
Just before we finish our realistic boat drawing, we are going to add a few spots of highlight to the water surface. Use a small blending brush and some white paint to apply short strokes of light onto the water surface.

Step 18: Finishing Your Boat Drawing
In this last step, we are going to add some final spots of water spray and then remove the outline. Begin by using a small blending brush and some white paint to create some realistic water splashes against the side of the boat. You can then remove the dark outline form your boat drawing, leaving you with a seamlessly realistic sketch. Use a fine detailing brush and the corresponding color at each point of the outline to carefully trace over it. You can do the same for any inner texture lines.

We really hope you have enjoyed your voyage of discovery today! As with all of our drawing tutorials , we hope that we have made boat drawing easy for artists of any levels. You now know how to draw a ship of any kind, following the same basic process.
Frequently Asked Questions
How to make boat drawing easy.
Learning how to draw a ship can seem like a daunting task. Fortunately, we make it really easy by breaking the process down into easy-to-follow steps. We begin with simple shapes, creating the basic outline of our boat sketch. We then build up a realistic boat drawing by using color to create detail and dimension.
What Colors Do You Need for a Drawing of a Boat?
You only need a few basic colors for this easy and realistic boat drawing. Firstly, you will need several different shades of brown , including one very light cream and a slightly darker shade. You will then also need white, black, and grey for the contouring, Finally, you will need a sea blue shade for the ocean waves around the base of your boat.

Matthew Matthysen is an educated multidisciplinary artist and illustrator. He successfully completed his art degree at the University of Witwatersrand in South Africa, majoring in art history and contemporary drawing. The focus of his thesis was to explore the philosophical implications of the macro and micro-universe on the human experience. Matthew uses diverse media, such as written and hands-on components, to explore various approaches that are on the border between philosophy and science.
Matthew organized various exhibitions before and during his years as a student and is still passionate about doing so today. He currently works as a freelance artist and writer in various fields. He also has a permanent position at a renowned online gallery (ArtGazette) where he produces various works on commission. As a freelance artist, he creates several series and successfully sells them to galleries and collectors. He loves to use his work and skills in various fields of interest.
Matthew has been creating drawing and painting tutorials since the relaunch in 2020. Through his involvement with artincontext.org, he has been able to deepen his knowledge of various painting mediums. For example, watercolor techniques, calligraphy and lately digital drawing, which is becoming more and more popular.
Learn more about Matthew Matthysen and the Art in Context Team .
Similar Posts

How to Draw a Chinese Dragon – Drawing a Symbolic Creature

How to Draw a Carnation Flower – An Easy Carnation Sketch

Unicorn Coloring Pages – 43 Unique Unicorn Coloring Sheets

How to Bullet Journal – Your Step-by-Step Tutorial Beginners

Monster Truck Coloring Pages – 12 New Monster Truck Printables

How to Draw a Duck – An Easy Duck Drawing Tutorial for All Artists
Leave a reply cancel reply.
Your email address will not be published. Required fields are marked *
Save my name, email, and website in this browser for the next time I comment.
- PRO Courses Guides New Tech Help Pro Expert Videos About wikiHow Pro Upgrade Sign In
- EDIT Edit this Article
- EXPLORE Tech Help Pro About Us Random Article Quizzes Request a New Article Community Dashboard This Or That Game Happiness Hub Popular Categories Arts and Entertainment Artwork Books Movies Computers and Electronics Computers Phone Skills Technology Hacks Health Men's Health Mental Health Women's Health Relationships Dating Love Relationship Issues Hobbies and Crafts Crafts Drawing Games Education & Communication Communication Skills Personal Development Studying Personal Care and Style Fashion Hair Care Personal Hygiene Youth Personal Care School Stuff Dating All Categories Arts and Entertainment Finance and Business Home and Garden Relationship Quizzes Cars & Other Vehicles Food and Entertaining Personal Care and Style Sports and Fitness Computers and Electronics Health Pets and Animals Travel Education & Communication Hobbies and Crafts Philosophy and Religion Work World Family Life Holidays and Traditions Relationships Youth
- Browse Articles
- Learn Something New
- Quizzes Hot
- Happiness Hub
- This Or That Game
- Train Your Brain
- Explore More
- Support wikiHow
- About wikiHow
- Log in / Sign up
- Hobbies and Crafts
How to Draw a Sailboat
Last Updated: November 29, 2022
This article was reviewed by Jeanine Hattas Wilson . Jeanine Hattas Wilson is a Professional Painter and the President of Hattas Public Murals, Inc. With nearly 20 years of experience, Jeanine specializes in creating, overseeing, designing, and painting murals. Jeanine holds a BA in Advertising from Marquette University and a Studio Painting Minor from The Milwaukee Institute of Art & Design. She has studied at The Atelier Artien in Paris, France, Los Angeles Academy of Figurative Art, and under renowned artists such as Robert Liberace, Michael Siegel, and William Cochran. To date, Hattas Public Murals has painted nearly 5,000 commissioned works of art in homes and commercial and public spaces. This article has been viewed 213,738 times.
Drawing a sailboat can be a great way to envision sailing the open seas if you're not able to do so at that moment. It's also a relatively easy process! This wikiHow article will explain how you can draw a sailboat.

Community Q&A
Things You'll Need
- Piece of paper
- Coloring tool(s) of your choice (if you'll be adding color to your picture)
You Might Also Like

About This Article

To draw a simple sailboat, first, sketch a long, upside-down trapezoid for the hull of the boat. Then, draw a small trapezoid on top of the larger trapezoid for the cabin. You can also draw some long rectangles to serve as windows. Once you’ve drawn this, sketch a long, skinny L-shape on top of the cabin. This will be the mast. Finally, draw 2 right triangles on each side of the mast for the sails. If you’d like, draw some waves below the boat to make your drawing more life-like! To learn how to finalize your sailboat sketch, read on! Did this summary help you? Yes No
- Send fan mail to authors
Reader Success Stories
Jul 27, 2016
Did this article help you?
Sep 16, 2017
Dove Warbler
Dec 11, 2019
Oct 16, 2021

Featured Articles

Trending Articles

Watch Articles

- Terms of Use
- Privacy Policy
- Do Not Sell or Share My Info
- Not Selling Info
Get all the best how-tos!
Sign up for wikiHow's weekly email newsletter
- Contents Page
- Painting and drawing tools
- The Coloured Pencil
- Coloured Pencil Brands
- Drawing Papers
- Graphite & More
- Pastel Pencils
- Watercolor Pencils
- Planning Your Art
- Coloured Pencil Techniques
- Mixed Media
- Step by Step Tutorials
- Landscape drawing
- Drawing a boat
Drawing a Boat: techniques for placing your boat IN the water and getting the reflections right
Picture yourself standing on the dock, looking at a serene lake where a majestic sailboat gently rocks. You grab your pencil and paper, eager to capture the tranquility.
However, as you start drawing, your boat seems more perched on top of the water than floating in it.
Sound familiar? You're not alone!
Many artists find it challenging to depict a boat realistically in water.
I'll guide you through effective steps to draw realistic boat shapes, reflections, and ripples that will make anyone that looks at your art feel as if they are right there with you at the edge of the water.
Getting the shape right when drawing a boat

Many artists struggle to accurately depict the unique shapes and proportions of boats. The primary challenge is understanding how a boat's design varies with its intended environment.
River and lake boats have flatter bottoms and wider beams for stability on calm waters. In contrast, ocean-going vessels feature a narrower, more V-shaped hull to slice through waves and maintain balance in rough conditions.
Neglecting these distinctions can result in unrealistic drawings, with boats looking top-heavy or unstable.
In this section, we'll explore the fundamental principles that govern boat shapes, enabling you to create accurate and visually appealing boat drawings.

Drawing a River Boat Outline
Let's start by sketching a simple river boat outline, focusing on a design with gentle curves.
To ensure our boat is drawn with the correct perspective, we'll use a rectangular guideline box.
Begin by drawing the box in perspective, marking the centre line at the front and back. Then, draw the boat's shape within the box, which will help you achieve the correct curves and sides, as well as position the bow in the middle.
The two graphite sketches below demonstrate this approach, showcasing boats hauled up on a beach.
When drawing a boat in the water, the view will naturally differ.
By applying this technique, you'll be able to create a realistic and visually appealing river boat outline.

Drawing a Coastal Boat: Mastering the Curves
When it comes to drawing a coastal boat, the task becomes more complex due to the pronounced rise of the bows and the unique curves of the hull.
Unlike river boats, coastal boats have a more V-shaped hull, which creates complex problems for accurate drawing, especially when viewed from a side angle.

To tackle these challenges, we can use a clever technique to determine the correct curves of the hull.
Observe how the gunwale flows and how the curves appear to go in opposite directions on either side of the top of the boat. This shape can be described as a flattened figure eight.
Let's explore this concept further. By drawing a figure eight shape on its side and developing it into a boat, we can create a versatile outline that can be adapted to various views.

In Figure A , we start with the basic outline of the flat figure eight. With practice, you'll find that most shapes of "eight" will produce a suitable top outline for the boat hull.
Next, we can decide on the orientation of the bows and stern. In Figure B , I've positioned the bows to the right.
Then, we can choose whether the boat is facing towards us ( Figure C ) or away from us ( Figure D ). By erasing and adding lines strategically, we can create different views of the boat while maintaining accuracy.
To demonstrate this versatility, I've used the same figure eight outline to create an alternative hull shape in Figure E , showcasing how this technique can be adapted to draw a boat facing in a different direction.

Remember, the drawn figure eight shape is only a guide; don't be afraid to deviate from it as you refine your drawing.
The goal is to master those difficult opposing curves along the top edges. Once you've added your finishing lines, any surplus drawn lines can be erased.
Clinker Built Boats: Traditional vs Modern
As we explore the world of boat drawing, it's essential to understand the differences between traditional clinker built vessels and their modern counterparts. When drawing a boat, it's not just about capturing its shape, but also its construction and history.
Traditional clinker built boats, like "Rona" and the two boats at Whitby, feature overlapping planks of wood that follow the curves of the hull. This unique construction method creates a distinct visual appeal.
In contrast, modern boat building has introduced glass reinforced plastic (GRP) boats that mimic the look of traditional clinker built vessels, but are created from a full-sized mould.
On the other hand, many river and shallow water boats have smooth, surfaced outside hulls, often built from sheet ply or GRP. While these boats may lack the artistic interest of traditional clinker built vessels, understanding their construction and design is critical for creating accurate and visually appealing drawings.
Drawing boats in water: The importance of displacement and reflections

When drawing a boat in water, it's essential to remember that boats move through and sit in the water, not on top of it.
To create a realistic piece of art, you need to understand the importance of displacement and how to capture accurate water reflections and ripples.
Understanding displacement
Observe how the weight of the boat and its occupants affects its displacement in the water.
The foreground boat in the example is low due to the weight of the two fishermen and their nets and tackle. Notice how this displacement creates a curve at the waterline, which is more pronounced when viewed from a lower angle.
Your perspective will influence the curvature of the hull, with a higher vantage point resulting in a more pronounced curve.
Capturing realistic water reflections and ripples
We have added an extra page with photographs and information about drawing reflections.
Accurate water reflections and ripples are crucial when drawing a boat on water.
Understanding how to depict these elements will help you create a more realistic piece of art.
The angle of view: A key to reflections
When observing a still water surface from above, you'll see either the bottom or a reflection of the sky and surroundings.
At an angle of approximately 45 degrees, you can see a gradual shift from seeing into the water's depth to observing its reflective surface.

Ripples and their impact on reflections
Slight waves alter the viewing angle, altering the water's appearance between light and dark.
Angles sharper than 45 degrees generally result in a darker appearance, while angles greater than 45 degrees make it look lighter.

This interplay results in the varied light and dark patterns seen on rippled water surfaces.

Reflections and Moving Objects
When drawing a boat reflected in the water, calculations become more complex.
The boat’s movement, weight, and wake affect how reflections are cast on the water.
External factors such as weather conditions and the width of the waterway also play roles in how these reflections distribute across the surface.

Usually, we see the image on the left below, but the image is often broken up by the varied surface angles. Sometimes we see the picture on the right, where the reflected image in the water is also broken up. The theory predicts the picture on the left, but in practice the picture on the right is more often seen.

Things to Keep in Mind When Drawing Reflections

When drawing reflections in water, it's essential to consider the factors that can affect the reflected image.
There is a section of broken water near to the large rock in the sketch above and that breaks up the reflection.
One common mistake is measuring the reflection from the edge of the broken water. This can lead to an inaccurate representation of the reflection.
In this example need to measure the equal distance from the base of the rock so our reflection in the calm water only shows the top of the large rock. The small rock is on the edge of the calm water so all the reflected image is shown.
When ripples occur, they can disrupt our calculations and make the reflected image appear longer than the original.
This happens because the wave-like structure of the water is picking up the reflection over a larger distance, similar to the drawing on the right.
Factors affecting reflections
The angle of the water can also impact the width of the reflected image.
When drawing reflections, it's essential to consider these factors to create an accurate representation.
By taking the time to understand how reflections work and how to draw them accurately, you can add depth and realism to your artwork.
Ready to Set Sail?
Congratulations for reading this far. By now you may feel overwhelmed by the wealth of information and techniques I’ve shared.
However, to become adept at boat drawing, just take it one step at a time.
Start by practicing the simple river boat outline exercise, focusing on getting the shape and proportions right.
Remember, the goal is to create a visually appealing and accurate depiction of a boat.
By taking this first step, you'll build confidence and lay the foundation for more complex drawings. So, grab your pencil and paper, and set sail on your artistic journey!
You might like these

Drawing a landscape in colored pencil - what to include
Drawing a landscape in colored pencil - tips and tutorials for areas such as skies, trees, bricks, stones and tiles

Three tips for drawing clouds and skies with coloured pencils
Tips for drawing clouds and making them look realistic in your coloured pencil artwork. Discover how felt can help you create fluffy clouds

How to Draw Trees: An Overview of the Basics to Get You Started
How to draw trees by studying the type and shape of the tree. Illustrated introduction to adding trees to your coloured pencil landscape drawings
Would you like our occasional newsletter?
Home | About Us | Contact Us | Privacy Policy
Copyright Peter Weatherill and Carol Leather - 2009-2024
Drawing How to Draw Tutorials Home
Home > Directory Home > How to Draw Modes of Transportations > Boats and Ships
LEARN HOW TO DRAW BOATS AND SHIPS DRAWING LESSONS
How to draw different modes of transportations step by step. Learn how to draw a variety of boats, big and small, including Ships, Canoes, Sailboats, and Yachts.
Privacy Policy .... Contact Us Privacy Policy .. Contact Us Home » Vehicles » Yacht Yacht DrawingYou can choose your favorite images to see detail drawing instructions:  How-to-draw-a-Yacht-step-8 How-to-draw-a-Yacht-step-8-2 How-to-draw-a-Yacht-step-7-3 How-to-draw-a-Yacht-step-6-8 How-to-draw-a-Yacht-step-8-4 How-to-draw-a-Yacht-step-6-111. instruction on how to draw a simple yacht for children. Today, drawing123.com will show you how to draw a simple yacht You may also like: How to draw a boat ? Step 1: First, draw the bottom of the boat 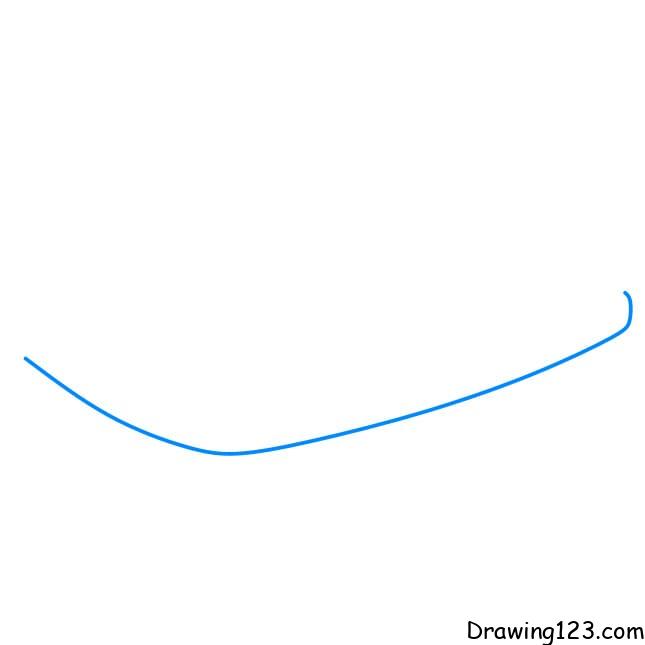 Step 2: Draw the frame for the yacht 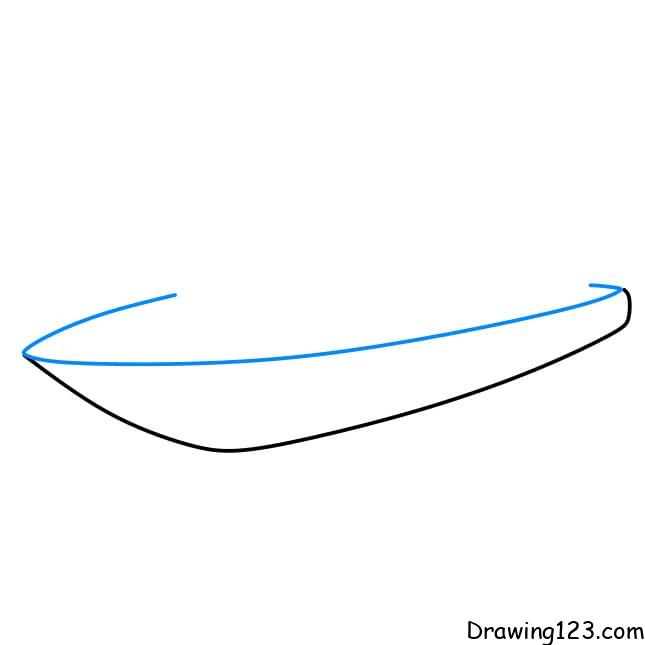 Step 3: Next, draw the body of this yacht  Step 4: Draw the roof for it 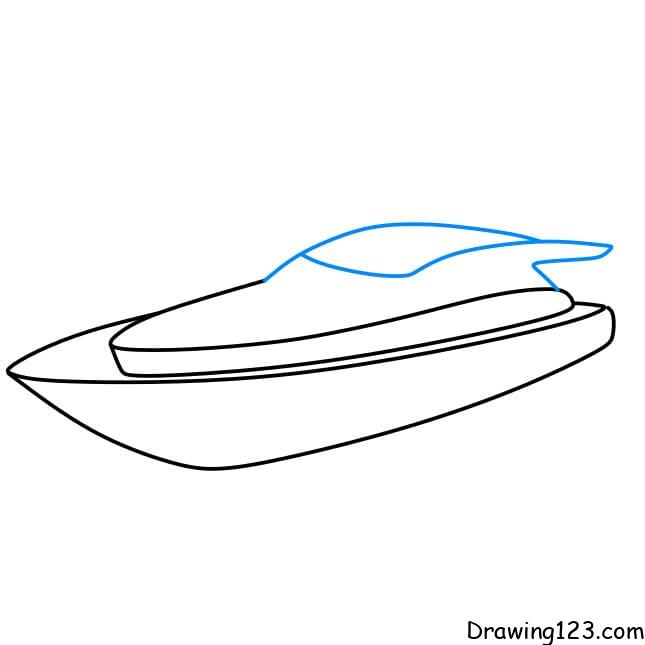 Step 5: Draw more windows for observation for the yacht 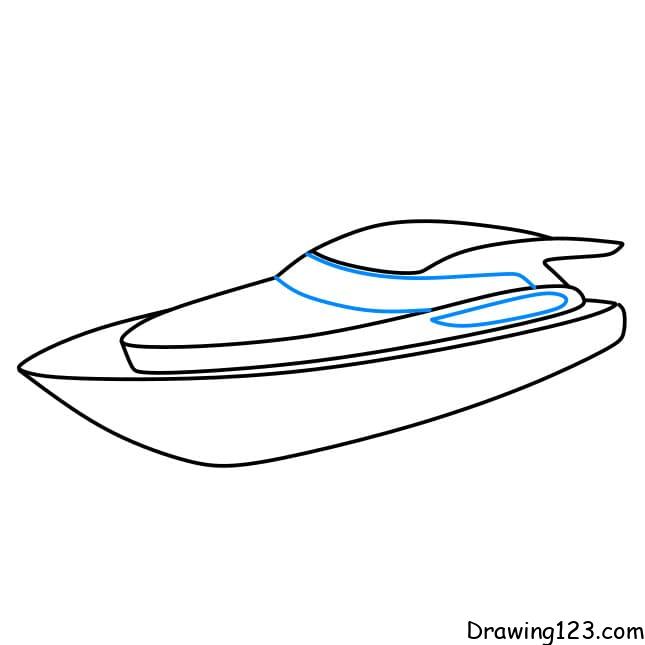 Step 6: Draw the barrier on the back for 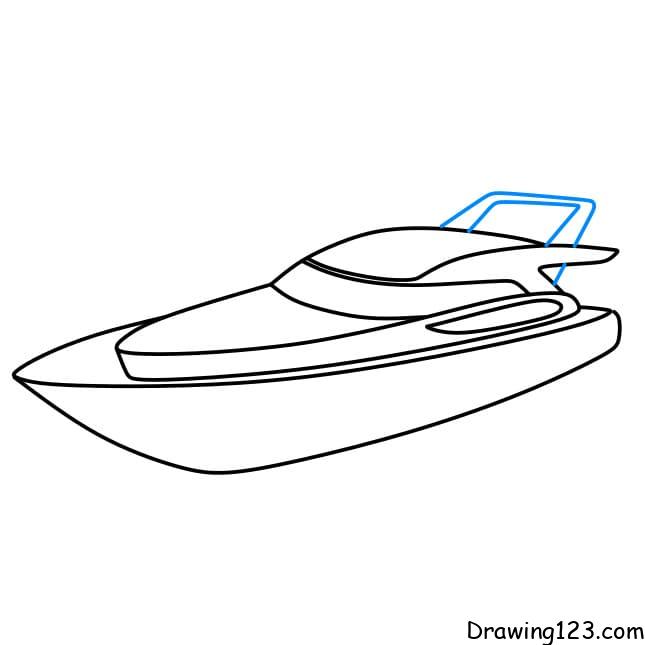 Step 7: Draw more details on the hull of the boat  Step 8: Color to make the picture more beautiful 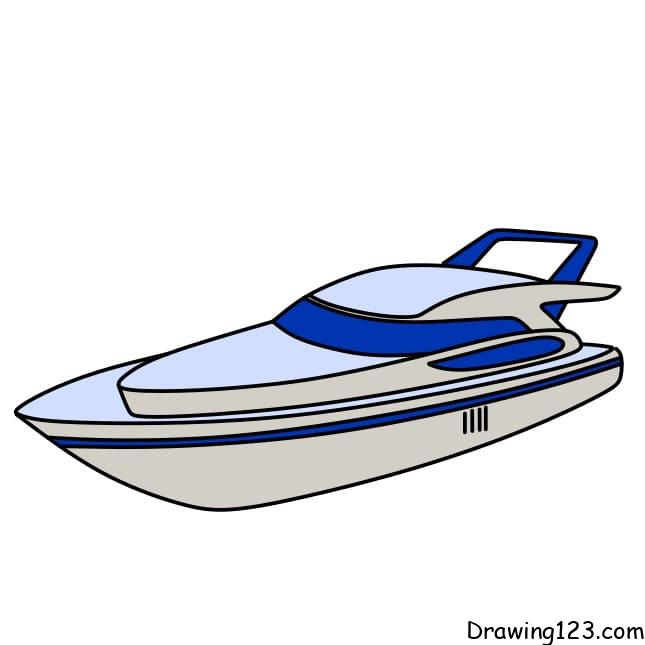 2. How to draw a cool yacht easily step by stepStep 1: First, draw the bottom of the yacht 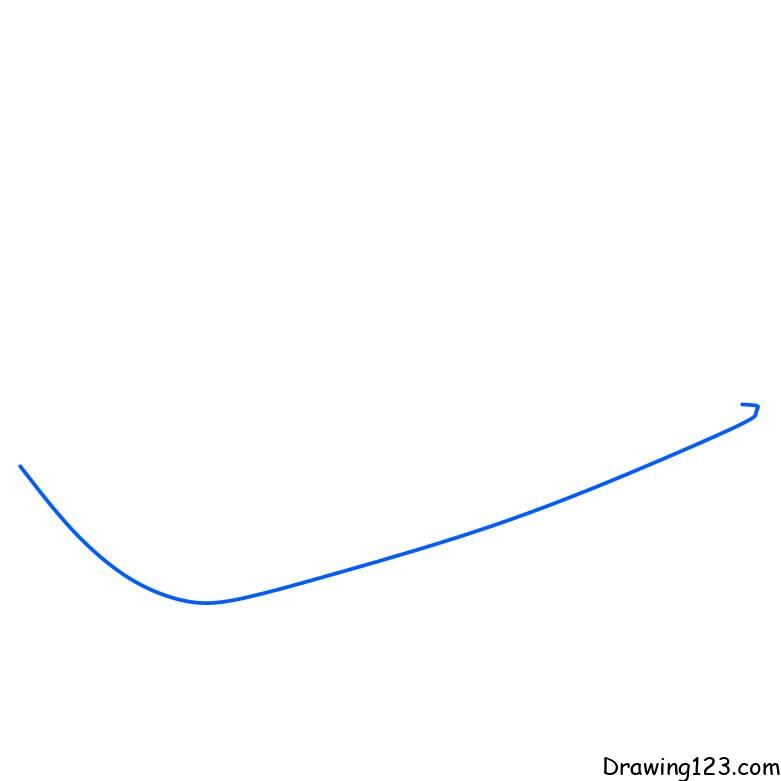 Step 2: Draw more shells for it 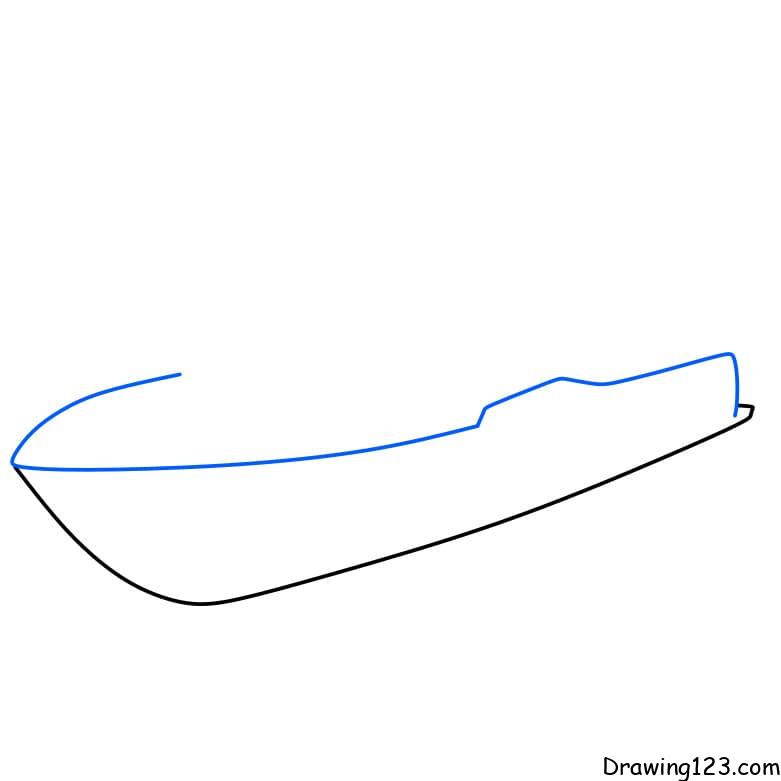 Step 3: Draw the tip of the bow of this yacht 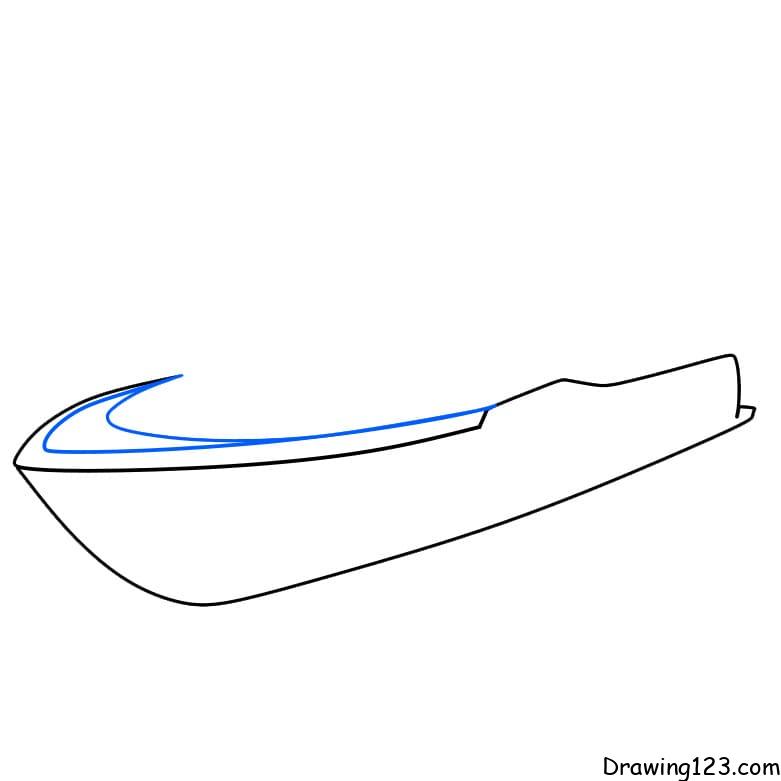 Step 4: Draw the cockpit of the yacht 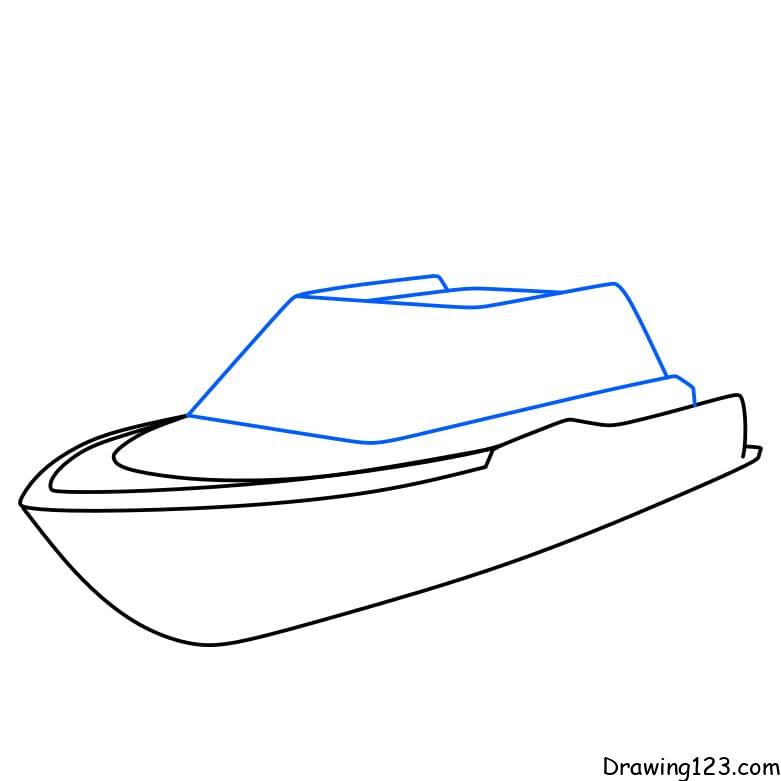 Step 5: Draw an additional wind tear barrier 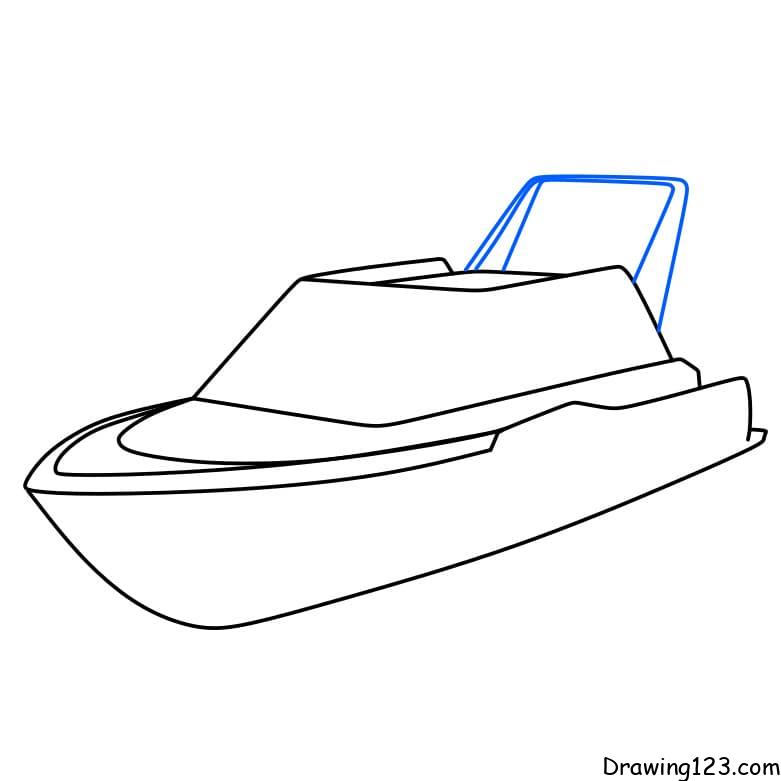 Step 6: Draw more observation windows of the yacht 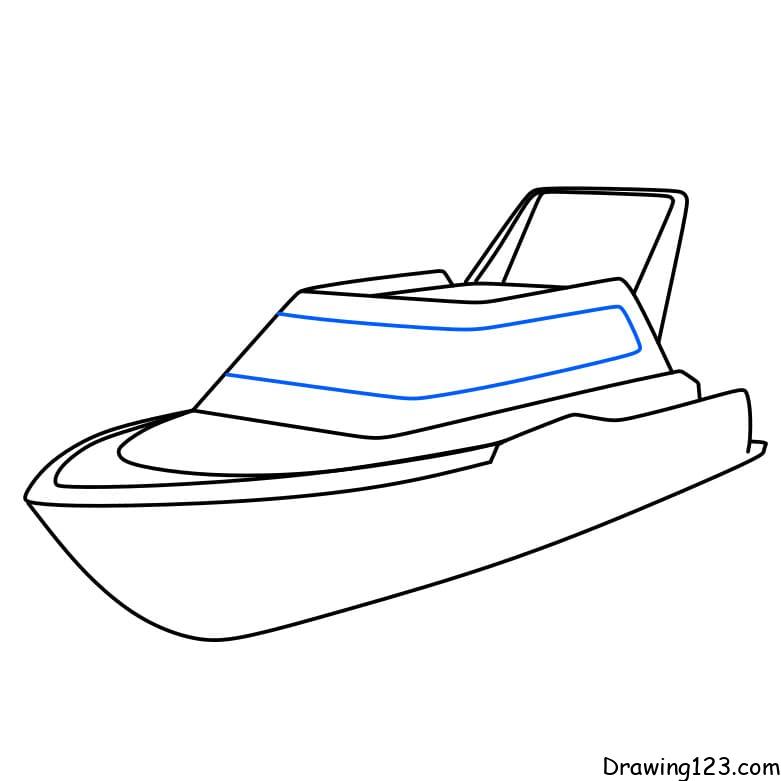 Step 7: Draw more details on the bottom of the yacht 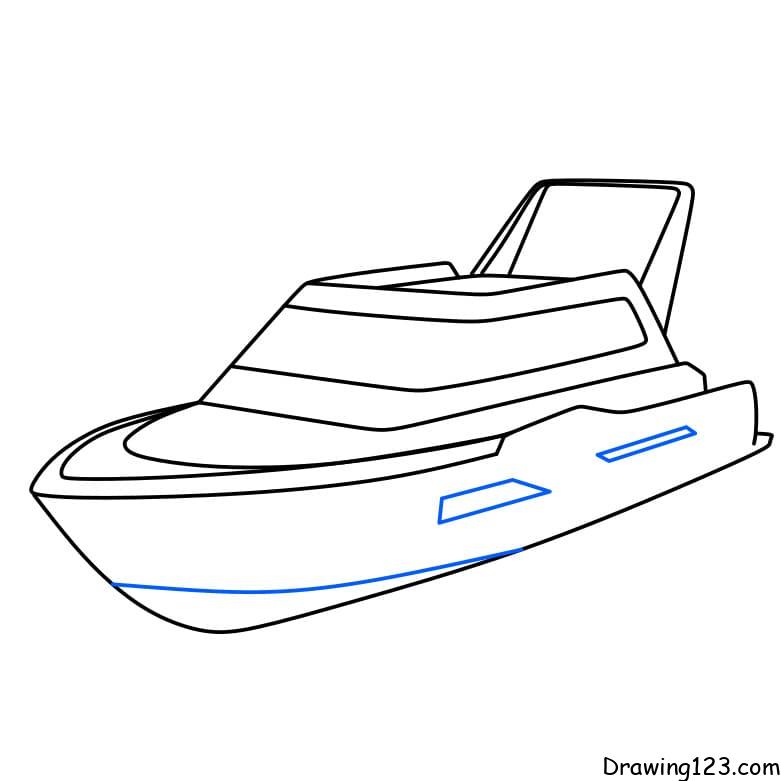 3. How to draw a simple yacht with some easy stepsStep 2: Draw the frame and shell for that yacht 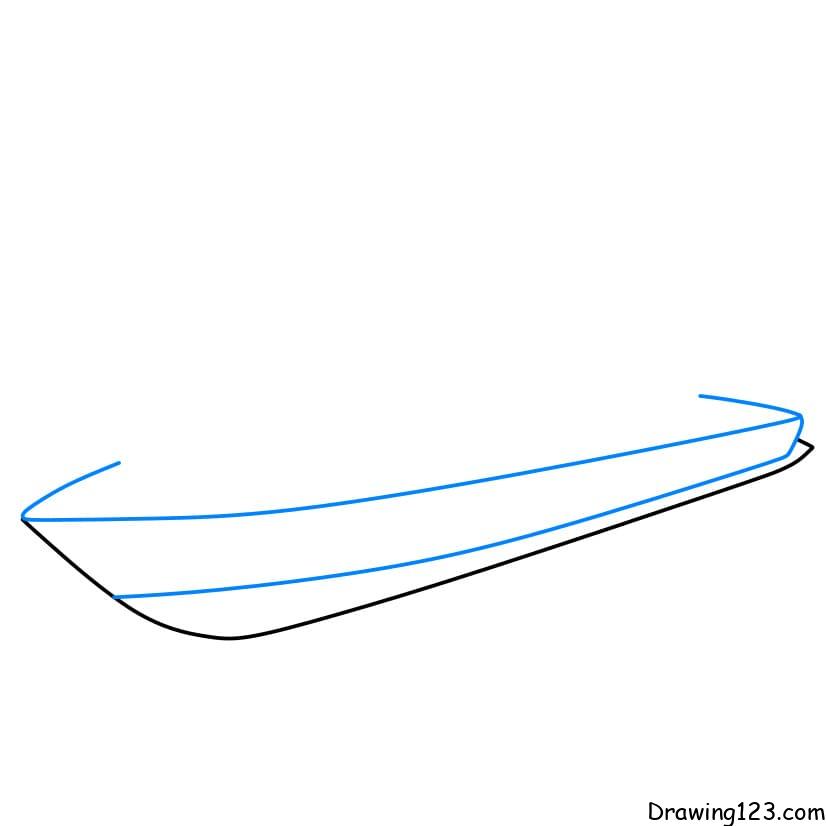 Step 3: Draw the hull of the yacht 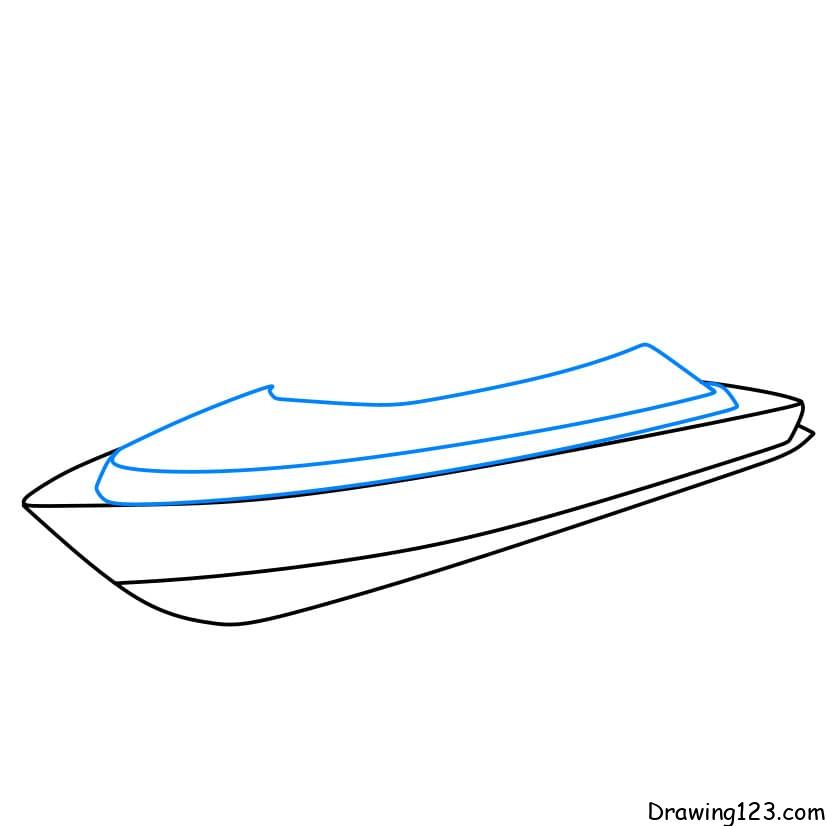 Step 4: Draw the roof for the boat  Step 5: Draw a windshield 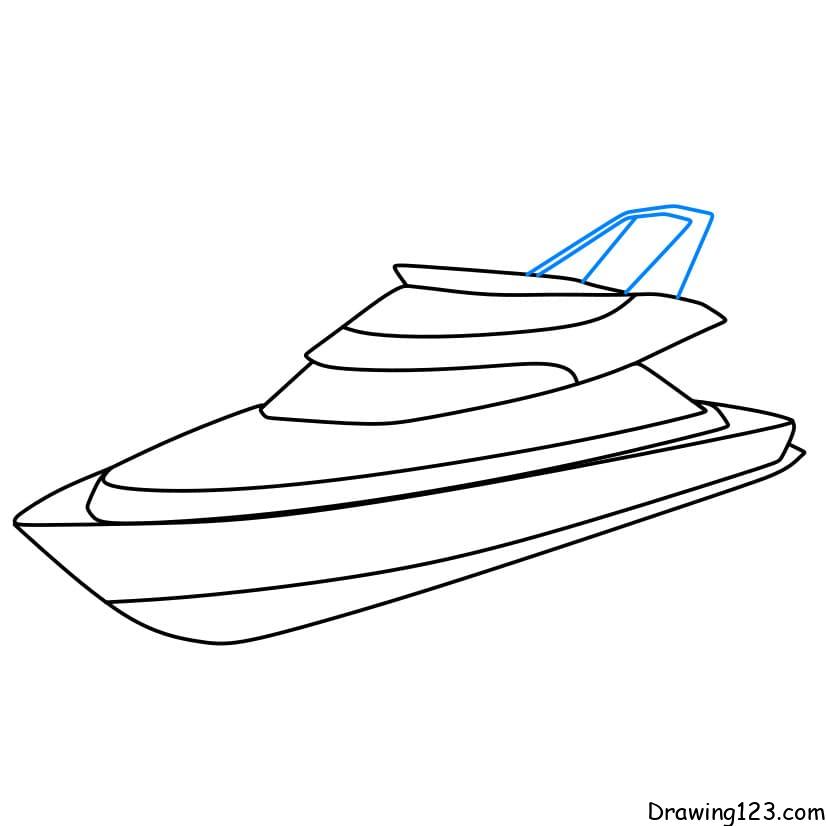 Step 6: Don’t forget to draw small details on the hull of the boat 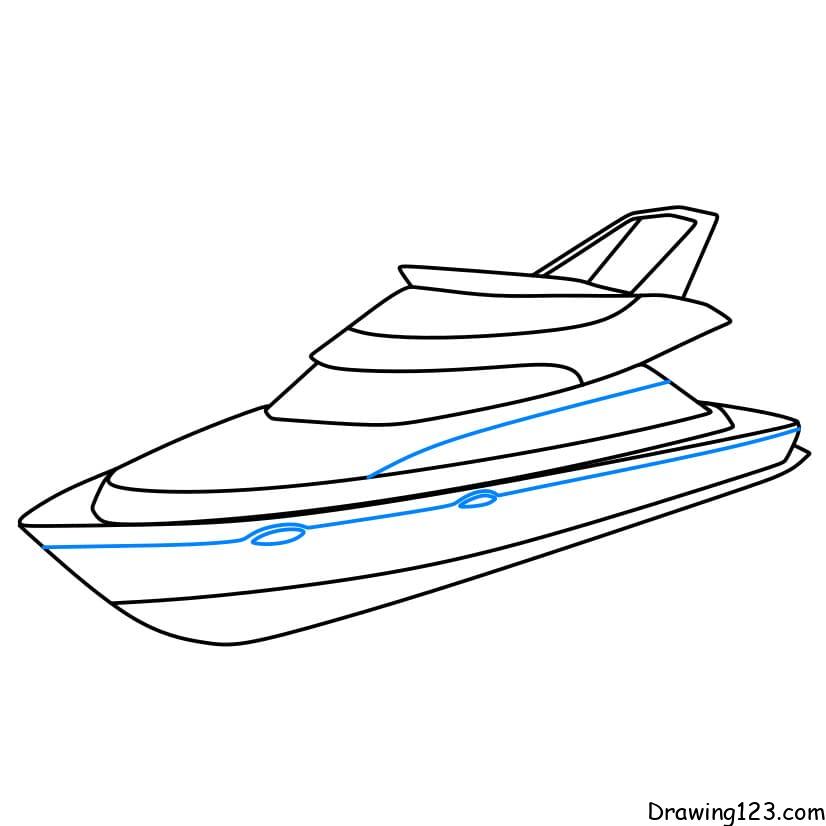 Step 7: Color to make the yacht painting more beautiful 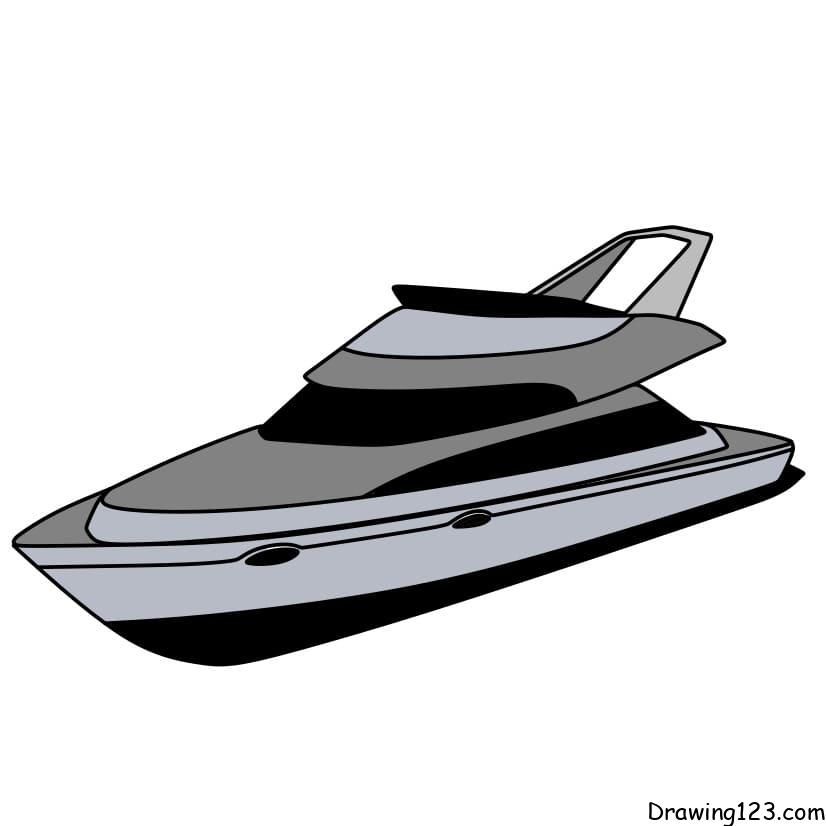 4. A simple drawing tutorial: a giant yacht Step 2: Draw the frame of the boat 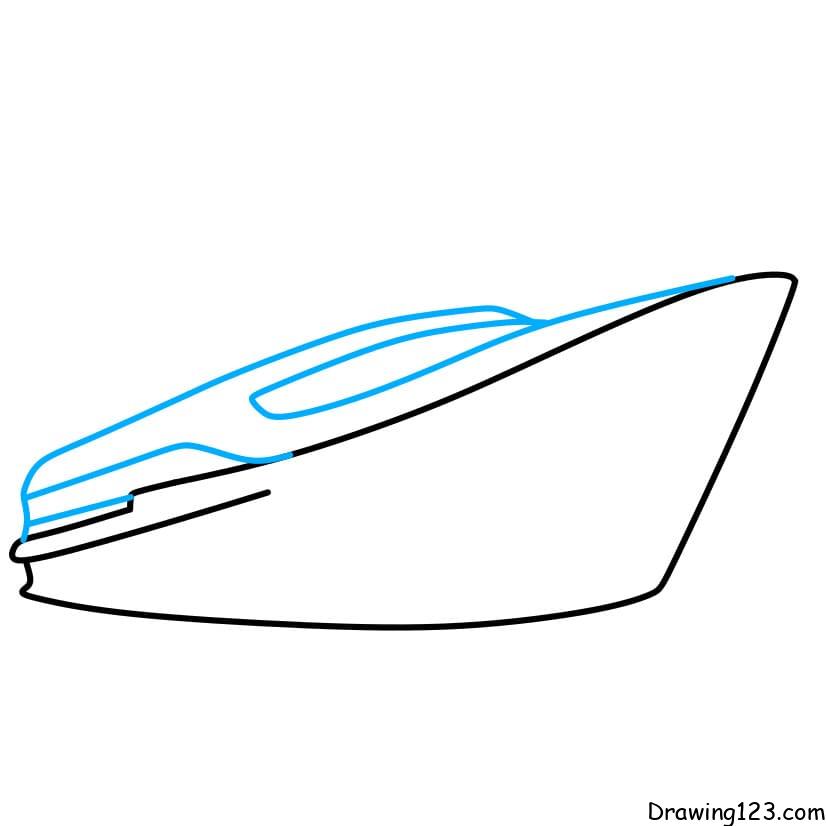 Step 3: Draw more layers of the yacht 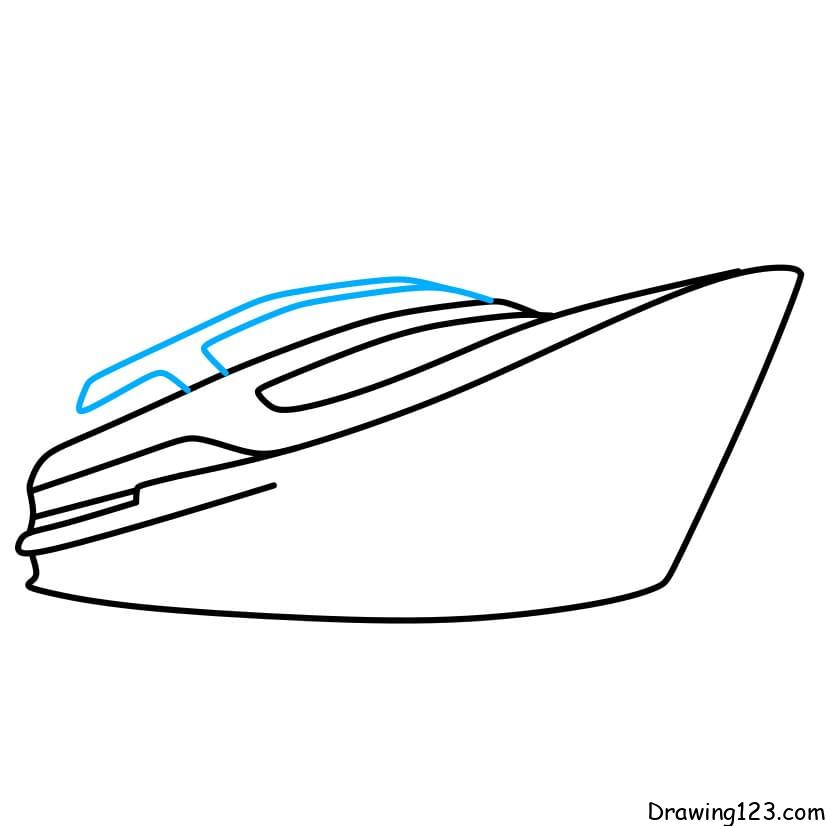 Step 4: Don’t forget to draw the small details of this huge yacht 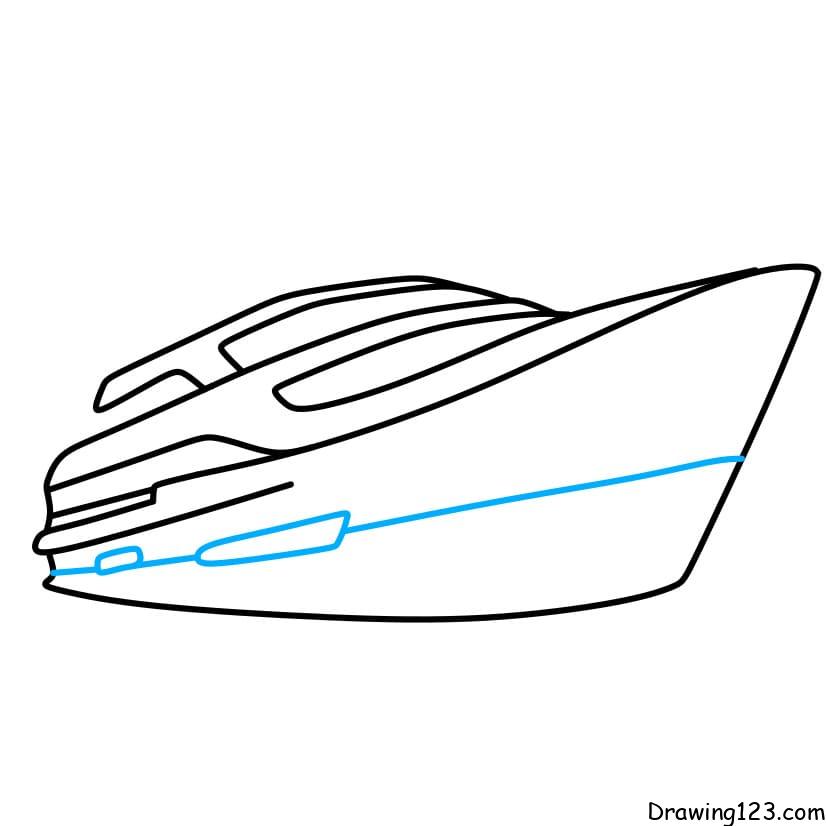 Step 5: Color to make the picture more beautiful  5. Step by step instructions on how to draw a simple yachtStep 2: Draw the frame of this yacht 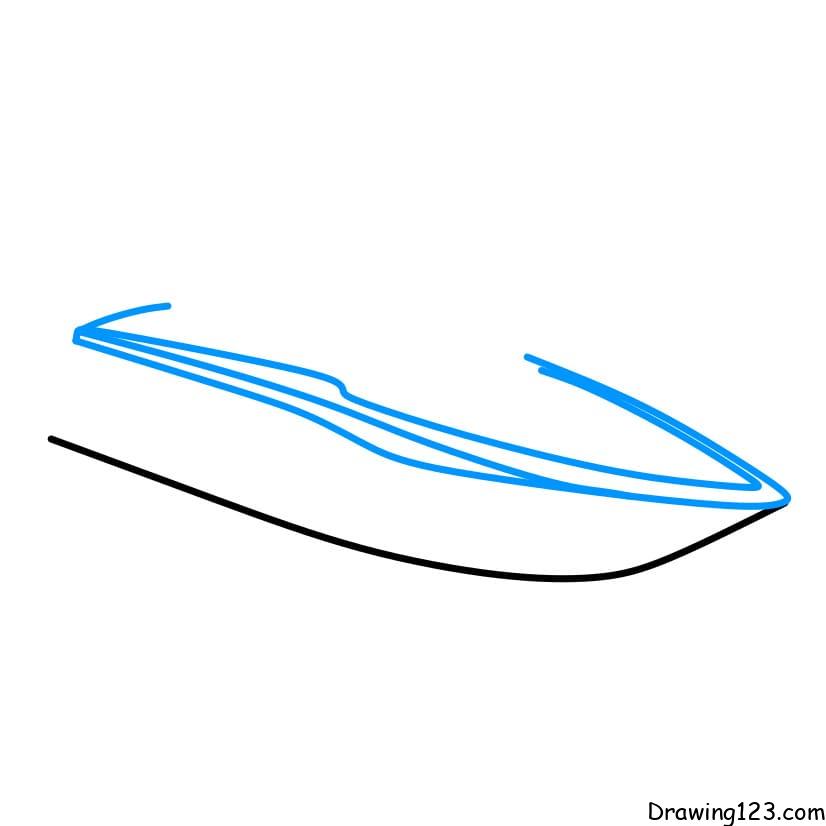 Step 3: Draw the hull on the bottom of the boat  Step 4: Let’s draw the cockpit for this yacht 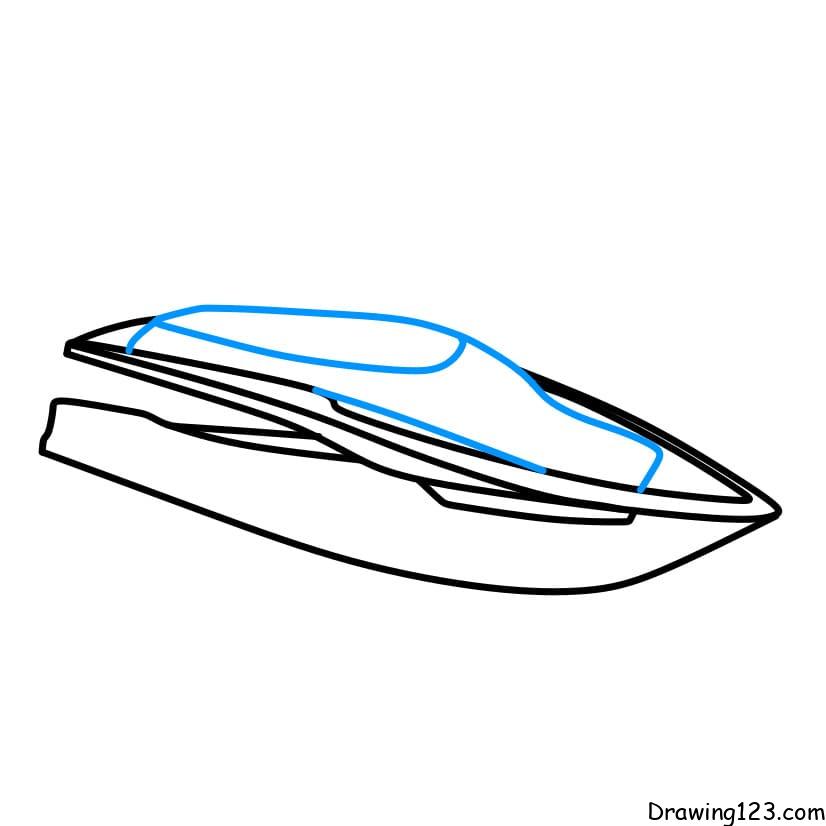 Step 5: Don’t forget to draw the window for observation 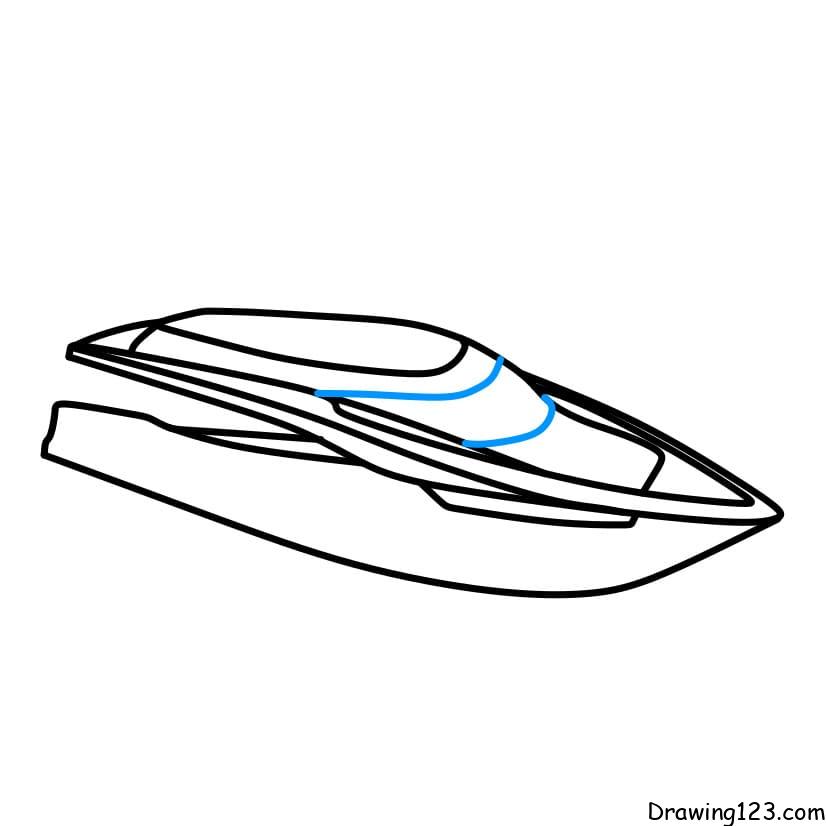 Step 6: Draw more rear of the stern of the yacht and details on the bottom of the boat 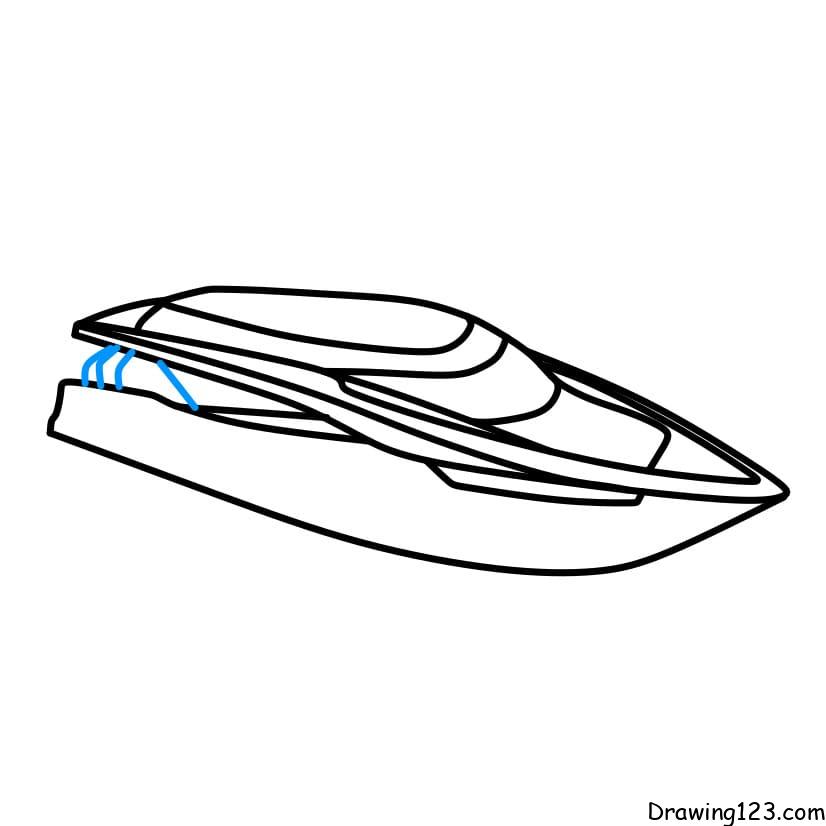 Step 7: Color to make the picture more beautiful 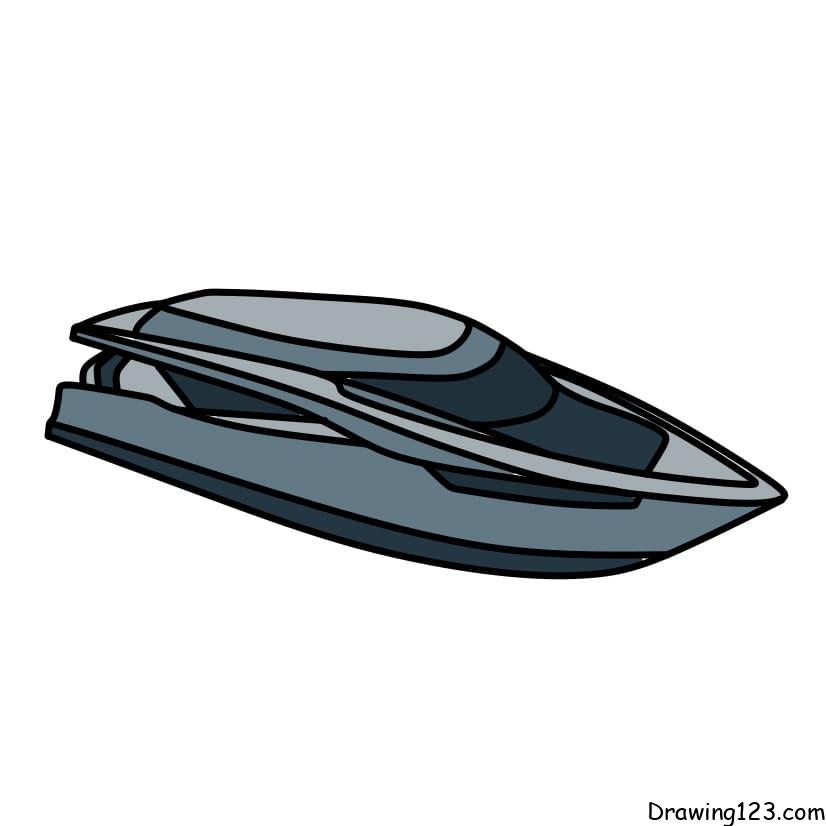 6. How to draw a simple yacht easily step by stepStep 1: First, draw the shell for the yacht 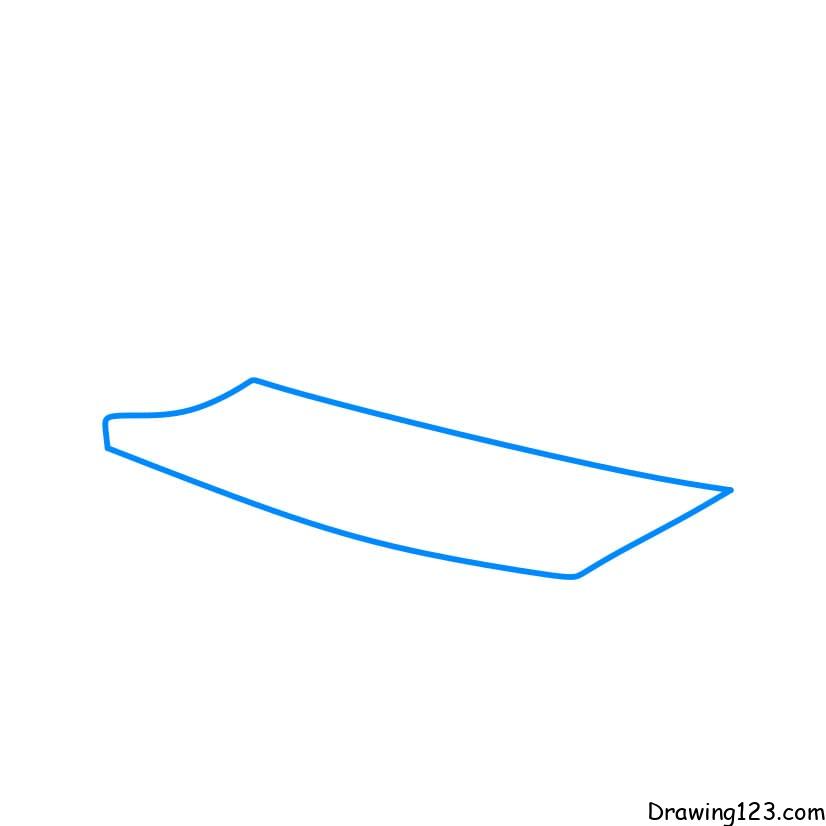 Step 2: Draw the frame for this yacht 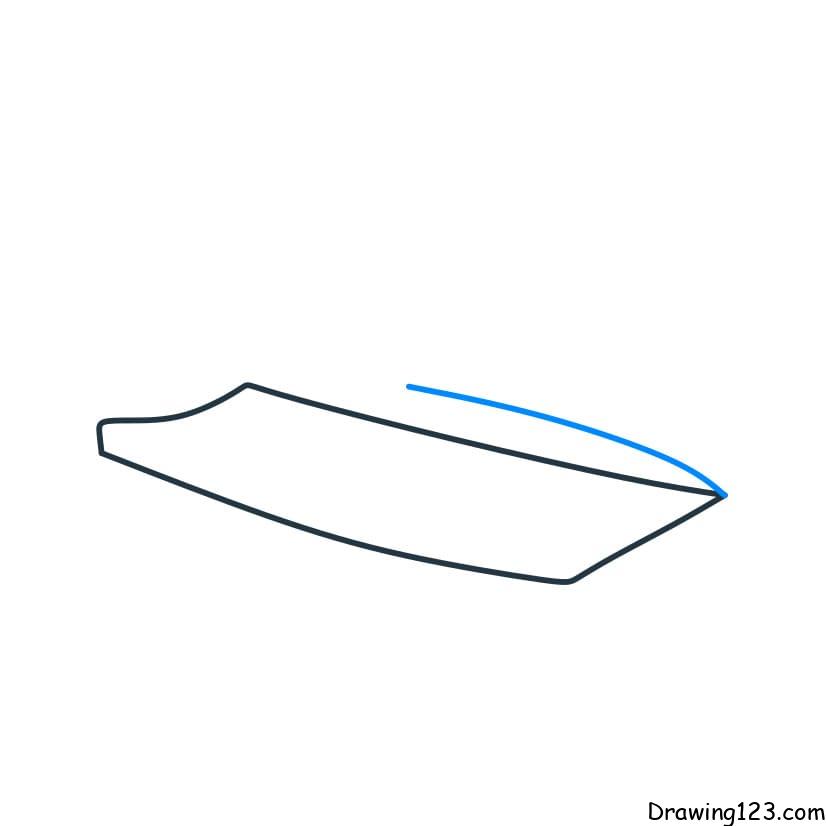 Step 3: Draw the view window of the yacht 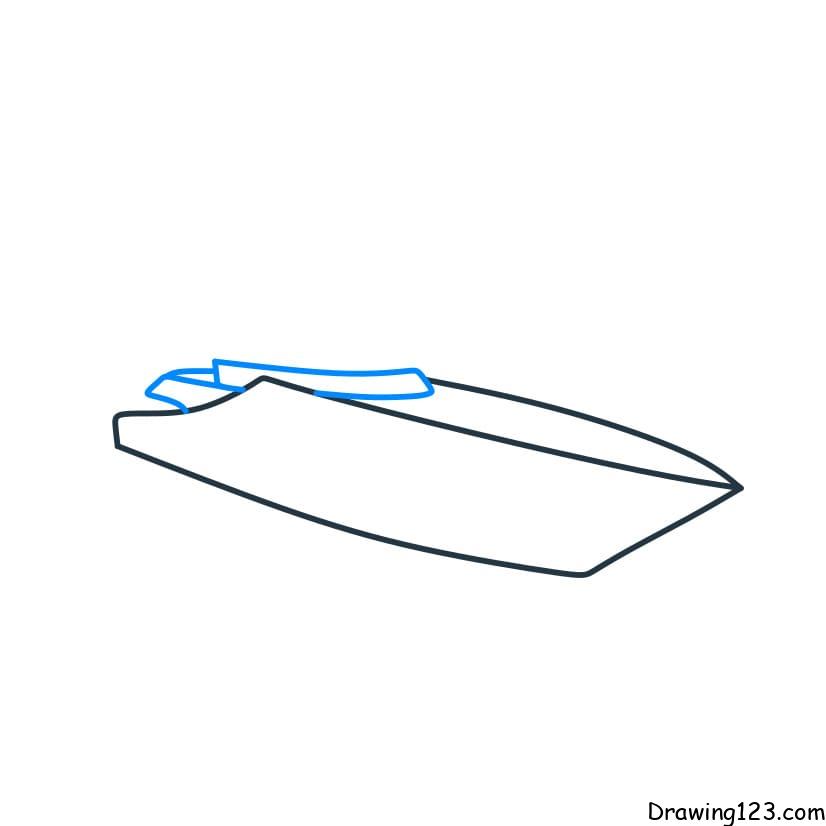 Step 4: Draw more details on the hull of the yacht 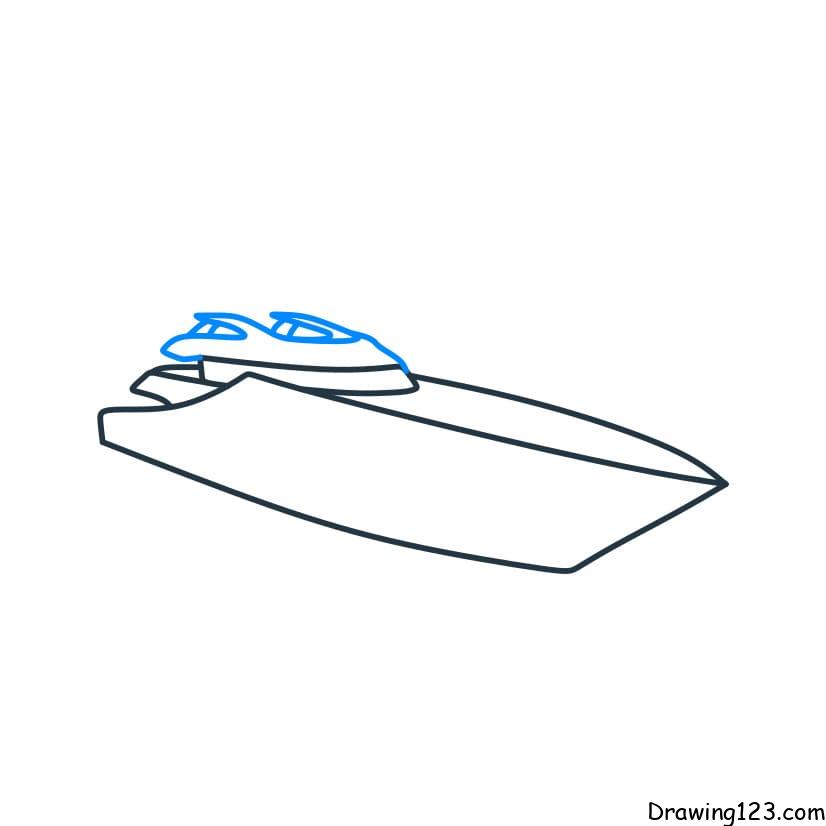 Hopefully, through the tutorial on how to draw a simple yacht for your kids, it will help you have a real picture Related Drawings
How to Draw a Yacht It is a recreational ship and its sports event are very popular around the world. How to Draw Boats and Ships
 More How To Draw Boats and Ships Drawing Tutorials How to Draw a Boat for Kids  How to Draw a Sailboat  How to Draw a U-boat  How to Draw Boats How To Draw Books How to Draw for Kids (Vol 3) How to Draw for Kids (Vol 2) How to Draw for Kids (Vol 1)Popular tutorials this week.  Search Cloud11 Easy Boats and Ships Drawing IdeasYou can set sail with a fleet of easy boat and ship drawings. Below, you will find watercraft of every size and description. If you want to start small, begin with the kayak and canoe. These vessels are designed to hold only one or two people and they are powered by hand using paddles. Sailboats are a bit bigger. They can have a small crew and capture the wind to move themselves along. Some of the boats are meant for hard work. Tug boats, for instance, pull larger ships in and out of the harbor. Fishing boats capture fish and crabs to feed people.  There are also big steamer ships designed to take people and cargo across the ocean. Can you believe that these heavy metal ships can float? There are even submarines - boats that spend most of their time under the water! 
A few of the boats on this list are historic, seen today only in museums and recreations. You can let your imagination run wild to the days when Vikings pillaged and pirates raided the seven seas. Grab your pencil and sheet of paper. You can build an armada of hand-drawn ships and boats. Just remember that your sketchbook isn't waterproof! 11 Boats and Ships Drawing Ideas Whether it's a yellow submarine or a super secret spy submarine, you can build this heavy-duty craft. Who might you draw peering out the porthole windows?  Easy Cartoon BoatThis little tugboat has a cabin with windows, a smokestack on top, and an anchor and a life preserver ring hanging on the side of its hull.  This fancy sailboat might be described as a yacht. You can tell that it is big because it has many windows along the cabin and the hull.  Huge metal steamer ships like this one have patrolled the oceans for a long time. Similarly styled cargo ships and cruise ships are still used today.  The TitanicThe Titanic is perhaps the most famous ship to ever sail the seas. It is also one of the shortest-lived, sinking on its maiden voyage.  Fishing BoatIn addition to the hull, cabin, and life preserves, fishing boats have a lot of special features. The poles and rigging hoist nests in and out of the water, and the railing keeps crew members on deck during stormy seas.  Wooden canoes made from hollowed logs are the oldest types of boats. This one is made from planks of wood, as you can see from the horizontal lines.  This small sailboat is basically a rowboat equipped with a sail. One of its sails is striped. It is not uncommon for sails to be decorated with patterns and bright colors.  Pirate ShipAarg! When you see the skull and crossbones on the flag or sail, take caution before you step on board. You might be made to walk the plank!  Viking ShipViking ships like this one were powered by great sails. They had dragons' or beasts' heads on the bow to intimidate their enemies, and the rowers were protected by brightly colored shields.  Kayaks are simple boats for one or two people. They are usually made of plastic or fiberglass and steered using a double-ended paddle.  See a Google Web Story of this Boats and Ships Drawing Ideas Blog Post. Why You Can Trust Our Drawing GuidesWe've been creating high-quality, easy-to-follow drawing tutorials since 2016. Rauno and the team of experienced artists are dedicated to helping people of all ages and skill levels learn to draw. We've carefully crafted over 1,900 step-by-step tutorials, ensuring that each one is safe, beginner-friendly, and engaging. We expand our library with new drawing guides every week, adding more drawing ideas and staying up-to-date with new trends. Our commitment to quality and accessibility has earned the trust of more than 1,700 satisfied paid members who have access to the huge library of drawing printables and ebooks, in addition to the regular step-by-drawing tutorials that are available for all readers. You can trust Easy Drawing Guides to provide you with some of the best drawing tutorials available online. Learn more about Rauno and Easy Drawing Guides. EasyLineDrawing Easy & Fun Drawing Tutorials for Beginners How to Draw A Boat Step by StepThis tutorial shows how to draw a sail boat in nine steps with detailed illustrated examples and easy to follow instructions.  The sail boat used in this example is fairly modern and also fairly simple with just two sails. You can see a preview of what the final drawing as well as the different steps look like in the image above. Start the tutorial using a pencil and make light lines that you can easily erase in case you happen to make a mistake. You can darken them later with a black pen/marker. You may also want to have some colored pencils/paints if you wish to color the drawing afterwards. Step 1 – Draw the Boat Hull Start by drawing the hull of the boat as shown in the example. Before you begin be sure to leave enough room at the top of your page/drawing area for the mast/sails. All you need to outline the hall are just three slightly curved lines, one for the front, one for the top and one for the back. Leave the bottom out as it will be submerged in water. Also be sure to draw the front slightly raised. Step 2 – Draw the Surrounding Water Add a wavy line along the bottom of the hull of the boat to show the water ripples around it and add the horizon line on each end of the boat slightly above that for the horizon. Unlike the water ripples around the hull this line can be straight. Step 3 – Draw the Cabin Sticking out from about the middle of the hull add the cabin. Draw it with a flat top, give it a slope on the front and a steeper slope at the back. Step 4 – Draw the Mast Going up from the top of the cabin draw the mast. Make it a straight pole with another part attached near it’s bottom and pointing backwards (the boom). Step 5 – Draw the Sails Draw the sails with the front one curved slightly forward but leave a little bit of room between it and the mast and front tip of the boat (there will be ropes tying it to those places added in the next step). Afterwards draw the back sail attacked directly to the mast and the boom. You can simply draw one very lightly curved line between these two to show it. Finally you can also add a flag at the top of the mast pointing forward with a slightly fold to show that it’s blowing in the wind. Step 6 – Draw the Ropes Draw the ropes tying the front sail to the mast and the bow (front tip of the ship). Next draw another rope going down form the boom to the hull. Step 7 – Draw the Windows Draw some windows on the cabin as shown in the example. You can make the two in the middle rectangular in shape (also give them slightly rounded corners). The one in the front should look like it’s cut-off by the front of the cabin. The back end of the back window should be angled to match that end of the cabin. Also try and space the windows to have the same distance between each of them. Step 8 – Finish the Line Drawing Add more water ripples below the big wavy line at the bottom of the hull. Make the waves larger near the bottom of the drawing and smaller near the boat. This will add a bit of perspective making it look like the picture has some depth. After you finish drawing the water go over your lines with either a black pen or marker. Alternatively you can simply darken the them with a pencil. Step 9 – Color the Boat Finally you can color the boat as well as the water/sky. It may be a good idea to use either water based paints or colored pencils to do this. Markers can be a little too bright. Add the colors as follows:
You can of course use a different colors for the boat if you prefer. This tutorial shows how you can draw a sail boat without needing to go into too many small details or complex shading. By adding the most important parts and using a good combination of colors you can have a drawing that is simple but also looks nice. For more similar tutorials also see:
Related Posts: Recent Posts
  How to Draw a SailboatLearn how to draw a sailboat by following along with this fun & easy drawing guide! Everyone will like this simple step by step lesson for learning how to draw a boat sailing at sea. This easy sailboat instruction guide is perfect for young students looking to get started with drawing. All drawing steps are included here which make it fun and easy to follow! Expect this drawing to last about 30 minutes, but the drawing process may actually take more time if other nautical crafts are included in the artwork. Art making is much more fun when you have a clear lesson to follow. Let’s get drawing!
 In this post, we are going to learn how to draw a sailboat with basic drawing tools. Be sure to observe the different sizes and shapes of each part of the sailboat. The pencil lines in each step is drawn out in blue so you can see the current parts that you will be illustrating. Time Needed: 30 minutes Draw The Hull First, draw the top of the hull by creating a horizontal oval shape with two pointed edges similar to the illustration. Next, create the side of the hull by drawing a line attached to the pointed edges of the oval. Add The Cabin Add the cabin by forming a sloped rectangular box. Draw Windows Draw the windows by forming rectangular shapes as shown. Attach The Mast Attach the mast by drawing a long vertical pole. Attach The Boom Attach the boom to the right side of the mast by creating a shorter horizontal pole. Draw The Sails Let’s draw the sails of the sailboat! First, draw the mainsail by making a diagonal line connected to the mast and boom. Next, draw a triangular shape on the left side of the mast to form the jib. Add The Burgee Add the burgee by making a V-shaped line attached to the top of the mast. Draw The Water Draw the body of water surrounding the sailboat by making wavy horizontal lines. Complete The Sailboat DrawingComplete the sailboat drawing by first coloring the mainsail with an orange crayon and the jib with a red crayon. Next, shade the burgee with a yellow crayon. Now, fill in the mast and boom of the sailboat with a brown crayon. Then, color the cabin with a white crayon and the windows with a blue crayon. Don’t forget to shade the hull of the sailboat with indigo. Finally, fill in the sky with a light blue crayon and the body of water with a dark blue crayon. How to Draw a Sailboat PDF DownloadClick the link below to view or download this drawing lesson. The PDF is a printable drawing lesson for How to Draw a Sailboat . The last page of the downloadable PDF includes a coloring book page with just the outlines and an extension exercise for prompting kids to get creative! One CommentVery nice, helped me very nice. Very nice Leave a Reply Cancel replyYour email address will not be published. Required fields are marked *
‘Project Ali Baba’ Yacht Makes Jeff Bezos’ $700 Million Megayacht Look Tiny Image: DMARGE/BOAT
Last year, German shipyard Lurssen made headlines with the unfortunate fire and the destruction of a Saudi billionaire’s $250 million USD yacht . But, like the phoenix rising from the ashes, Lurssen’s back in the spotlight with the superyacht Project Ali Baba—a 466-foot vessel that makes Jeff Bezos’ 416-foot sailing yacht, Koru , look like a dinghy in comparison. A Palace Fit for a Super-Modern SultanProject Ali Baba has begun sea trials in Germany, with construction nearly complete and only minor adjustments remaining. The trials showcase a close-up of the yacht’s extended bow, drawing inspiration in design from military styles. The vessel is scheduled for delivery in December 2024.  At $450 million USD, Project Ali Baba is the nautical equivalent of the GDP of a small country. This aquatic wonder will sleep 24 guests in 12 staterooms, waited on by 45 crew—because when you’re this wealthy, even your help has help. The four-deck yacht features two helipads—one fore and one aft—revealing the near-constant flurry of high-profile visitors. It also features a spacious beach club off the aft of the main deck and several lounge areas sprinkled throughout, promising endless possibilities for relaxation and fun. Luxury That Defies DescriptionCharacteristically tight-lipped, Lurssen doesn’t give away many secrets regarding the interior of this yacht. However, reports suggest unparalleled luxury abounds: sumptuous furnishings, sophisticated entertainment systems, and custom finishes redefine opulence. The upper deck is rumoured to be a private sanctuary for the ultra-wealthy owner, with exclusive amenities to fire the imagination. Related Stories ‘Honolulu’ Superyacht: Lürssen Shipyard Fire Destroys Saudi Billionaire’s $400 Million Yacht ‘Ulyssia’ Superyacht: World’s Largest Yacht Is Bigger Than The Titanic & Way More LuxuriousBuilt from a steel hull, aluminium superstructure, and teak decking, Project Ali Baba is an engineering masterpiece with great design. With a gross tonnage of 9,400 GT, she will enter into the elite fleet of only 70 motor yachts that have exceeded 100 meters in length. Her MTU engines promise impressive performance, with a maximum speed of 20 knots and a cruise speed of 12 knots. With an added 3,000 nautical mile range, no destination will be out of reach.  A Giant’s Turbulent PathThe path of this yacht to centre stage wasn’t all without incident. In December last year , the yacht collided with an internal gate and had a brief encounter with a bridge, providing an early, brief glimpse of the gigantic vessel of luxury. Project Ali Baba started construction in 2019 and was commissioned by Russian billionaire Leonid Mikhelson, estimated to be worth $25.5 billion USD per Bloomberg . Then came Russia’s war on Ukraine, and Mikhelson wasn’t able to take possession because of subsequent sanctions. Sold while still under construction, the true identity of Project Ali Baba’s new owner remains a tantalising mystery.  The Future of Floating FortunesEven as climate activists protest these fuel-guzzling giants and the occasional superyacht meets an unexpected fate , the demand for these floating palaces simply shows no signs of abating. Project Ali Baba is among the ten superyachts in the construction process at Lurssen.  As a matter of fact, it is estimated that the global superyacht market was valued at over $10.2 billion USD in 2022 and is set to hit $25.7 billion USD by 2032, growing at a robust 9.8% CAGR. Whether one applauds or condemns the luxury yacht industry, the numbers do tell the story. The rich and famous continue to pump money into these fabulous vessels as part status and part testament to their unlimited wealth. With Project Ali Baba set to rule the waves, the adage is once again proved right that as far as superyachts are concerned, nothing’s too big, too luxurious, or too expensive. After all, in the world of the super-rich, the sea’s the limit. Stories that matter, delivered.Get the latest breaking news and original content across sport, entertainment, luxury and travel. You may occasionally receive promotional content from DMARGE 
The 19 best motor yachts at the Southampton Boat Show 2024
It’s a packed line-up, but if you don’t have the time to see them all, we’ve picked out a some of the boats that we think are especially worthy of your attention at the 2024 Southampton Boat Show . Keep scrolling to read more, or click on the links below to jump to the boat you want to see. Best motor yachts at the Southampton Boat Show 2024 Sunseeker Ocean 156Unquestionably the biggest boat making its global premiere at the Southampton show is Sunseeker’s all-new Ocean 156. Unlike last year’s Ocean 182, which started life as an Ocean 90 before having an enclosed hardtop tacked on top, the 156 was designed from the ground up as a tri-deck model. The result is a more considered and, we would argue, better looking craft. Given that it’s also considerably shorter with an LOA of 82ft 6in (the 156 in its name refers to its Gross Tonnage), that’s no mean feat. As with all Ocean models, it’s also unusually beamy. A maximum width of 26ft 6in exactly matches that of the Sunseeker 95 Yacht and the result is a really spacious craft, relative to its length, with a broad choice of layouts. Crucially, that includes the option of a main deck owner’s cabin with all the benefits that incurs, such as bigger windows, better views, quieter nights, increased privacy and direct access to the bow lounge. That still leaves room below for four more double cabins, including a large full-beam suite amidships. The alternative is to keep the main deck as a vast open-plan entertaining zone with the galley at the centre of the action and a variety of dining, seating and bar options filling the spaces on either side of it. Recommended videos for you Fairline Targa 40Southampton will be playing host to one of the world’s most exciting sportscruisers. With lofty topsides, an upright bow and a wide beam that extends a good way forward, Fairline tells us this boat is 20% more voluminous than the old Targa 38. But while it’s clearly designed as a genuine mini-cruiser, the styling is also a delight. The snub-nosed semi-plumb bow comes with backlit stainless steel logos; the foredeck sunpad is framed by fibreglass ‘spears’; and the long plunging hull windows are dramatically mirrored in what appears to be a virtually mullion-free superstructure. On the inside, the practical ingenuity of the cockpit is also brilliant. The aft deck is split by a pair of broadly symmetrical sunpad-cum-bench units. There’s space for a partially inflated 2.7m tender inside the port unit, as well as a hinged table to keep the deck space clear. On the starboard side, a ‘power-down beach club balcony’ extends the cockpit outwards and to make very best use of that, there’s a bench that can be reversed to face out across the water.  Princess X95 VistaThe largest boat at the show is also one of the most interesting. As an adaptation of the starkly distinctive X95, the vast interior spaces on both the open-plan, helm-free main deck and that trademark ‘Super Flybridge’ still cover virtually the entire length of the yacht. It still claims to deliver 10% more outdoor space and 40% more indoor volume than a traditional motor yacht of the same length. And it’s still the same pioneering platform that inspired so many other builders to follow suit with their own interpretations of the long-range, explorer-style sub-100ft ‘superyacht’. But the Vista variant updates the concept in a couple of ways, firstly with a new full-length single-piece hull window, and secondly, with a new foredeck design that opens up the bow structure to provide uprated views, both through the main deck’s forward window and the exterior foredeck seating.  Though second in size to the flagship 46, the new 41 is probably the best boat in the entire fleet. Modest innovations include plenty of firsts for Targa – proper hull windows, bonded pilothouse glazing, larger side doors and cockpit boarding gates. But it’s the fact that the 41 is playful, as well as practical, that’s so pleasing. The cockpit, for instance, features symmetrical L-shaped seating sections at the transom, opposite an aft-facing bench at the back end of the pilothouse, all ramped up with the option of flip-down seats, drop-down tables and sunbed infills. There’s another sunbed forward plus a convertible C-shaped dinette up on the flybridge – and you even get space to sleep up to seven people, thanks to two cabins and a convertible wheelhouse dinette.  Norway’s Marex will be taking its award-winning flagship to the Southampton Boat Show in its optional (and for most people, preferable) ‘Gourmet Cruiser’ guise. This uses a massive aft galley that dominates the internal space and projects out into the cockpit with an optional bar. You can spec this boat with the more conventional internal saloon of the ‘Scandinavia’ variant instead but rigged like this, the kitchen is very much the hub of the dayboating zone with plenty of space to cook and eat, plus four huge chest fridges in and around the galley area, so you can spend long spells at sea without returning to shore. Back aft, the big cockpit is hemmed in securely and lined on all sides by bench seats, creating an alfresco lounge big enough for ten. You can turn this into a four-season space with tensioned canvases; and the accommodation is flexible too, thanks to a two or three-cabin layout with a pair of cleverly conceived bathrooms. Whether you want IPS drives, sterndrives or V-drives, the 440 again offers plenty of choice, but what is really likely to put a smile on your face is the way it combines classical elegance with striking design intelligence and delivers it all in a package you would feel very proud to own.  Nord Star 33+Southampton will host the first outboard-powered Nord Star 33+ to hit UK shores – and like the inboard variant, it looks like a very cruise-friendly boat. It features deep, wide walkaround decks with opening side gates built into the railings amidships, plus sliding doors on both sides of the pilothouse. The tinted windows are all bonded in, helping narrow the mullions for uprated views from the main saloon – and in the optional ‘Cruiser Layout’, the starboard galley comes with a full-height fridge, a gas-free stove and wide aft patio doors. Down below, a striking full-beam mid cabin with twin beds and hanging storage is neatly accessed via a hinged seat and there’s also a permanent double in the forward cabin. In Cruiser form, it’s the central section that really shines. By putting the galley up top, it frees up the space for a wetroom on one side and a starboard heads on the other. Alternatively, you can spec both sides with a loo and shower; use the port compartment as a walk-in wardrobe; or you can opt for the standard fit-out with the galley below and larger dinette in the saloon.  Absolute Navetta 48The smallest of Absolute’s Navetta range does a superb job for a sub 50-footer. As on the larger models, the plumb bow, raised foredeck, generous beam and trawler-style superstructure mean plenty of volume for a boat of this length. It’s big enough to sleep six adults in remarkable comfort, thanks to a pair of generous midships guest cabins and a supremely bright and spacious owner’s bow cabin. Pocket doors and long, panoramic windows make the space feel very generous, and the bed is set on the diagonal for maximum floor space around it. That still leaves room for a couple of decent bathrooms and an additional ensuite crew cabin that you can access directly from the stern platform.  Having forged its reputation over the last 50 years through the creation of premium ocean-going sailing yachts, Rustler’s first ever motor boat will be taking centre stage in Southampton. Designed very much in the fashion of a classical gentleman’s launch, it uses a sheltered main deck saloon with twin helm seats that back onto a fully featured galley. Opposite that, a U-shaped dinette can be converted into a third double berth to supplement the owner’s bow cabin and the midships guest double. From here, aft doors lead to a sociable outdoor cockpit with L-shaped seating in each quarter and a wet bar with additional seating forward. A central through-transom door gives access to the swim platform and further forward, side gates and walkaround decks make onboard movement equally easy.  Cormate Chase 35Making their UK debuts in Southampton will be a couple of extremely attractive new Cormates. The Utility 27 is an ultra rapid high-end weekender with lovely looks – but with its extra length, day space and weekend cruising potential, it’s the new Chase 35 that is likely to be the bigger draw. Extended by a foot with a revised hull for extra efficiency and stability, the new boat comes with the extraordinary option of twin 565hp Mercury Racing engines for a claimed 82-knot top end. But such is the efficiency of the hulls that even the basic twin TDI V6 270 diesels will deliver performance in the region of 46 knots, alongside cruising efficiency of less than 1.2 litres per nautical mile. It achieves that by means of a narrow beam (around 25% of the overall length), a hull monostep and stiff, lightweight vacuum-infused construction that sees this boat tipping the scales at just 3,000kg.  Greenline 45 FlyThis is the first chance for showgoers to see the 45 Fly on UK shores since it was launched back in 2019. And we reckon this is Greenline’s most appealing boat yet. Much of that comes down to its clever design and packaging – it looks good inside and out with a lovely bright saloon and aft galley on the main deck and three good cabins below with exceptional levels of natural light, especially in the forward VIP. There’s also some smart thinking on the engineering side with a wide range of Yanmar or Volvo engines to choose from and the option for varying degrees of electric hybrid power. Even the base boat comes with a li-ion battery pack plus an inverter and solar panels on the saloon roof to give you mains power at anchor without the need for a noisy, smelly generator.  Balt Yachts SunCamper 31Possibly not the fastest, prettiest or most luxurious boat at the show, but we challenge you to find a better value one than this SunCamper 31. Built by Polish yard Balt Yachts, which also manufactures craft for some much more prestigious brands, it looks like being a great little waterways cruiser for buyers on a budget. Powered by either a single petrol outboard or small shaftdrive diesel engine, it should be just as cheap to run as it is to buy. For as little as £129,226 inc VAT you get a really bright, spacious wheelhouse with a well-equipped galley and convertible dinette, as well as sleeping space for an astonishing seven people. There’s a double cabin forward with an extra single berth under the saloon and another double aft – and we’re told the heads compartment has lots of headroom too.  Show visitors in search of a boat that marries offshore potency with stylistic flair would do well to check out the new Sargo flagship. In addition to the promise of a soft, dry ride on long offshore passages from that rigorously proven Sargo hull, the new 45 makes everything really simple. From the easy-access fender stowage and the impeccable helm station to the wide-gauge fuel fillers and the side-opening engine bay, the basics have been really well executed on this flagship model. In terms of its cruising credentials, it comes with a convertible dinette, an ingenious ensuite mid-cabin, a pair of forward cabins and a generous day heads, so you could feasibly sleep eight people on this boat in really decent comfort.  Enjoying its UK debut at the Southampton Boat Show is the smallest of Fjord’s elegant daycruiser fleet. It comes as standard with twin helm seats offset to starboard behind the large central console. There’s also a large aft bench and a big open deck to make the most of the boat’s fluid zero-step walkaround design. As a high-end Med-style party platform it’s a very easy boat to customise too. There are six alternative upper deck layouts, revolving around the use of aft benches, a galley and a T-top. There are also two lower deck arrangements that subtly tweak the base layout’s bow cabin and starboard heads. But for us, this boat looks best with three helm seats, backing onto a transverse galley, with a large central dinette and an aft sunpad.  Windy 29 HuracánNew to the Southampton Boat Show will be one of the smallest Windy boats to inhabit the brand’s classical (and still much sought-after) sportscruiser format. Slotting neatly between the 27 Solano and the 32 Grand Zonda, the Windy Huracán 29 ticks all the usual Windy boxes with a step-free deep-vee hull, a choice of petrol or diesel inboard engines, a deep, wide cockpit and an aggressively raked foredeck with a step-through screen. The deck layout is also classical Windy, thanks to an asymmetrical cockpit arrangement, featuring a pair of rotating helm seats that back onto a starboard dinette and a facing corner seat to port. Behind that, a sunpad adjoins the aft end of the dinette, with a sliding backrest for extra flexibility.  Prestige F4.9What was originally the Prestige F4 has become the Prestige F4.9 to better reflect its 49ft length – but it’s good to see that the boat remains the same because there’s some ingenuity to the deck arrangements that makes this latest-generation Prestige flybridge cruiser feel extremely gratifying. The ‘Ocean View Galley’, for instance, adopts a transverse layout way aft, enabling it to straddle the zone between saloon and cockpit to great effect, while also putting your eyeline at the same level as that of the seated saloon guests on the other side of the low-level glass screen. But there’s even better thinking at the bow, where the raised forward cabin takes great advantage of the extra breadth in the upper, less tapered, section of the hull, while creating natural separation from the two guest cabins further down and aft.  Make no mistake. The 68 Fly on Azimut’s Southampton show stand is a fully-fledged luxury cruising machine, brimming with light and space, opulent upholstery, designer detailing and sensible storage solutions. But it’s also a proper driving machine. The slippery medium-V Pierluigi Ausonio hull is coupled with a pair of Volvo Penta 1,000hp IPS-1350s for a 32-knot top end and a really comfortable long-legged cruise at speeds as low as 19 knots. The weight is also kept good and deep, thanks to the use of carbon fibre in the superstructure, hardtop and deck mouldings and the agility of the handling fully reflects that. It’s particularly pleasing then that when you step away from the helm, there’s such remarkable space and volume on offer…  Beneteau Antares 12After nearly five decades in production, the capacity of the Antares line to imbue modestly sized platforms with big versatility is well known – and that’s nowhere more evident than on the flagship 42-footer. While its spacious flybridge, expandable cockpit and beamy bow lounge all function very effectively as independent open-air dayboating zones, the lower deck is pretty well arranged for extended cruising too. The owner’s bow cabin and the primary twin cabin both come with ensuite bathrooms and, while the latter is shared as a day heads, there’s still space for a modular third cabin that can be specced as a single berth, a double berth or a dedicated storage room.  Quarken 35 CabinAfter much anticipation, the Quarken 35 Cabin has done exactly what fans of the award-winning 27 had hoped. It features a twin-stepped hull with a fine entry and a flared bow, very much in line with previous models, alongside a pair of Yamaha F300s for a top speed of around 46 knots. Like its smaller sibling, it also features an asymmetrical wheelhouse to maximise internal space, while leaving room for a deeper, wider side deck to starboard. But with its extra scale come all sorts of additional benefits. In the pilothouse, for instance, the forward-raked windscreen, plunging windows and large sunroof make both brightness and visibility very strong; and with an aft door, as well as a side door, movement around it is first-rate too.  Saxdor 400 GTCSaxdor’s 400GTC made a brief appearance at the British Motor Yacht Show earlier in the year but Southampton will still be the first chance for more occasional showgoers to see it properly. It’s well worth making a beeline for Saxdor’s marina berths, if only to witness the 400’s brilliantly clever convertible wheelhouse in action. With huge sliding glass doors on both sides in addition to drop-down side platforms, bi-fold rear doors, a lifting rear window and a large central sunroof, it transforms from a fully enclosed pilothouse boat to a big open party platform in a matter of seconds. It’s no slouch either; when we tested it last month its stepped hull and twin 400hp Mercury outboard engines pushed it to a top speed of 43 knots and would have gone quicker still if the wind and water had been a bit kinder. The choppy conditions did, however, give us the chance to explore its seakeeping manners and despite all those moving parts, it acquitted itself remarkably well, punching confidently through the waves without excessive shake, rattle and roll. Perhaps best of all, prices start at £323,995 in the UK – surprisingly reasonable for a 40ft boat with so many strings to its bow. If you enjoyed this….Motor Boat & Yachting is the world’s leading magazine for Motoryacht enthusiasts. Every month we have inspirational adventures and practical features to help you realise your sailing dreams, as well as tests and news of all the latest motorboats. Plus you’ll get our quarterly Custom Yachting supplement where we share the last on offer in the superyacht world and at the luxury end of the market. Build your knowledge with a subscription delivered to your door. See our latest offers and save at least 30% off the cover price. New Boats at Southampton Boat Show: Greenline 45 FlyNew boats at southampton boat show: azimut 68, new boats at southampton boat show: fjord 39xl, latest videos, princess s65 sea trial and tour: £2m sportsfly ticks all the boxes, watch: beneteau swift trawler 54 sea trial – £1.4m cruiser is the ultimate home, watch: parker sorrento sea trial: 50-knot cruiser with a killer aft cabin, watch: virtue v10 sea trial: €272k weekender. |
IMAGES
VIDEO
COMMENTS
Learn how to draw a stunning luxurious yacht with this simple step-by-step tutorial. Watch the drawing process and follow along to create your own beautiful ...
Sketch the main body of the sailboat. Start by drawing a trapezoid shape. 2. Sketch a line perpendicular to the body of the boat. Next, draw a small trapezoid where this line is connected to the boat. 3. Sketch another line. This time, place the line perpendicular to the first. Add more details to the stand of the mast.
How to draw a sailboat is meant for young artists! During this lesson we're going to work on drawing triangles, wahoo!SUBSCRIBE for regular drawing and art l...
Step 2: Draw the Deck and Cabin. With the hull complete, it's time to add the deck and cabin onto your drawing. Since it rests above the hull, let's start with the deck. The deck is basically the main floor of the yacht which acts as a platform for people to walk on. Simply draw a curved line above the hull for the deck.
Welcome to my boat drawing tutorial! In this video, I'll guide you through the process of drawing a detailed boat step by step. Whether you're a beginner or ...
Step 2: Outline Some Details. We are now going to begin adding some smaller details. Begin on the far left end of the boat sketch, drawing a curving canopy shape. Add a small narrow band around the base of the boat drawing below this canopy, and then add a small tear-drop shape in the front point of the boat.
Complete The Yacht Drawing. Let's finish the yacht drawing by adding some color! First, color the windows on the superstructures with a dark purple crayon. Next, shade the portholes with orange and blue crayons. Now, fill in the rest of the yacht with a white crayon. Then, color the sky with a light blue crayon and the body of water with a ...
1. Sketch the sailboat's hull. To do this, draw an upside-down trapezoid. 2. Sketch the cabin section of the boat. To sketch this section of the boat, draw a very skinny rhombus-like shape that is touching the boat—you won't need to draw the long bottom line though, since the sailboat itself already creates that.
Drawing a River Boat Outline. Let's start by sketching a simple river boat outline, focusing on a design with gentle curves. To ensure our boat is drawn with the correct perspective, we'll use a rectangular guideline box. Begin by drawing the box in perspective, marking the centre line at the front and back.
This is a tutorial on how to draw one of the most desirable things to own, a yacht. OTHER TUTORIALS . How to Draw a Boat. In this simple step by step guide learn how to draw a boat in a simple and interactive way. You just need a red pen and a paper to start drawing a boat in the next 2 minutes! How to Draw a Fishing Boat
Step 2: Draw the frame and shell for that yacht. Step 3: Draw the hull of the yacht. Step 4: Draw the roof for the boat. Step 5: Draw a windshield. Step 6: Don't forget to draw small details on the hull of the boat. Step 7: Color to make the yacht painting more beautiful. 4. A simple drawing tutorial: a giant yacht. Step 1: First, draw the ...
6. Extend two vertical straight lines from the middle of the boat. Connect them at the top with a short line, and erase lines from between them. This is the mast that supports the sails. Then, draw rectangle-shaped seats inside the hull. Draw a straight line from the back corner of the hull to give the boat a three-dimensional shape.
How to Draw a Yacht. It is a recreational ship and its sports event are very popular around the world. Tags: Yacht, Yachts, boats, ships, transportation,
Learn how to draw a Boat in this simple pencil drawing tutorial of a sailboat. SUBSCRIBE for more: http://www.youtube.com/user/circlelinemediaI hope you like...
11 Easy Boats and Ships Drawing Ideas. Last Updated on: July 9, 2024 | Published on: April 29, 2024. You can set sail with a fleet of easy boat and ship drawings. Below, you will find watercraft of every size and description. If you want to start small, begin with the kayak and canoe. These vessels are designed to hold only one or two people ...
Step 1 - Draw the Boat Hull. Boat hull drawing. Start by drawing the hull of the boat as shown in the example. Before you begin be sure to leave enough room at the top of your page/drawing area for the mast/sails. All you need to outline the hall are just three slightly curved lines, one for the front, one for the top and one for the back.
drawing set of pictures of yacht and boat from dubai marina,sketch, hand drawn cir vector illustration. Save. Hand drawn maritime ships. Vector icon set of outline ship at sea, sail boats, speed boat, yacht, liner, sailboat, cruiser and cargo ships. Water ocean transport boat. Sea marine travel
Complete The Sailboat Drawing. Complete the sailboat drawing by first coloring the mainsail with an orange crayon and the jib with a red crayon. Next, shade the burgee with a yellow crayon. Now, fill in the mast and boom of the sailboat with a brown crayon. Then, color the cabin with a white crayon and the windows with a blue crayon.
in this video tutorial you will learn How to Draw a Yacht step by step| Easy Drawing Lessons for KidsLately we are experiencing a boom in online drawing less...
Jun 15, 2022 - Explore Jennifer DeLuca's board "Drawing - Boats", followed by 139 people on Pinterest. See more ideas about boat drawing, drawings, sailboat drawing.
Chill out and follow this tutorial to learn how to draw a kayak, draw a yacht, draw a... Boat Drawing Simple. Pirate Ship Drawing. Sailboat Drawing. Boat Cartoon. Simple Boat. Dibujo Simple. Bateau Pirate. Boat Drawing.
Follow my step by step Yacht Drawing & you will be able to draw as Beautiful as mine. It is so interesting & easy Yacht Drawing that it is suitable for begi...
The trials showcase a close-up of the yacht's extended bow, drawing inspiration in design from military styles. ... Boat International. At $450 million USD, Project Ali Baba is the nautical ...
Best motor yachts at the Southampton Boat Show 2024. Sunseeker Ocean 156. Unquestionably the biggest boat making its global premiere at the Southampton show is Sunseeker's all-new Ocean 156. Unlike last year's Ocean 182, which started life as an Ocean 90 before having an enclosed hardtop tacked on top, the 156 was designed from the ground ...
Learn how to draw a Boat with the help of our drawing lessons! In this video I will walk you step by step through the drawing techniques you will need to cre...