Affordable Sailboats You Can Build at Home

Key Takeaways
- There are many sailboats that anyone can build from home depending on tastes
- Budget will be the biggest deciding factor on a majority of the process
- Consider kits that come with most of what you need or choose ones that are all-inclusive
- Design complexities and new materials may make the building time process longer
- Plan the best you can ahead of time to save money and your working hours
Buying a sailboat can be expensive, but building your own can save you money. So what are sailboats you can build from home?
Sailboats that you can build from home will likely be a small boat under 20 feet. These could be from many different boat suppliers such as B&B Yachts, Brooks Boat Designs, and Chase Small Craft. Boat plans will vary based on your budget and how much time you have on your hands.
Based on my previous experience, building your own boat will take much longer than if a professional were to do it. You also have to be able to study plans, consider various sailboat designs, and have tons of supplies such as fiberglass tape or fiberglass cloth. On top of that, you will also have to be good with your hands.
Table of contents

Top 10 Affordable Sailboats Anyone Can Build at Home
Building your own pocket cruiser or other styles from boat plans is an impressive feat, as this will need dedicated time and money to assure your boat sails safely. Boat building takes a lot of patience as well, especially since this will not be completed in a fast manner.
Finding boat plans and materials that fit your budget will be key to being able to complete the project. The time it takes to complete these projects will vary on your overall experience and needs. Below are 10 of the most affordable sailboats that you can build in the comfort of your home.
B&B Yachts

B&B Yachts have 14 different boat plans you can choose from to find the boat of your desires. Their shop is located along the Bay River in North Carolina where they construct all of the kits and have a 100 foot dock to show off your project once you complete it.
One popular model to check out is their Core Sound 15, as it is the perfect size for those wanting to build a modest size boat for a handful of people on board. Their website features some videos of completed projects and the plans or kits for purchase.
- 14 different models to choose from plus some dinghies
- Various monohull and multihull options
- Friendly customer service with attractive prices
- Might be too many options for some that are indecisive
- Not ideal for those wanting to have a motor sailer
Brooks Boat Designs

Brooks Boat Designs has a handful of options to consider for your next sailboat building project. They are located in Brookline, Maine and give the option to buy the kits or have them build one from scratch for you. They have plenty of knowledge, so do not be shy to ask about modifications or custom features you are looking for.
Depending on your specifics, they can attempt to accommodate some of their plans to help fit your desired outcome. By checking out their site, you can see many examples of their construction in progress and what the boats will look like when completed.
- Offers a variety of kits
- Plans vary around $50 and up, while materials will obviously add more costs
- Some plans can be rowing boats that can convert to sailboats
- Might take a while to hear back from them, as their contact section is a little outdated
- Their plans may not accommodate a ton of extras for your taste
Chase Small Craft

Chase Small Craft offers a simple process for building boats. Their kits are equipped with everything you need and will help save you time than just buying the materials outright and other parts you could need. This is arguably one of the best bang for buck instances if you want to save time and money searching for pieces to your boat.
They are located in Saco, Maine and will ship everything to your home from there. All the necessary materials are included and all you need are the proper tools and working space.
- All-inclusive kits with what you need
- Tons of knowledge on their site for boat building
- Easy process to order and customize
- Complete kits can range over $20,000 for larger boats
- Kits may take up to eight weeks to ship out
Chesapeake Light Craft

You can expect high-quality boat kits from Chesapeake Light Craft . They feature 18 different sailboat kits that vary from eight to 20 feet in length. This should be more than enough to find one for you if you are newer to boat building.
They also have a wide variety of other kits in addition to the sailboat, in the event that you wanted to order a small kayak or paddleboard in addition to your sailboat. The prices vary considerably when considering a small or larger boat, so check the complete list of options to in order to potentially fit your needs.
- Plenty of sailboat offerings to choose from
- Different beautiful hull form options to consider
- Easy to build and perfect for sailing
- Only has basic materials needed for kit, so you may need to purchase other items
- Has epoxy shipping fee no matter if you pick up item
Dudley Dix Yacht Design
Dudley Dix Yacht Design has an extensive list of plywood and single skin sailing boat options. They have plenty of sail plans and kits to consider depending on your goals. These follow a classic look for sailboats, which are aesthetically pleasing.
If you are wanting one to accommodate a small family, they have more than plenty to look through. The cost is not as bad compared to others, but keep in mind that you may need to throw in your own supplies or specific tools to get the job done.
- Plans start at $30 and range up to $7,500 or more for kits
- More than enough of options to consider
- Affordable variety of sailboat offerings
- Might be too many options for those new to sailing
- Most are wood without the use of aluminum or steel
Farrier Marine

If you are in search of a multihull to build, then Farrier Marine is what you need. They offer a unique folding catamaran that is trailerable and give you the option to build it yourself. This not only makes it an appealing option, but anyone can take this multihull boat wherever they want with ease.
It features a thorough construction guide once you receive all of the materials. These also come with stainless steel fasteners and an aluminum mast for high-quality materials. Pricing will vary since you must request which model type you are considering.
- Ability to build a unique catamaran
- In-depth construction guide to help
- Easily handled and trailerable
- Price may be too high
- Limited offerings since only a few multihull options
Glen-L Marine Designs

Building a boat from Glen-L Marine Designs can save you time and money. They feature an easy system to order and receive the kits, as well as an in-depth guide to building them. This is an appealing option compared to most boat kit sellers.
The beauty about Glen-L is that anyone can build these from scratch, so you do not have to be the best boat builder in the world to get it done. They offer guides and helpful insights from their team to point you in the right direction. Plans vary around $15, while kits can range well over $1,000 depending on boat size.
- Nearly 50 designs to choose from
- Complete guide to help anyone build it
- Plenty of price points depending on size
- Might be overwhelming with the amount of options
- Could take a while to get parts since they are popular
John Welsford Boat Designs

John Welsford Boat Designs invites new and veteran boat builders that want a taste of quality small wooden boats. The boat plans are designed to meet your specifications and are catered to your desires.
There are seven sailboat designs to choose from so you do not feel overwhelmed in the process. However, they do not sell kits all the time, so you would need to have the materials or be on the lookout for the best prices when they are available.
- Seven sailboat plans with different sizes
- Quality boat builder and supporting community
- In-depth knowledge provided to you when you order
- Might be too small of boat size
- Kits are not always available
Iain Oughtred
There are plenty of options on the wooden boat store, but you should narrow down your search for Iain Oughtred’s line of sailboat kits and plans. There are 25 different plans to choose from, which should accommodate most everyone looking to build their own boat.
While they do offer some kits, they do not routinely offer sailboat kits. You would need to purchase all of the materials if you are considering one of their sail plans. Keep this in mind if you are considering, as you would need to hunt down the parts yourself.
- 25 different sailboat plans to look through
- Various sizes to contemplate for you sailing needs
- Prices will vary but are not bad compared to market
- No sailboat kits, only plans
- Newer boat builders might find too many options unappealing
Paul Gartside Boat Builder and Designer
Gartside Boats is a boat builder company based in Long Island, New York that showcases a variety of boats from traditional and newer methods of boat building. Within that variety, they have boat plans meant for six to 50 feet in length.
With an abundance of options, you will need to contact them regarding prices and any customizable options. Kits may vary as well, as they typically design in-house and build for you.
- Experienced boat designer that can accommodate with custom plans
- Many options are trailerable
- Can have plans for up to a 50 foot boat
- You will need to contact them for prices
- Customized options may make process more complicated for new boat builders
How Much Does it Cost to Build a Sailboat at Home?
As you have likely already done so, the math between building your own boat and buying one may be a huge difference. Likewise, you may even enjoy the challenge of taking an older boat that is gutted and restoring with parts from a kit to build one new again.
But how much does it cost exactly to build a boat from the comfort of your own garage or workshop? The prices are going to vary dramatically depending on your situation and material needed to get the job done. In addition, the time that it takes to complete this will also vary.
Sail plans are rather inexpensive if you are aiming to build a small boat. These plans allow you to see the workings of the boat design and what you need to build the boat.
Without these plans, you will not know the exact details of the design and it can cause major issues with the boat’s hull or other areas of the boat. Think of these as the backbone or instructions of the boat’s infancy before being built.
Price Per Square Foot
You should assume to pay anywhere between $300 to $600 per square foot if you are interested in building a boat. Buying a kit outright can be a good way to save time, but oftentimes these do not come with everything you need.
Instead, you should try to source as much of the materials at the best price as possible. Thinking ahead is part of the process and you might be able to score a deal at a lumber yard or hardware store for parts.
Boat Designs Matter
The design of the boat will be much different from one boat to the next, regardless if they are the same size in length. If you are pondering boats that range anywhere between 16 and 20 feet, you should factor in the shape of the hull, any rigging, and various appendages.
Prices tend to increase when there are more complexities within the designs. If you are considering a kit with more details than others, you will also have to pay more for the designs on that as well.
Kits Can Differ
It is important to understand that all kits are not going to be the same. As you gander at sailboat kits online to stitch together, you need to thoroughly look over to see if you have everything you need before buying.
It would also be at your advantage to ask the seller if any additional parts or supplies are needed. This may change your dynamic on the kit buying process and you may pass up one for another if it has everything you need. An all-inclusive kit may cost several hundred, if not thousands, of dollars more to have the convenience of everything in the bundle.
Construction Approaches
Some boat plans may require you to have certain tools to get the job done. This means special saws or planers, which the average person simply does not have.
Purchasing specialty tools might be expensive upfront and hard to find depending on what it is. Your best bet would be to check locally for others trying to sell their tools or consider a boat plan that does not require extensive tools to finish the job.
How Long Does it Take to Build a Sailboat?
An easy to build sailboat could take a while to build from scratch. Many different variances come into play that are difficult to pinpoint for everyone. But how long is that exactly and how will your experience play into this?
A fun project to sail in the wind could take you several months to well over a year depending on the boat plan and how big your boat is going to be. In addition, the materials all need to be accounted for prior to starting in the event a hardware store does not have them in stock.
Time Varies
The time that passes for simple boat designs on small sailing vessels can be done in a few weeks. This is assuming you have everything you need and work non-stop around the clock.
Certain complex situations may make the process long, such as the difficulty of working with some materials. If you are a skilled laborer, it may take you half the time compared to a novice. The amount of time it can take will vary on your availability and skill level.
Planning ahead will undoubtedly offer the most time-saving features. It also helps if you can tackle parts of the project at your own pace.
Complexity of Design
The design of the boat may make the construction process longer. For example, it may take you longer to build a catamaran compared to a similar lengthed monohull.
More complex designs might require more materials, therefore making the process a bit longer to complete. Furthermore, you will also need more experience working with difficult designs and that will affect you more as a newbie.
Be sure to manage your expectations well and do not allow yourself to become too stressed over this fun project. If you can, seek expert boat building advice from a local builder or the company you purchased sail plans through.
Quality Materials
The quality of the materials will matter significantly when building a boat and will greatly affect the time it takes to construct it. Handling fiberglass or carbon fiber might require specialty tools, while wood also demands a certain level of craftsmanship.
If you are not skilled at working with the material at hand, it might affect the quality of the build and you may have to go back to fix mistakes. This will definitely add more time to your project, because mistakes are bound to happen with your first project.
To save time, consider adding the tools and materials throughout the year or as often as your budget allows. You may want to try testing your skills on fiberglass or other materials to get a feel for how to work with it.
Related Articles
Daniel Wade
I've personally had thousands of questions about sailing and sailboats over the years. As I learn and experience sailing, and the community, I share the answers that work and make sense to me, here on Life of Sailing.
by this author
Best Sailboats
Learn About Sailboats
Most Recent

Best Small Sailboat Ornaments
September 12, 2023

Best Small Sailboats With Standing Headroom
December 28, 2023
Important Legal Info
Lifeofsailing.com is a participant in the Amazon Services LLC Associates Program, an affiliate advertising program designed to provide a means for sites to earn advertising fees by advertising and linking to Amazon. This site also participates in other affiliate programs and is compensated for referring traffic and business to these companies.
Similar Posts

Discover the Magic of Hydrofoil Sailboats
December 11, 2023

Best Bluewater Sailboats Under $50K

Hunter Sailboats: Are They Built for Bluewater Cruising?
August 29, 2023
Popular Posts

Best Liveaboard Catamaran Sailboats

Can a Novice Sail Around the World?
Elizabeth O'Malley
June 15, 2022

4 Best Electric Outboard Motors

How Long Did It Take The Vikings To Sail To England?

10 Best Sailboat Brands (And Why)
December 20, 2023

7 Best Places To Liveaboard A Sailboat
Get the best sailing content.
Top Rated Posts
© 2024 Life of Sailing Email: [email protected] Address: 11816 Inwood Rd #3024 Dallas, TX 75244 Disclaimer Privacy Policy

Driftboat Wood Kit

Boatbuilders FORUM
Boat plans, patterns and supplies for the amateur boat builder.
Every year, thousands of amateurs much like yourself build their own boats the proven Glen-L way. Many builders save 50% or more over the price of a factory-built boat. It’s easier than you might think, and it can be a rewarding experience.
Industry experts
Established in 1953
300+ Models
International shipping
Plans & Patterns

All plans come with a 30-Day money back guarantee.

Providing boat Plans & memories Since 1953
For more than 60 years Glen-L has been the world’s premier supplier of boat plans and patterns designed for the amatuer builder. We make it even simpler by offering associated supplies and hardware kits for each design.

More Products

Boatbuilding hardware

Books, DVDs, & Audio

Tools & Raptor® Fastenings

Epoxy and Supplies
Featured designs.

View Plan Details

Cabin Skiff

- For Sale/Wanted
- Readers Tips
- Your Yarns.
- Restoration
- Miscellaneous
- DIY Boat Yards
- Boat Building
- Cabin Cruisers
- Free Boat Plans
- Begin Boating
- Boating Terms
- Ropes and Rigs
- Just for Fun
- Celestial Navigation
- Passage Planning
- VHF Marine Radio
- Diagonal Scale
Sailboat Plans
Free Sailboat Plans
A selection of some of the Free Sailboat Plans (pdf) that were published in magazines such as “Popular Mechanics”, "Popular Science" and the "Boat Builder Handbook".
If you need help with lofting out the plans click here for an article here which should help.
- Open Dayboats/Dinghys
- Rowing Boats
Open/Dayboat, Free Sailboat Plans
Everyone who digs boating has heard of the Hobie Cat, the sleek little catamaran that burst on the scene and captured the attention of all the fast-action sailors.

Marked by asymmetrical hulls and special trampoline supports, the Hobie can reach speeds above 20 mph and perform with a rare agility.
But it has one drawback.
It costs mucho dinero.
Thus, we introduce the Hobby Kat, sailboat plans, a build-it-yourself version of the “Hobie” that should cost from half to a third of the commercial version. If you have the moola, of course, go for a Hobie and have the time of your life on the water.
If not, try our Hobby
The homebuilt is not quite the same.
But she sails sweetly and fast—qualities which have made the “Hobie” popular
Even in a light air she’ll slip through the water at a fast clip.
She has no centreboards, leeboards or keel, and needs none.
The inside of each hull has built-in lift, like an airplane wing, so that as the boat heels and one hull digs in the boat is pulled back to windward.
Click Here for the Plans
She can run in very shallow water and the rudders kick up for beaching.
You can carry her on a trailer or even disassemble her.

Many a “stink pot” addict will take a second look at Tern because she planes in modest breezes, is easy to handle, and her streamlined prow arid pod-shaped, “inland scow” type hull offer slight water resistance. Then too, there’s a charm about the tiller of a sailer that’s not matched by the wheel of a motor-powered boat. Part of it is the challenge of making the most of nature’s free-wheeling breezes. Even with her 72sq.ft of sail, this Free Sailboat Plan is remarkably stable, and packs as many as four persons aboard
For thousands of inland lakes, Tern is the answer to sailing water sport, she is rugged and easy to launch
And she’s remarkably easy to build.

Falcon is a small, speedy, sporty sailboat which handles well. Tests on the original Falcon showed that she could easily out-distance boats of comparable size such as the one design class Snipe and Comet sailers.
And she will pace neck and neck with 18 footers with considerably greater sail spread.

This strong, beamy, eight-foot pram may be sailed either cat-rigged or sloop-rigged.
The dagger-board may be adjusted forward to balance the helm when sailing with the addition of a jib sail.
Oars or a small outboard motor may also be used to power this versatile Free Sailboat Plans.

Dart” is a small two or three person sailing craft, designed for use on protected waters such as bays. lakes, rivers or wherever sheltered waters are found. Its construction will repay the builder handsomely and provide a fast sailing craft, light in weight, easily transportable and cheap to construct with all difficult joinery eliminated
It provides thrilling and economical sport.

The 'Crescent', designed by C. T. Allen, is the ideal sailboat for day sailing on a small lake, river, or protected waters of a bay.
Centreboard design (Fig. 2) reduces Crescent's draft, so Shallow is not a problem.
Its broad beam of over 5½ft. makes it an ideal family boat because there is room for a cockpit large enough to accommodate four adults or two adults and three kids, and side and forward decks big enough to stretch out on when sun bathing.
"Jewel" is a 16' Crescent Sailboat being built by Mike Allen from the free sailboat plans by C.T .Allen in the 1958 "Boat Builders Handbook". And what a superb job Mike is doing check out his photos here .
Click Here for the Free version of the Plans

Sailing enthusiasts and backyard boat builders are not likely to find free boat plans for a sailing pram that can be built faster, lighter, stronger, or less expensively than Graefin-10. Two men can begin work on a Friday evening and have a smart, lively 10-ft. 85-pound sailboat in the water by Sunday evening (it’s been done).

Zephyr Is a refinement of a type of boat developed by the English for use in the rough open waters of the English Channel. Not only is it fast under sail, but it can stand up under punishment. And it’s light enough to be easily loaded atop an auto or light trailer.
Breeze-Baby

Skimming off a brisk wind or with the wind abeam, Breeze-Baby actually planes with one person aboard. Despite her rowboat lines that make her easy to build, she handles easily under her simple sail, an ideal first boat. Simple lines are adapted to plywood construction that’s strong, light and that keeps Breeze-Baby’s bilges dry
You can take her with you atop your car or on a lightweight trailer for summer fun wherever you vacation or get in a week-end’s sailing.

Cat’s Paw is easy to build because of the straight-sided hulls. The sheer line is flat and that simplifies building the form. Bow and stern are straight, so there’s no cockeyed bevel to fit and fuss with
She Is an Ideal boat to learn or practice sailing in because she will forgive so many mistakes.
Cabin Cruiser, Free Sailboat Plans

Previous posts
See What Others Have Posted

Recent Articles
Boat Winches
Jun 21, 24 04:18 AM
- Boat Plan Books
- Boatbuilding Tips
- Glass Cloth
- Stitch and Glue
- Strip Plank
You might like these

Knotty wood, problems with boat building timber.
Knotty wood, how to avoid structural problems with knots in lumber when using softwood timber for fitting out and boat joinery

Build a Boat, tips for the DIY Wooden Boat Builder.
How to Build a Boat, Wooden Boat Building methods for the DIY, backyard, self-builders explained, carvel, lapstrake and plywood

Wood Screws for Boat Building and Repair.
Wood Screws are the most widely used and versatile fasteners used on wooden boats. Which type to use and how to use them
Wood, Environmentally Friendly Boat Building Lumber.
Make sure that the Wood that you buy and use is sustainably grown and harvested.

Timber, Lumber for Boat Building.
A brief description of the most common Timber used for building Wooden Boats how to choose wood for your project boat
Timber Properties
A brief guide to timber properties and wood, characteristics such as strength, stiffness and elasticity for choosing lumber for wooden boat building and restoration.

Rivets and Copper Rove Wood Boat Fastenings.
How to use Copper Rivets and Roves construction guide to fasteners on your wooden boat.
Ring Nails for Marine Fastening.
Ring Nails sometimes call Gripfast or ring shank, silicon bronze boat nails are renowned for their holding power. but how to get them out?

Plywood and Veneer Guide for Marine use.
A guide to plywood for boat building and why you should use the best marine grade you can afford.
Glue for Wooden Boat Building
Which Wood Glue to use when building or restoring a wooden boat, resorcinol to epoxy.
Rowing Boat Plans
Free Rowing Boat Plans for the backyard home builder, build your own rowing boat, dory, folding dinghy or pram using these simple plywood designs.
Free Motorboat Plans
Free Motorboat Plans for the backyard home builder, build your own speed boat, cabin cruiser, runabout or utility boat using these simple plywood designs.

Wooden Boat Kits.
Wooden boat building is easy and inexpensive with wooden boat kits. From row boats and kayaks to sailing cruisers, boat to be proud of
Supplies for Wooden Boat building and Maintenance
Supplies for Wooden Boat Building and restoration, how to choose the materials and marine chandlery for your project.
Small Boats, Made of Wood
What Everybody ought to know about building Small Boats, guidance and tips for self-building or restoring.
Owens Boats
Jun 05, 24 12:14 PM

Penn Yan Boats
May 28, 24 07:51 AM
Wooden Boat Restoration, Repair and Maintainence.
Wooden boat restoration, how to fix up an old wooden boat, one of the cheapest ways to get afloat and have a boat to be proud of.

Epoxy Resin for DIY Wooden Boat Building.
A guide to the epoxy resins and sustainable enrtopy resins to use when building wooden boats with marine plywood.
Wood Rot Repair and Treatment
Wood rot in wooden boats, how to treat, repair and replace rotten timbers in a wooden boat

Privacy Policy
Advertising Policy
Cookie Policy

I am perfectly aware that the majority of Wooden Boat aficionados are sensible folk. However, I need to point out that I am an amateur wooden boat enthusiast simply writing in order to try to help other amateur wooden boat enthusiasts. And while I take every care to ensure that the information in DIY Wood Boat.com is correct, anyone acting on the information on this website does so at their own risk.
- No products in the cart.

Build your own boat
With our tried and tested plans.
The oldest business of it's kind. Since our first plans were sold for home construction in 1938, more than 100,000 Hartley boats have been built.
Hartley Boats has the widest range of boat plans for sail boats, power boats, catamarans and trimarans, dinghys and small craft, canoes and kayaks, surfboards and surf skis, vintage power boats, self steering capabilities and trailers.
Established in 1938, more than 100,000 boats have now been built by enthusiasts from our plans. All Hartley Boat Plan sets come with full size frame patterns.
Power Boats

Catamarans and Trimarans
Dinghys and Small Craft
Vintage and Classic Boats
Windvane Self-Steering

Canoes and Kayaks

Surf Boards and Surf Skis

Boat Trailers and Other Drawings
Help and guidance on construction.
We offer a range of books and study packs to help you build your boat. Each project is unique, so you are welcome to contact us with questions.
Books and Guides
Construction Methods

About Hartley Boats
Hartley Boats is the first business of its kind. We have been providing build-it-yourself boat plans since 1938. Based in New Zealand, we send our boat designs all around the world.
Read our story >
How to order
Each item on our site has a product page where you can add the item to your cart. All payments are securely processed online using the Stripe payment gateway. All plans are sent by airmail.
Visit the Ordering and Shipping page >

Your shopping cart is empty!

Featured Categories

Sailboat Plans 18-30ft

Sailboat Plans 30-40ft

Sailboat Plans 40-65ft

Spray Plans 22-55ft

Powerboat Plans 21-65ft

Photo Gallery

Boat Building Information

Boat Building Methods
Bruce roberts sailboat and powerboat designs, & boat plans for the diy boat builder, bruce roberts international, the original bruce roberts design office began life in 1968 in, queensland, australia. we are still located in queensland, australia and in 2010 had a name change to fine line boat plans and designs. read more on our history on about us ..
For over forty five years the Bruce Roberts Group, with input from many designers, shipwrights, builders and owners, have been drawing detailed boat plans for sailboats and powerboats with the DIY boat builder specially in mind. These boatplans & designs range in size from 5.8 mts to 20 mts and can be built in many different materials. We have boat plans & designs for building in steel or aluminium in either multichine, radius chine or round bilge hull forms. Most boat plans & designs are also in fibreglass using either c-flex, foam sandwich or single skin hull construction methods or in cold moulded ply or strip plank using what is commonly know as wood epoxy boatbuilding. Thousands of boats marketed as Roberts designs have been built in backyards and successfully sailed around the world.
Our range of boat plans & designs include the:- Roberts, Waverunner, Trader, Spray, Centennial Spray, Coastworker, New York, Adventurer, Tom Thumb, Henry Morgan, Offshore, PCF, Mauritius / Norfolk, Classic, Power Cat, Trawler Yacht and the Longboat.
In our archives are nearly all the boat plans & designs that we have designed over the years. If you are resurrecting an older Roberts boat then it is very likely we will still have the drawings to help.
The emphasis has always been on safety and the fact that when building your own boat you can not only build for less but can build what you want, not what a boat salesman tells you you need . The boat plans come with full size frame patterns and detailed construction drawings as well as information on building one's own tools, fitting self steering vane, mast, trailers (for trailerable boats) etc.
Featured Boat Plans

Roberts 310 Boat Plan
Roberts 310 This design may be built with either a regular trunk cabin or a pilot house. It is al..

Spray 28 Boat Plan
Roberts Spray 28 There are over 500 examples of this design currently sailing in all parts of the..

Canoe Stern 341 Boat Plan
Roberts Canoe Stern 341 Designed by Graham Shannon this is for those of you that are looking for ..

Mauritius / Norfolk 43 Boat Plan
Roberts Mauritius / Norfolk 43 The Mauritius 43 and Norfolk 43 plans were first drawn in 1969 and..

Offshore 38 Boat Plan
Roberts Offshore 38 Full plans for this design are available for building in round bilge Fibergla..

Waverunner 25 Boat Plan
Roberts Waverunner 25 This design has been especially designed for steel construction and special..

Coastworker 30 MK2 Boat Plan
Roberts Coastworker 30 MK2 Powerboat This design is for steel or aluminium construction. It comes..

Coastworker 25 Boat Plan
Roberts Coastworker 25 Powerboat Designed for construction in either steel or aluminium, this mak..
Practical Boat Owner
- Digital edition

Home-built boat: From design research to launch
- Chris Comerie
- June 13, 2023
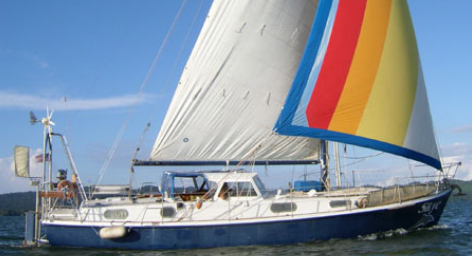
Chris Comerie uses retirement to fulfil a teenage boatbuild ambition, resulting in a trailable gaff-slooped pocket cruiser

Bunty B anchored off Brodick Castle, Isle of Arran. Credit: Chris Comerie Credit: Chris Comerie
You may wonder why a home-built boat was preferable to the hundreds of vessels both new and used out there in the marketplace.
But, for me this was more than just about getting a boat to go sailing.
My father was a keen boatman and owned a small sailing yacht while he was posted with the Royal Air Force in Egypt during World War II.

Bunty B beached at Loch Scresort, the Isle of Rum, the Small Isles. Credit: Chris Comerie
When my brother and I were young, his influence resulted in us always messing about in boats which, in my later teenage years, inspired me to begin building a wooden rowing boat, and of course Dad got involved.
Unfinished business
We found a design in a book borrowed from the local library from which we lofted out the lines on wallpaper stuck together with Sellotape and laid out on the landing at the top of the stairs.
Unfortunately due to my limited finances and space constraints, I never completed the project.

Bunty B moored in Tarbert Harbour, Argyll and Bute. Credit: Chris Comerie
However, years later after serving an apprenticeship as a pattern maker, constructing precision wooden patterns for sand moulding and casting, I set up in business as a self-employed joiner.
After a year or so the owner of a local boatyard and chandlery asked me if I’d like to do some sub-contract work in the boatyard, initially to build two pontoons to allow leisure cruisers to land from the River Trent.
I loved it, and was thrilled when the job was completed and installed. Then as a result of its success, I was further employed carrying out repairs and alterations to all manner of different vessels.
Project boat
During my time there I purchased a run down GRP boat which, subsequently turned into a modest restoration project that for the time being satisfied my desire to get afloat again.
My joinery business grew then developed into a construction company building extensions and carrying out alterations to domestic property.
After 45 years of running my business I retired.
I’m fortunate enough to live in a property with outbuilding space and an equipped joiner’s workshop to boot.

Undergoing construction on the jig. Credit: Chris Comerie
My building site in a barn high in the Cumbrian Fells that used to house cows and sheep, appeared somewhat incongruous to hikers passing by on the public footpath who often referred to me as ‘Noah’, and asked ‘are you expecting a flood?’
But with these facilities to hand, I began to think about the boat that I’d started to build all those years ago.
While I hasten to add that I’m a complete amateur when it comes to building boats, my skills base and background gave me the confidence that I could construct a decent boat.
This time I was determined to finish the job and go sailing. I produced a wish list:
- A visually aesthetically pleasing classic styled sailing boat built in wood.
- To be able to go lake or coastal cruising with a crew of up to three adults.
- A small cabin to enable a few nights away, prepare food and be somewhere to retreat in poor weather.
- Trailer-able, easy to launch and recover.
- An outboard motor discreetly mounted in a centreline well, rather than transom .
- A retractable centreplate that did not compromise cockpit or cabin space.
Design research
After months of systematic research and investigation into modern methods and materials of wooden boat building, I discovered a design by the Brittany-based naval architect François Vivier that really caught my eye.
The Beniguet, a trailer-able classic cabin yacht with a gaff sloop rig was the pocket ship for me.
Ideally I’d have preferred a larger boat but we have a very long, steep and convoluted track leading up to our old farmhouse which was to be the build site, and it would be impossible to manoeuvre anything bigger than the Beniguet out to the road.
I bought a set of Monsieur Vivier’s plans and began work during February 2017.

Home-built boat: Lovely foredeck with bronze fittings. Credit: Chris Comerie
There then followed two years and nine months of intense, absorbing work and study.
Along the way I researched every detail of the structure and the fittings, to satisfy an overwhelming desire to learn and fully understand every single aspect of the design.
During that period the actual hands-on build time consumed 2,770 hours, although I must add that this total could have been greatly reduced by adhering to the original basic design.
From the outset I’d decided to build the boat to a high specification, fully fitted out with a chartplotter , VHF radio , navigation lights , cabin lighting, teak decking , additional reinforcement of the hull and a whole host of other personalisations and additions.
Launch day for my home-built boat
My father’s boat was called Bunty , so I named her Bunty B .
We launched her on Lake Windermere on 2 November 2019 with the family in attendance.
Later that day, following the successful trials, we recovered her and trailed her back home to overwinter undercover in anticipation of future adventures during the following summer season of 2020.
Unfortunately the coronavirus pandemic interfered with those plans.

Very smart: Bunty B is a François Vivier design. Credit: Chris Comerie
I was frustratingly prevented from being able to sail her by the government-imposed lockdown and I had to be patient until restrictions were eased.
It was 29 August 2020 when at last I launched her at Dunstaffnage Marina just north of Oban, and from there I was able to take her to sea for the first time.
Since then I have sailed Bunty B around 1,000 miles, mainly single-handed, exploring the Hebrides off the west coast of Scotland and crossing the Irish Sea to the Isle of Man.
As my experience of handling the boat has grown, I have made further additions, alterations, and fine-tuned the boat, continuing to do so right up to the present day.
I earlier alluded to my desire to build a bigger boat, but the size restrictions imposed upon me by our restricted access have inadvertently proved that there are some significant advantages in having a small day-sailer .
Bunty B is very easy to tow , launch and sail single-handed. These attributes allow you greater flexibility in your choice of cruising grounds.
Provided there is a suitable slipway available, you can go just about anywhere you choose, and of course there are no annual expensive marina or mooring fees to worry about.
The onboard facilities and locker space are more than adequate to allow me to cruise for two weeks or more, with of course the occasional visit to a marina.
Continues below…

How I built a bespoke aluminium powerboat at home
Late in 2015, just as James Oakley was finishing the hull of his home-built aluminium speedboat, he was diagnosed with…

Around the world in a 5.8m boat! Meet the sailor preparing to race a Class Globe 5.80
British sailor Adam Waugh is currently building his 5.8m boat at his home in Northumberland before taking part in the…

How to build a boat: Essential guide to building your first kit boat
You don’t have to be a boatbuilder to learn how to build a boat, argue Roger Nadin and Polly Robinson.…

Build your own Western Skiff – part 1: the first steps
Finally, after months of planning and discussion, the moment of truth had arrived: the first Western Skiff MkII kit, put…
In fact I’m usually away for 10 or more days at a time.
I particularly enjoy the ability to take the ground, just hoist up the centreplate, pop on the drying out legs and, on the ebb tide she’ll sit gently on a secluded sandy beach of your choice.
You can then just walk ashore. Very satisfying.
I have to be honest, overall I found the building of my own boat to be initially quite daunting, and by completion it proved to be an expensive undertaking.
However, you shouldn’t underestimate the benefits you reap from the experience which proved to be totally consuming, enjoyable and fulfilling.
First things first
Before embarking on any project, it’s best to sit quietly with a cup of tea and mull it over.
Well, I must have drunk gallons of tea before embarking on this particular home-built boat project.
I eventually chose a design that would, as close as possible, fulfil my requirements and, importantly, be towable from my build site to the public highway.
Before committing to buy the full plans from François Vivier, I purchased the study plans for just a few pounds which enabled me to check the lines and fully understand the construction.
I contacted the architect directly who proved to be very accommodating with my queries.

The full size pattern of the outline of the hull hitched up ready to set off down the hill. Credit: Chris Comerie
I then attempted to estimate the cost. This was informative but time-consuming due to my lack of knowledge of much of the terminology and where you could buy the materials and myriad of fixtures and fittings required.
Needless to say, on completion of the build I’d underestimated the final cost.
To ascertain if I could tow the boat out to the road from my Cumbrian Fells property, I took detailed measurements and surveyed the pinch points of our access track.
The final bend before the track meets the highway is very tight and in order to be sure that I could manoeuvre the boat around this obstacle, I used the study plans to construct a full sized pattern of the outline of the hull, sporting two bicycle wheels at the estimated centre of balance of the boat.
Then I hooked it up to the tow bar of my pickup truck. I towed the pattern to confirm (or otherwise) that I’d be able to negotiate the convoluted track.
As I approached the suspected problem bend at the bottom of the hill, two of my neighbours suddenly appeared; the track is a public footpath and they were out for a stroll.
The astonished and amused look on their faces was priceless.
The outcome proved that we could get the pattern out to the road, yet despite this there was always a nagging doubt in the back of my mind throughout the build thinking, what if I can’t actually get the boat around that bend?
And so now I’m going to attempt to illustrate 2,770 hours of work carried out over a period of 31 months into a handful of photographs: impossible I know but, I’ll try to touch on some of the key elements of the build.
The build: step by step

1. To get building under way my first job was to construct the jig which had to be very accurate – any imperfections would irretrievably be transferred into the build. Here the overturned jig is being used to provide a large, flat working area for glueing up the planking strakes . Each joint was then sheathed in epoxy saturated glass fibre cloth then faired with epoxy filler. They were then sanded flat and smooth before fitting to the jig.

2. The jig, the correct way up, fitted with the timber supports holding the transverse bulkheads in their correct positions. The backbone has been glued in and the clamps are holding the laminated outer or stem to the inner to allow a perfect fit. The backbone gap is the aperture to carry the lead ballast. I had the 29 sheets of marine plywood CNC cut , though in retrospect I wished that I’d purchased the patterns to mark and cut out the plywood components myself.

3. The ballast aperture follows the hull lines and is designed to be filled with around 80kg of lead. I constructed a plywood mould to follow these lines and dimensions that was divided into five sections then, coated the internal faces with sodium silicate solution as a fire prevention. The plywood strips between the aluminium separators are temporary supports – as each section cooled and set after casting they were removed as the work progressed along the mould.

4. The ballast is securely glued into its cavity by thickened epoxy – ensure there are no voids. A capping hardwood strip is then bedded in epoxy and screwed down to seal the compartment. To prevent chafing when taking the ground, I capped the entire backbone/keel in marine grade stainless steel flat bar.

5. I applied thickened epoxy fillets to all the strake joints, garboard and backbone, the latter was then completely sheathed in epoxy saturated glassfibre cloth and faired with epoxy filler. The entire hull was then faired and sanded down flat and smooth. A sealing coat was applied followed by eight coats of paint.

6. The hull was then turned and set level in readiness for fitting out. All joints between planking, bulkheads, transom , backbone, shelving and any internal fitting out were epoxy filleted, sheathed in glassfibre and faired. I also sheathed in epoxy saturated glassfibre all the planking up to the water level. Epoxy sheathed plywood produces an enormously strong material. I tested this using the waste cut from the engine well aperture, which I securely clamped in the bench vice and beat with a hammer. It amazed me how tough it was – the edge joint between the pieces did not break!

7. Before the decks, coachroof and other inaccessible areas were closed off, I applied the full paint regime. I also fitted the conduits for wiring; this necessitated the increase in some of the timber sections to accommodate it. At this stage, I’d already made the drying out legs and put them to use during the build to stabilise the hull

8. The mast is laminated from four boards of Douglas fir. I had to customise the design to allow cables to pass through to the mast head. This shows my solution using plastic conduit supported at intervals by plywood cradles. The mast was a challenging project: to achieve dead straight true boards and perfect jointing faces over its entire length required care. I assembled and glued it on a hot summer’s day to take advantage of the perfect conditions, which allowed the epoxy to fully penetrate the jointing surfaces and achieve an excellent bond.

9. All of the spars were made from Douglas fir with the exception of the gaff jaws . These were manufactured from laminated ash that required me to make a jig to achieve the desired shape. You can see I’ve also fixed leather sheathing in the base of the jaws to help prevent damage to the mast.

10. The 100kg centreplate also forms part of the ballast total and is manufactured from 25mm-thick 316 marine grade stainless steel. I had the outline shape laser cut. Further machining was carried out on a friend’s milling machine while the drilling, shaping and finishing I did by hand using an angle grinder, a pillar drill and a file. That was hard work, and even harder work fitting it in the boat!

11. I built a lot of detail into Bunty B , for example you can see the inlay in the transverse board on the transom aft deck and the ball on the end of the tiller . All of the timber used for the build was cut from rough sawn boards, machined and prepared in my workshop. The ash tiller and the gaff jaws were manufactured from a tree that I’d felled on our land some years previously. The ball spliced into the end of the tiller is mahogany that I’d reclaimed from some old furniture more than 20 years ago. I use recycled timber where possible. At a later date I removed the paint from the cockpit seats then re-covered them in teak planking.

12. The big day, loading Bunty B onto her new customised trailer. It took two of us the best part of a day to manoeuvre her out and onto the trailer using various jacks, levers and rollers. Similar I suspect, to the methods used by the Egyptians when moving the large stone blocks when building the pyramids!

13. The signal flags are tied to the rigging, gold gilt inlay has been applied to the detail in the rubbing strip at the bows; she’s spick and span, shipshape and Bristol fashion and ready for the launch.
Cost breakdown of a home-built boat
- Purchase of drawings £450
- Plywood & CNC cutting £3,776
- Timber, epoxy, fittings, paints etc £15,122
- Sails and cushions £1,900
- Stainless steel centreplate £1,000
- Radio, plotter, tiller pilot, electronics etc £2,900
- Engine and fuel tank £1,421
- Trailer £2,688
- Total cost £29,257
- Hours (initial build) 2,770
- Plus additions 104
- Total hours 2,874
The teak deck
Despite attempting to steam bend in a jig or, dry bending by applying gradual pressure, I could not coax the teak planking around the tight radius of the side decks.
The only solution I could think of was to purchase some wide boards and cut each plank individually with the appropriate radius.
The supplier of the Burmese teak I managed to obtain for this purpose told me that it had come from the salvage operation in 2011 of a World War I wreck, the SS Pegu .
I found this intriguing and carried out some online research to try and find out what had happened.
The Wrecksite website described how the Pegu was a steam powered cargo ship owned by the Henderson Shipping Company.
She was said to have been torpedoed by a German U-boat (U57) under the command of Carl-Siegfried Ritter von Georg on 8 July 1917.
Unfortunately, the sinking of the ship caused the loss of one life, 22-year-old 4th engineer, Robert Maxwell.
The ship had been carrying general cargo which included a large supply of Burmese teak, from Rangoon to Liverpool.
Apparently this timber was destined to be used for the fortification of heavy gun emplacements in France and Belgium.
The teak then lay on the seabed for more than 90 years before being salvaged.
I believe that in part, the salvaged timber provided a source of material for the repairs to the Cutty Sark project following a serious fire that nearly destroyed the renovation.
Using this fine, historical wood for cladding the deck of Bunty B felt like a privilege.
Enjoyed reading Home-built boat: how I made and launched my own day sailer?
A subscription to Practical Boat Owner magazine costs around 40% less than the cover price .
Print and digital editions are available through Magazines Direct – where you can also find the latest deals .
PBO is packed with information to help you get the most from boat ownership – whether sail or power.
- Take your DIY skills to the next level with trusted advice on boat maintenance and repairs
- Impartial in-depth gear reviews
- Practical cruising tips for making the most of your time afloat
Follow us on Facebook , Instagram and Twitter
How to Build a Wood Sailboat

Introduction: How to Build a Wood Sailboat

I've been wanting to combine my two favorite hobbies - woodworking and sailing for a long time, so I thought I'd build a boat. It's got classic lines and looks so dazzling in the sunshine that people constantly stop me at the boat ramp to ask me about it. There's something unbelievably rewarding about building something like this from scratch. This is definitely a boat that is much better built than bought . Here's how I did it.
The boat takes about 100 hours to build. I did it over 3 months, working a little bit just about every day and full days when my schedule permitted.
It will take about $1,000 in total to build if you buy everything at full retail cost (not including tools you might need to buy), but you can spread that across the length of the project. For example, you only need to buy one $30 sheet of plywood at a time, take it home, draw out the parts (loft) that fit on just that sheet and cut them out. That will take a couple of hours right there. Some boating supply stores (chandleries) might let you setup an account which might give you a discount if you tell them you're building a boat.
All of the skills needed to build a sailboat can be learned slowly, one step at a time. For example, if you've never fiber-glassed plywood before, just practice on a small piece first to get your confidence up. This was my first boat build, so I did a lot of learn as you go . Not only am I going to show you the right way to successfully build your own sailboat, but I'm going to share with you the mistakes I made along the way to hopefully save you from repeating them.
The end result will be a very attractive little 8 foot long pram, that is easily made out of 4x8 sheets of plywood that is light enough to put in the back of a small pickup truck or roll down to the local lake on the optional dolly. Anything longer would require you to either make a scarf joint (which is a bit tricky) or buy longer sheets of plywood (which is considerably more expensive).
What you will need:
Boat building plans
8 panels of 1/4" oak plywood 4'x8'
Pencil, Sharpie, ruler, tape measure, yard stick, etc.
Long flexible straight edge
Box of 1" brad nails
2 gallons of epoxy resin
1 gallon of epoxy hardener - SLOW
1 quart silica thickener
5 quarts wood flour thickener
1" masking tape
Japanese pull-saw
Table saw (helps, but optional)
Round-over router bit
Flush trim router bit
Palm/random orbital sander
220 sanding discs
Combination square
Drill bit set
Drill bit extension
Basic hand tools
Small diameter wire or zip ties
Wire cutter
12 C-clamps - 3"
Mixing cups, mixing sticks, rubber/nitrile gloves
16' x 60" of 6oz fiberglass cloth
2" plastic spreader
Gallon of waterproof glue
Glue roller
Silicone bronze screws
Stainless steel fasteners
Small blocks
Gudgeon & pintle - dinghy size
Patience - large
Elbow grease - large
For more detailed explanations on each step and more specific info/reviews on the materials and parts used, check out my boat build blog: www.Midnight-Maker.com
Step 1: Cutting Out the Parts...

First, you'll need boat building plans. I purchased some very nice ones from a popular boat building website because I had a specific style in mind to build, a "pram". It's a Norwegian design with lots of buoyancy in the bow and building a pointy boat is a little more difficult. There are a bunch of free boat building plans (search "dinghy") online. Also, I wanted my boat parts to fit in a standard (read cheap) 4'x8' sheet of plywood. It also had to be light enough for me to load/unload/move myself. This boat weighs in at about 70 pounds. When on the custom dolly I built, it's very easy to move from the parking lot to the lake.
Next, you'll need to draw out the parts of the boat full-sized onto the plywood (lofting). I actually did this step on hardboard/masonite because I wanted to make templates of all the parts in case I ever wanted to build another one.
This step requires you to be very meticulous. Carefully transfer the measurements (offsets). They may or may not look correct because it's very non-intuitive to look at curved boat parts that are laying flat. Some parts actually bend the opposite way you think they should. To make the curves, I nailed a bunch of 1" brads into the panel and used a long, flexible straight edge (yard stick, etc.) bent to follow the curve, then I traced the curve with pencil/Sharpie. Once I removed the brads, I had perfectly smooth curves. Keep in mind that with the side panels that are symmetrical to both sides of the boat, only draw out one version and cut two stacked sheets at a time. This ensures the boat will not be lop-sided. Make sure to immobilize the two sheets together with screws outside of the boat parts or use double-sided tape/clamps, etc. to keep the parts registered properly.
Using a Japanese pull-saw allows you to control the cuts very carefully and it can follow the graceful curves. They cut on the pull stroke which means they're very easy to control. Make sure you leave a bit of your cut line, meaning cut just outside the line. This allows you a bit of a safety margin and you can always sand to the line to sweeten it up. This is where the elbow grease really kicks in. It takes hours to cut out the hull panels by hand, but it's worth it. I tried cutting the first part out with the jigsaw and it wandered all over the place and quickly cut inside the line before I knew it. Also, a jig saw blade can lean to one side which could mean two panels might not be the exact same shape. Using hand tools is a classic way to do woodworking and is a very gratifying process. With hand tools, things happen slow enough for you to be in total control, whereas power tools can quickly do unexpected damage. With the understanding that you're building a classic boat, using hand tools wherever possible is part of the philosophy.
The plans I bought were in metric and called for 6mm (1/4") and 9mm (3/8") plywood, but I wanted to make everything out of 1/4" plywood so the thicker parts in the plans were glued together with two layers of 1/4" (so at 1/2" they were a bit thicker than designed). I actually liked this because it made the boat feel sturdier and of course it was cheaper that way. The trade-off was that the boat would be a bit heavier.
For any of the parts that need to be doubled-up/laminated (e.g. the transoms), now is a good time to do that. Make sure you use "waterproof" glue instead of "weatherproof" glue like I did...
Spread a thin layer of glue over one of the "bad" sides (plywood usually has a good side and a bad side, glue bad sides together so good sides show on both outside faces), making sure it's completely covered (I used a special glue roller), then carefully place the other half on top. Align all of the edges together, then clamp them in place. Now put heavy things carefully on top to press the parts together. The glue should be dry in about 6 hours.
NOTE: It's considerably easier and safer to do any woodworking processes to the parts before you assemble the boat. This way, you can safely clamp pieces to the work bench and cut out handle holes, etc. Since my boat is a "lapstrake" design, I had to route a rabbet (groove located on the edge) carefully on the bottom edge of each side panel. This creates a shoulder for the parts to sit on, positively locating them while you're stitching the panels together. Likewise, the grab handles in the transoms are much easier to cut out before putting the boat together.
Also keep in mind that any mistake will be considerably more painful the further you are along in the build. For example, if I biff cutting out the grab handle holes while they're just loose pieces rather than when they're a permanent part of the boat, it's much easier to recover - just make another transom. If you had to patch a hole in the boat, it would be difficult and possibly never look perfect. No pressure...
Step 2: Assembling the Hull...

Once you have the bottom and sides cut out, you can start to "stitch and glue" the hull together. This is a technique used usually for smaller boats to be able to pull the hull form together without the need to build a frame or mold (which can take almost as long and as much wood as the boat itself).
I built a gauge stick to make sure my holes were perfectly spaced at 4" at 1/2" in from the plywood edge. It was 1" wide so either edge was the required 1/2" from the centerline. I worked my way down one side of each of each mated seam and drilled all those holes at once while the panels could lay flat on the bench. Make sure to use a backer block to prevent tear out on the back side, even with such a small drill bit.
With one mating panel drilled with a 1/16" drill bit, hold the mating panel in it's relative position. I used some spare twine to wrangle my panels into the proper orientation as I was marking them. Make a pencil mark where the mating hole should be, remove the pre-drilled panel and drill the second set of holes 1/2" in from the edge. This makes sure there's enough strength to hold the boat together.
The first pass on the stitches is just to get the hull together structurally. You can always go back and make the stitches fancier/tighter and tweak the position of the panels.
The stitches go from the inside out. Cut 6" lengths of wire and bend them into long, narrow U's that are the width of the distance between the holes. Stick the ends through the holes and carefully twist the tails together on the outside of the hull, making sure not to damage the plywood. If you're using zip ties, then the holes you drill will need to be bigger and you'll have to start on the outside, go in, turn around, then back out, then "zip".
Make sure your panels' rabbet shoulders are resting securely on the mating panel and carefully tighten all the stitches. For my boat, once I had two panels stitched to the bottom panel on each side, it was time to attach the transoms (ends). Once all of the exterior parts are stitched together, you should have something that looks like a boat. It will be a little rickety at this stage, but that's okay.
NOTE: In the photos I took of my build, you'll notice that the transom doublers (reinforcers) aren't in place. That was because I was following the instruction manual, but I think that was a mistake, so I highly recommend laminating (gluing) the doublers to the transoms before you stitch the boat together.
Step 3: Reinforcing the Hull Joints...

Now that the hull is stitched together, flip it over upside down. You'll be surprised at how stiff it is, considering how difficult it was to wrangle all those panels into position. Be careful, there's lots of poky wire ends sticking out all over the place.
I used a technique called "tabbing", meaning I made small, structural tabs from thickened epoxy that fit between the stitches, then I removed the stitches and made one long, larger fillet to connect the hull panels together.
Make sure your panels are perfectly aligned and tightened. I used a nipper to lop off most of the tails so they wouldn't get in the way, but that left very sharp spikes.
Make sure your boat is square. Take diagonal measurements from corner to corner, make sure the boat parts are parallel to each other, etc. because if there's a twist in your boat, the next step will make it permanent, which will affect the boat's performance.
Now mix up a batch of epoxy and silica thickener according to the manufacturer's directions (meaning each type of epoxy has a different resin to hardener ratio) until it's between the consistency of thick ketchup, but runnier than peanut butter (make sure to mix the 2 parts of epoxy together first very well before adding a thickener). Too thick and it won't fill the void, too thin and it'll run down inside the boat. Both are bad. I used a small syringe to inject the mix into the V intersection between the panels and checked underneath/inside to see if there were any runs.
Once the epoxy has partially set, use a glove wet with denatured alcohol to smooth out the "tabs" so they fit inside the V groove and don't extend above the intersection between the panels. This will give you good practice for the seams that will show on the finished boat. Be careful of the wire spikes.
Repeat this process for every seam on the hull. Let it cure overnight.
Once the tabs have cured, carefully remove the stitches. If the wire seems to be epoxied permanently to the hull, heat the wire with a lighter. That will soften the epoxy enough to pull the wire out. Be careful not to scorch the boat (you don't want a Viking funeral). Now repeat the thickened epoxy process for each overlap, except this time each seam will need to be one long, smooth joint. Let it cure overnight. This goes a long way in making the boat hull structural.
Step 4: Fiberglassing the Hull...

Now that you've got a permanent hull shape, it's time to make it waterproof and rugged. Fiberglass and resin over plywood is a tried and true Do It Yourself boat building technique which makes it strong and light.
Mask off the bottom panel and roll out your fiberglass cloth. Smooth the cloth out very carefully so as not to snag or tweak the fibers' orientation. Mix up an unthickened batch of epoxy (it will be the consistency of syrup). Starting at the stern, pour a small puddle of epoxy and spread it out nice and thin. You should be able to squeeze most of the epoxy out of the cloth, leaving only saturated cloth with no dry spots (which will appear white) but the weave should still be showing (meaning no extra epoxy is pooling). You should easily be able to see the wood grain through the cloth now.
Let the epoxy partially cure and using a razor, slice the dry fiberglass cloth away on the taped seam. Then remove the masking tape. Let the epoxy cure overnight.
Flip the hull over and mix up a batch of epoxy that is the consistency of peanut butter. I masked off the joint, but this step is optional, but keep in mind that it will be visible if you plan on finishing the interior bright (varnished wood). It's not as critical if you're painting the interior. With a plastic spreader, carefully make a large radius transition (fillet) between the bottom panel and the first side panel (garboard). Remove the masking tape when the epoxy mixture is partially cured and carefully scrape/wipe any unwanted mixture. It's much easier to remove now than having to sand it all off later. At this point, it's also a good time to fillet the transoms to the sides using 3/4" radius tabs between stitches and 1" finished fillets after you've removed the stitches. Let the fillets cure overnight.
Now, repeat the entire fiberglassing process on the inside. Except instead of just doing the bottom panel, make sure both the bottom and the garboard are fiberglassed. This is basically the waterline of the boat. The fillet should allow the fiberglass cloth to smoothly make the bend between boards. Remove the excess cloth when partially cured and let sit overnight. Some people fiberglass up onto the transom at this stage which will make the boat stronger, but that means you have to have already filleted the transoms to the bottom.
Step 5: Installing Interior Parts...

The bulkheads get stitched in place just like the panels. They will make the already stiff (and much heavier boat) completely structurally sound and push/pull the sides into their final shape. Then make 3/4" "tab" fillets between the stitches to lock them in place, remove the stitches and make long, smooth 1" fillets. The smaller fillets will get covered by the larger fillets. I used two different modified plastic spreaders to do this step. Each spreader was cut with a box knife and filed/sanded into its final shape.
While you're doing the previous steps, if you're in a time crunch, go ahead and build the daggerboard trunk. It's made of numerous parts that are pre-coated with a couple layers of unthickened epoxy, then glued together with silica-thickened epoxy. This makes it strong and waterproof as it will be below the waterline so must be completely waterproof.
The daggerboard trunk is the most important part of the boat, especially if you're making a sailboat version (this boat can easily just be used as a rowboat). Not only does it support the center seat (thwart), but it has to transfer all of the force from the sail to the water and if you run the boat aground, it takes all the shock loading from the daggerboard.
The daggerboard gets filleted into place like everything else. Make sure it's perfectly on the centerline of the boat as that will affect its sailing characteristics.
Next, let's make the daggerboard slot in the center thwart. I set up a straight edge with a spiral upcutting router bit. Make sure to enlarge the slots at the end of the center thwart so that it can fit around the fillets of the center bulkhead. Now is the time to ease the edges of the center thwart because you'll be sitting on it a lot, so it needs to be comfortable. Because it's so thin, I only routed the top edge of the center thwart that shows and just hand sanded the edge underneath (it's very problematic to use a round-over bit on the second side of a thin board). Paint all of the thwarts with three coats of unthickened epoxy, especially the undersides. Once the woodworking is done, the thwart can be epoxied into place with peanut butter (or you can jump to cutting the daggerboard slot in the bottom of the hull). Make sure the thwart fits snugly in place. Drop dollops of peanut butter on the top edges of the center bulkhead and daggerboard case and spread it out evenly (make sure none gets inside the slot to interfere with the daggerboard). Firmly seat the thwart (pun intended) into the goop and weight it down. Let it cure overnight.
While you've making sawdust, cut out the mast hole (partner) in the forward thwart by drilling holes in the four corners (for the square mast we're going to make), then cut out the sides, file it smooth, then round over the top edge with the router.
Any time after the bulkhead thwart fillets have cured, you can seal the airtank chambers. Paint the bottom, sides, inside of the bulkhead and transom up to the level where the thwart will be.
Step 6: Rail & Sailboat Parts...

There are several processes in this boat building instructable that can be done concurrently. While you're waiting for the epoxy on one part to cure, you can be doing woodworking or epoxying another part. This step illustrates that point. While you're waiting for the epoxy on the rub rail (outwale) to cure, you can be fabricating the sailboat accessories (e.g. daggerboard, rudder, tiller, spars, etc.).
In order for the outwale to be thick/strong enough to be effective, you'll need to laminate it in two strips on each side. You can't bend a single piece that thick around the curvature of the hull without either breaking the wood or softening it by steaming it which is a complicated process.
Take a strip that's half the final thickness and a little longer than the boat edge (I made mine a bit beefier), mix up some peanut butter with the colloidal silica and carefully spread it on the inside of the strip. Starting at the stern, clamp it in place, perfectly align it with the top edge of the plywood. Now you have a long, springy lever to bend the wood strip along the compound curve. It dips both vertically (shear), and bows out at the widest part of the boat (beam), then back in toward the bow. At least every foot, clamp it as you go, moving forward. More is better. Toward the bow, the strip will get stiffer as it gets shorter. Once clamped in place, scrape/wipe off all the squeeze-out. It's much easier to remove now than after it hardens. Let it sit overnight. You'll have to repeat this three more times, meaning this step takes four days (if you're using "slow" epoxy hardener).
During those four days that you're dealing with the outwale, you can make major progress on the sailboat parts. They're completely separate from the hull. If you're just making a rowboat, then you can skip making these parts.
The daggerboard and rudder are cut out and laminated. Then a bevel is ground onto the leading and trailing edges to make it slice through the water more efficiently. Then they're covered in layers of epoxy. The mast step is assembled. This has to be very strong because all of the force of the sail is transmitted to the boat through the mast step and the mast is a very long lever arm. The rudder cheek plates and tiller also have to be assembled similarly to the daggerboard case.
NOTE: Whenever there's a hole to be drilled into any part of the boat, you must take additional steps to make sure the water doesn't penetrate and damage the wood. The correct procedure is to drill an over-sized hole, completely fill that hole with epoxy (I usually put a piece of masking tape on the back side to act as a dam), then once the epoxy cures, re-drill in the center of the epoxy plug the correct hole size. That makes each hole in the boat possibly a 2 day process, so plan accordingly. You can also use 5 minute epoxy to knock out a bunch of holes quickly, but be careful, they're not kidding. This stuff gets rock hard very quickly and will permanently glue anything touching. This is exactly how you drill the hole for the pivot point for the rudder/cheek plate assembly. If the pin is 1/4", then drill 1/2" hole and fill that with epoxy. Now the 1/4" hole will fit nicely in the center and be completely waterproof.
Since all the parts need several coats of unthickened epoxy and they just about all have holes in them, I hung them up with some twine and painted them on all sides, one layer at a time, for several days. Make sure the rudder doesn't get too thick to fit inside the cheek plates.
Step 7: Making the Spars...

More sailboat parts you can make while waiting for other parts to cure are the spars, the structural parts that support the sail. The mast is another glue up. I used 3 - 1x3's of hemlock. A relatively soft wood, but with a nice tight grain with no knots. A mast would break at a knot, regardless of how strong the wood is. Using the waterproof glue, align the pieces as perfectly as you can then clamp up the assembly and let dry overnight. Then run it through a table saw to get the final dimensions. Use a router and a round-over bit to ease the edges. Cut to length and sand the sharp corners. It should fit easily, but snugly into the forward thwart.
The boom (bottom of sail) is a little more complicated. Cut out the gooseneck (boom pivot point) by using a hole saw first, making sure to clamp it securely to the workbench, then cut out the profile. This gets attached to another piece of 1x3 hemlock, after it's been cut to length and the edges have been rounded over.
The yard (top of sail) is easy. Just cut to length and round over the edges. Drill and fill any holes in the spars at this time. You'll need at least one hole on each end to lash the sail grommets to.
This time, everything gets covered with several coats of varnish, epoxy is not necessary. The varnish protects the wood from water and UV damage.
The reason we had to make at least the mast at this point is because we'll need it in the next step to establish the location of the mast step.
Step 8: Finishing Up the Interior & Exterior...

Once the outwales are successfully attached, trim them flush with the face of the transom(s). While you're at it, use a flush cut saw (with no sawtooth offset to mar the wood) to trim the sides flush with the transom. This will show you how well your injected silica mix worked earlier. Now you're ready to install the mast step.
The mast step must be precisely located on the floor (sole) of the boat to give the mast the proper angle (rake). This is very important because it directly affects the boat's ability to sail upwind. Using your mast, insert it into the forward thwart (partner) and into the mast step. With the mast at a 3° angle (mostly vertical but with a small, yet noticeable and graceful tilt toward the stern of the boat), trace the location of the mast step. Use a combination square to make sure it's perfectly aligned side to side (athwartship). You can now set the mast aside. Drill and fill holes in the bottom of the boat so that you can securely screw the mast step from the outside of the hull. The mast base must also be epoxied to the sole with peanut butter. After it's screwed into place but before the epoxy cures, make sure to test fit the mast again and verify the rake angle is correct. It would be a little messy at this point if you had to tweak it, but at least you wouldn't have to cut it off.
Now comes the most unpleasant part of the whole build. On your hands and knees, make a 1" radius fillet on the underside of every part in the boat. I didn't worry about making these pretty, just structural and water tight (these create the flotation tanks that keep the boat from sinking if you capsize). Let that cure overnight.
Next is the scariest part of the build, making the slot in the hull for the daggerboard. Using a drill bit extension, from the inside of the boat, reach down through the daggerboard case and drill a hole at each end of the slot through the bottom of the boat (make sure to use a backer board). Drill a couple holes in between, then take a jigsaw and connect the dots. This weakens the hull enough so that the router won't tear out any extra wood. Note, this step can easily be done prior to affixing the center thwart. Using a flush trim/laminate router bit, let the bearing run around the inside of the daggerboard case. This will make the hole in the hull perfectly match the slot. This is important because you don't want a shoulder on the inside for the daggerboard to hit and you don't want to damage the waterproof lining of the case. Last, ease the sharp edge of the daggerboard slot with the router and a small radius round-over bit.
The skeg must be cut to fit the curve of the hull (rocker), then using silicone bronze screws, attach it to the hull using the same drill and fill/peanut butter techniques. Make sure to snap a chalk line on the centerline of the boat for reference. Then make a 1" fillet where it meets the hull which will support the skeg and make it strong. The skeg keeps the boat tracking straight in the water. I optionally used some fiberglass cloth to cover the skeg and overlap onto the bottom to make the entire assembly stronger and more waterproof. The skeg will take the brunt of the abuse when launching, beaching, loading and unloading, etc. I also installed a stainless steel rubstrake on the aft end of the skeg with this in mind. In wooden boat building, silicone bronze screws are often used because they won't corrode when encapsulated like stainless steel screws can.
Install the skids parallel to the skeg. These are solid pieces of hardwood because they will also take a lot of abuse when the boat is sitting on shore, protecting the thin hull from rocks, etc. They get installed the same way as the skeg, although it's a little tough to bend the wood along the rocker. Scrape off the excess peanut butter once they're screwed in place.
I also installed the optional outboard motor pad at this point because I plan to use an electric trolling motor on the back to quietly putter around the lake in the evenings to relax with the family after work.
That should be the last parts that go into making the boat!
Step 9: Finishing the Hull...

Now comes the last dash to the finish line. One of the more tedious steps is that you now have to sand the entire boat. I actually built the entire boat inside, but for the sanding stage, I took her outside. Several hours of sanding all of the fillets nice and smooth. Everything will show in the finished product whether you paint the boat or leave it "bright" (unpainted). If you've been careful about cleaning up the peanut butter as you go, you should be able to sand the boat with mostly 220 grit. Be careful not to sand through the thin veneer of the plywood. After the sanding is done (make sure to use a dust mask), vacuum the entire boat and then wipe it down with a tack cloth to remove any dust. I also reversed the hose on the shop vac and used it to blow the sawdust off since I was outside.
Next, you must coat the entire interior and exterior with 3-4 coats of unthickened epoxy. This makes the entire boat waterproof. It will also give you an idea of how beautiful the wood will look when varnished. This is why a lot of boat builders decide to leave their boats bright so the beauty of the wood shows through.
Mix up 1 cup batches of unthickened epoxy and pour out large puddles onto the surface. Taking a foam roller, distribute the epoxy in a smooth coat. Now take a wide foam brush and gently smooth (tip) the rolled out surface. This should remove any lap marks or bubbles. Move along to the next area, making sure to not touch the wet parts. Also, make sure no dust or bugs get on your finish or it'll mean even more sanding later.
Start with the exterior first. It'll be much easier to get good by practicing on the convex surfaces. The interior is more tricky because you want to prevent sags and pooling by only applying very thin coats.
Make sure to check with the manufacturer's directions during this step in case you have to deal with "blushing", a thin layer that can sometimes form on the surface of epoxy when it cures. This could cause your layers to not stick to each other. If your epoxy does blush, it's easy to just wipe the entire boat down with a rag soaked in acetone after each coat has cured. Some people sand between coats of epoxy. This is how you would make an extremely smooth/shiny finish, so if you want your boat to be museum quality, invest the effort. I'm planning on banging my boat around so opted out of an extreme, fancy, mirror finish.
I was originally going to paint the exterior of the hull, which would require priming and painting, but I'm leaving it bright for the time being. The good news is that you can always paint later if you change your mind, but if you paint it and change your mind, it's tough to go back. There aren't a lot of pics of this step, which took a couple of days because there wasn't much visible progress after that first coat went on. At this point, any surface that's not painted should be varnished using the same "roll and tip" method as the epoxy, with the optional sanding between coats. Note that epoxy has no UV resistance, so to keep your boat from getting sunburned, you must either paint or varnish every surface. Giving a boat a "museum quality" paint and/or varnish finish can literally take as long as building the boat.
Step 10: Making the Sail...

Another step you can do while other parts are curing is make the sail. This particular design uses a "lug" sail, a classic looking sail for small boats with wood masts. It increases the sail area (therefore the force generated by the wind) without it having to be as tall as a modern sailboat mast made of aluminum. There is a kit from an online sailmaking company that you can get for a reasonable price. The Dacron cloth panels are all cut out by a CNC machine, so they fit perfectly together. I used a regular, domestic sewing machine, not an industrial one. The only time I had trouble was when sewing through all 7 layers at the reinforcement patches. When I got to those parts, I had to manually push down on the foot of the sewing machine with a flat-bladed screwdriver (minus) to help push the needle through the Dacron. We jokingly call Philips head screwdrivers "plus".
The panels/parts all come labeled. The directions were a bit confusing because they suggest you make sub-assemblies after the fact to make wrangling the large sail easier but they mention it after you've already sewn the large panels together. It's important to understand what parts go together while the panels are still small and more manageable. For example, the batten pockets are tricky enough to build on a single panel, much less the finished sail. Building the sail was about as difficult for me as building the boat, but it was worth it.
The lug sail gets reinforcement patches on all four corners where you attach it to the spars (bend), and there's also a reefing point for when the wind starts to pick up (freshen). Modern sails have three corners (Marconi rig).
I opted for the less expensive white Dacron sail kit, but there's also a classic red (tanbark) colored kit that's $100 more expensive. Before I sewed a single stitch, I carefully traced every part of the sail kit onto painter's tarp poly film so I can always use the templates to build another sail, all I need to do is buy the tanbark cloth.
Step 11: Rigging Your Sailboat...

This seems to be the trickiest part for most people, probably because there are numerous ways it can be successfully rigged, depending on your experience, preferences or criteria. It's confusing because you have to know what the finished setup will look like in your mind while you're staring at a pile of ropes. I chose a setup that allows the most room in the cockpit for a full-sized adult, so the mainsheet is led forward of the skipper's position. This keeps the skipper's attention forward so they're looking where they're going. I have another boat where the mainsheet is behind the skipper and it takes some practice getting used to.
The lines I made up (rope becomes a line when you give it a job description) were the halyard (hauls the sail up), the mainsheet (adjusts the angle of the sail to the wind = trim) and a traveler bridle (where the mainsheet attaches to the boat). I got fancy and spliced all my ends, but you can just as well use a bowline knot.
I installed a cheek block at the top of the mast instead of the large diameter hole in the directions. I wanted the halyard to run as smoothly as possible when setting the sail. Then I installed a pair of cleats at the base of the mast, one for the halyard and one for the downhaul (cunningham). With both of these lines pulling in opposite directions, it locks the sail in place, flat, so it effectivley acts like a wing. The main halyard attaches to the gaff with a snap onto a padeye. This allows easy on/easy off when rigging at the boat ramp. I also used a small loop (parrel) around the mast and through the eye to keep the gaff located close to the mast. I looped the downhaul over the boom and down to the cleat to try to keep the gooseneck from twisting. Note, except for the blocks, just about all of the hardware used on rigging a boat this size can come in stainless steel or brass/bronze, depending on the look you're going for. If you plan on installing oarlocks to row the boat, this decision becomes even more important to the final look of the boat.
For the mainsheet, I made a short bridle between the handles on the transom with a small eye tied in the center. This allows a place for the snap on the end of the mainsheet to attach to. I could've just as easily allowed the snap to slide, which would give the bridle the function of a traveler, but would affect its pointing ability (sail upwind). The mainsheet is then run to a block on the end of the boom, then to another block in the middle of the boom. This leaves the main cockpit area unobstructed with running rigging. Make sure your mainsheet is long enough for your boom to swing forward of 90° to the boat, with enough to still come back to the cockpit for the skipper to control. A stop knot at the end of the mainsheet will keep the mainsheet from getting away from you and give you something to grip.
The rudder pivot hardware (gudgeons and pintles) must be installed perfectly vertical and on the exact centerline of the boat so that she will sail well. Drill and fill the necessary holes for this hardware. Be careful with the spacing. It's designed to be easily installed and uninstalled while underway.
With this particular rigging layout, when under sail, the skipper must constantly keep the mainsheet in hand, which is a good idea anyway for safety reasons (if you get hit by a gust of wind = puff, you won't get blown over = capsize). The tension on the mainsheet is easily manageable for any size skipper. On larger boats, the mainsheet is held by a fiddle block with a cam cleat, which is not necessary for a boat this size. With that being said, a possible future upgrade would be to install a block and a camcleat somewhere on the centerline of the boat so that more advanced sailors wouldn't need to constantly have to oppose the tension on the mainsheet. Of course the trade-off would be the hardware would probably be somewhere you might want to sit.
Another upgrade I figured out after actually taking her sailing would be to rig up a bungee/shock cord system that will hold the daggerboard both in an up and down position. With the current setup, the centerboard is held down by gravity and must be pulled out of the slot when beaching.
Step 12: Go SAILING!

Because I wanted to be able to go sailing by myself if needed, I made a dolly out of 2x4's and large pneumatic tires (which makes the dolly float). The dolly fits securely between the center and aft thwarts when driving out to the lake. The sides on the dolly lock against the skids on the bottom of the boat so it can't twist. Roll the sail up with the spars and wrap it with the main halyard. At the designed length, the mast doesn't fit inside the boat, but it seems a bit long, so some people have cut the mast down enough so that it fits inside the boat.
Out at the lake, unload the boat, slide the dolly underneath and you're ready to roll down to the ramp. At the launch, roll the boat out into the water until it floats off the dolly, toss the dolly off to the side out of everybody else's way. Drop the daggerboard into the slot and install the rudder assembly. Facing into the wind (important), stick the mast into the receiver hole (partner), tie off the downhaul (cunningham) and hoist the sail until the downhaul is tight, then cleat off the main halyard. Reave the mainsheet (run the line through the blocks) and you're ready to go sailing.
I've found that this boat sails very well. The lug sail makes it very easy to sail upwind (weather helm), it's a little more tender for a large adult, more so than a boat with a hard chine, like an El Toro/Optimist but it's a lot more graceful looking. The payload is very reasonable for a boat this size. My wife and son can easily (and safely) go sailing with me and I don't even need anyone's help to get it rigged and launched. All in all, this is one of the best projects I've every built. I hope you too can discover the joy of building your own boat and then take her sailing. Remember, in sailing, the wind is free, but nothing else is...
This is my very first Instructable after many years of referencing this excellent site to build numerous cool projects (you should see my next post). Anyway, I hope you enjoy it and please feel free to ask any questions you may have and I'll do my best to answer them. I'm planning on building a larger boat in the near future so stay tuned...
27 Homemade Boat Plans You Can DIY Easily

Building a boat might sound like a big project – and depending on the kind of boat you want, it can be. However, with the right plan, it’s far from impossible, offering you the prospect of owning a boat without spending huge amounts of money on it.
For anyone who thinks that sounds like a fun challenge, we’ve had a look online to see what other people have been trying – and as a result, here are our favorite 27 DIY boat plans you might like to have a go at copying at home.
Table of Contents
1. How to Build a Boat – Popularmechanics.com
2. how to build a sneak boat – kara hummer plans, 3. know how: build your own boat – sail magazine, 4. build a 7.5ft boat with 2 sheets of plywood, 5. build your own 12′ x 4′ simple aluminum boat – boat design net, 6. diy foldable boat for only 30$ fits in car backseat, 7. build a wooden boat – mother earth news, 8. portable boat plans, 9. weekender sailboat build, 10. swamp boats, 11. welcome to my dreamboat project, 12. homemade pontoon boat: 8 steps (with pictures) – instructables, 13. $100 homemade kayak, 14. how to build a recumbent pontoon pedal boat – mother earth news, 15. how to make boat using pvc pipe and 42cc 2-stroke engine, 16. pontoon boat picnic table: 8 steps (with pictures) – instructables, 17. wooden boat building step 1: lofting boat plans, 18. homebuilt pontoon boat/double-hull kayak, 19. homemade cooler fishing boat with foldable pontoons, 21. diy boat plan: a rowboat can support a trolling motor, 22. building a wooden boat: 12 steps (with pictures) – instructables, 23. one sheet sampan, 24. building a cheap sail catamaran, 25. couple builds wooden yacht in backyard – 5-year amazing time lapse, 26. plywood lath coracle, 27. diy simple wooden toy boat: woodworking for kids, lots of great plans for all kinds of boats.

If you’re toying with the idea of building your own boat , this post will be a fascinating read. In it, this DIYer explains how he dusted off some decades-old plans for building a boat to try his hand at his ancestral trade. It takes you through the process in great detail, giving you plenty of info about each step, so once you’ve finished reading, you’ll have a much better idea about whether this is a project you want to tackle.
Check More Details
For anyone who enjoys duck hunting and who wants to try building their own sneak boat, this is a video for you. In it, this YouTuber explains how he tackled a similar project, giving you all the tips and advice you’ll need to make a success of your project when it’s your turn to try.

This post is not exactly a plan as such, but it’s full of the kind of useful information that any first-time boatbuilder should know. The writer starts off by listing all the reasons why you really shouldn’t build your own boat – and if after reading that, you’re still determined to go ahead with it, his experience and advice will help make sure you make the best job of it.
Depending on what you hope to achieve – as well as your previous DIY and boat-building experience – your chances of success when trying to build your own boat can vary enormously. However, if what you hope to make is a modest boat of the kind you can take into a lake for a day of fishing, that’s the kind of thing most people can hope to achieve. And if that sounds like you, this video tutorial will show you how to make a serviceable 7.5ft craft from two sheets of plywood.

The aluminum boat this post teaches you to make is suitable for rowing or being propelled by a small motor . It’s ideal for sheltered inland waterways for activities like fishing, and if that sounds like the kind of thing you want to make, this post includes pdf plans that tell you exactly how to do it.
Making a DIY boat doesn’t need to cost a fortune, and if you’re on a limited budget, this is the plan for you. In it, you’ll learn how to make a small foldable boat that you’ll be able to fit in the back seat of your car – without spending more than about $30. Sound like something you’d like to try? Then give the video a watch!

In this post, you’ll find detailed instructions for making a simple yet elegant wooden boat that would be perfect for fishing trips out onto a lake or many other similar activities. We like the way this plan includes a simple step-by-step guide along with plenty of diagrams to show you exactly what you need to do, allowing you to make something just like it at home.

This is a great resource for anyone who is thinking of building themselves a simple pleasure craft since it contains not just one but several relatively easy boat-building plans. You can browse the plan and choose from a swan boat, a sheet ply skiff, a composite cruiser and several others. And then when you know which one you want to build, this site has all the details you’ll need to make a success of it.
For those looking for a more ambitious project, this video should be worth a look. In it, you get to see the development as this YouTuber’s sailboat took shape between September 2001 and summer 2002. It’s not exactly the kind of plan you’ll be able to follow exactly, but his impressive work should be a source of inspiration. Then it’s just down to you to find out how to build something similar yourself.

As you can see from the photos in this post, boats like this have been around for many years – and boats like this are found around the world anywhere that shallow waters or swamps exist. They’re simple to make too, and this plan gives you all the info you need to make one, including sourcing the wood from growing trees and putting the whole thing together. A fun project and one we’re sure plenty of people will enjoy attempting.
If you’re looking for a long watch – and a possible source of inspiration – this video is the first part of a multi-episode series about how this YouTuber went about building his dream boat . For those who are interested, it’s sure to give you some ideas about what’s possible – as well as plenty of ideas for how to tackle it.

We love the way the boat in this tutorial looks. It’s so basic and unpretentious, but it also looks like a whole lot of fun. Want to know how to make one yourself? Then check out this post for more details.
Buying a ready-made kayak can set you back a whole lot of money, but with a few basic DIY skills and a little bit of determination, you can build one yourself for much less. This video teaches you how to make one for only $100, offering a saving that sounds too good to refuse.

If you’ve ever wanted to own your own pedal boat , this is the plan for you because it teaches you how to build one yourself! It discusses important issues like flotation and gives you all the information you need to complete the project. And if you think you’d like to have a go, why not see if you can build something similar?
Here’s an original idea we loved! In this video, this YouTuber shows us how he built a functioning boat – out of PVC pipe! It’s certainly unconventional, but it looks like it works perfectly. So if anyone is looking for a fun and off-the-wall to try project, this could be just the thing!

The boat in this plan is one of our favorites because, while technically it’s a DIY pontoon boat , in practice, it’s more like a floating picnic table. With a boat like this, you can power out to the middle of the lake before cutting the engine and enjoying a nice lunch in perfect tranquility. This is something we’re thinking of trying ourselves!
This video is the first instalment in a series of tutorials detailing how this YouTuber built a boat from scratch. This part deals with the start of the project and lofting the boat plans , but if you like the way he works, you can also check out the other videos he’s uploaded and see how the final thing turns out.

For anyone who wants to make a functional boat without spending a fortune, this plan is perfect. The boat it teaches you to make is very “DIY” since it’s made of nothing more than PVC piping and some other similarly inexpensive materials. However, it looks like it floats, so if that’s all you need – and you aren’t too worried about looking flash – this is a plan that could be fun to copy.
If you like fishing and you’re looking for ideas for an individual fishing boat, you’re going to love this video. In it, we get to see this YouTuber’s eccentric creation that, to us, looks a bit like a floating armchair perched on top of three coolers. But that sounds like all you need for a great fishing trip, right? And we’re sure lots of people will enjoy trying to make something similar.

The sub-heading to this plan is “as simple as it can get”, and that’s a pretty accurate way of describing this boat, both in terms of design and construction. The details state it has a displacement of 230lbs, so it can comfortably accommodate one person, allowing you to get out on the water without spending much money at all.
This short tutorial gives you a simple suggestion for building a motorboat that is both easy and inexpensive to make. In the video, you can see that the boat struggles a little with two people in it, but it still works. This could be a great project to attempt for anyone who wants to have a go at building their first boat, and if that includes you, it’s recommended watching.

This is the third plan we’ve included from the Instructables website, but this is by far the most professional of the three. The boat this tutorial teaches you to build looks as though it could have been made by a professional. The plan is easy to follow though, so if this is the kind of boat you want , this is a post that should be well worth a look.

As this post explains, a sampan is a type of boat from Southeast Asia, and the word “sampan” comes from the Chinese meaning “three planks”. They are a popular boat in the region because they are easy to construct and extremely reliable, and if you’d like to try building one yourself, this plan will teach you how to do it.
This is a plan for anyone who’s up for a challenge because in it, you’ll learn how to make a DIY sail catamaran. The video is only about five minutes long, but as long you have some reasonable DIY skills and a bit of common sense, it shouldn’t be too hard to replicate, so why not see if you’re up to the task?
While not many people will have the time, skills or determination to finish a project like the one in this video, we still thought it merits a place on our list because of how impressive what they did is. Over five years, this couple built their own boat from scratch, and this video documents their progress. Check it out – it will blow your mind!

Among the very first boats ever invented, the coracle is a simple design that’s easy to make and fun to play about in. And if you think you might like to have a go, this is the plan that will teach you how to do it!

Perhaps building a real full-sized boat might be a bit much for you – but if you have kids, maybe making a miniature toy one with them could still be fun. It could also be a way to fire their creativity and imagination, and who knows? When they grow up, maybe they’ll build a real one for you in return!
As you can see, whatever kind of boat you hope to build, there are all kinds of plans that will show you how to do it.
We’ve enjoyed collecting these plans for you, so we hope you’ve enjoyed reading and watching them too. And above all, we hope we’ve helped you find the plan you were looking for to build a DIY boat of your own.
Related posts:
- 27 Homemade Pontoon Boat Plans You Can DIY Easily
- 16 Homemade Boat Blinds Plans You Can DIY Easily
17 Homemade Boat Seats Plans You Can DIY Easily
- 18 Homemade Boat Upholstery Plans You Can DIY Easily
Similar Posts

16 Homemade Boat Dock Plans You Can DIY Easily
If your dock is a complete wreck and you’d like to replace it with a brand new, DIY dock, you’re at the right place! Be it building a cost-effective, simple floating dock to have a good time on or building an on-site big dock system, we’ve got you covered! Read on to find out 16…

18 Homemade Boat Trailer Guides Plans You Can DIY Easily
Boat trailer guides might seem insignificant but are major life-savors when it comes to loading and launching your boat. Especially if your boating location is windy and you don’t have an extra set of hands to help you load your boat, trailer guides are non-negotiable! Luckily, boat trailer guides are cheap and easy to DIY….

Put your heart and soul into maintaining your boat and preventing its accessories from water and weather; the damage is inevitable. Sooner or later, you’ll notice your seats old, dirty, and ragged, and it is only human to want to replace them. The bad news is that boat seat costs you hundreds of dollars! But…

17 Homemade Fishing Rod Holder For Boat Plans
If you’ve found yourself constantly complaining about how your fishing rods are kept unorganized – sometimes leaning at a wall and at times on the boat floor completely unattended, we hear you! It is a sign that you’re in desperate need of a rod holder or a rod rack if you have many fishing rods….

18 Homemade Wood Boat Plans You Can DIY Easily
While the blissful and fun feeling a wooden boat offers while cruising in the calm waters is unparalleled, it is sometimes a luxury we cannot afford. Yes, quality wooden boats can cost a fortune! How’d you like it if we say you can DIY a fantastic wooden boat from scratch all by yourself and for…

27 Homemade Jon Boat Plans You Can DIY Easily
Jon boats feature an extremely simple design, and their flat bottom makes them suitable for use on even shallow water, so they’re a popular choice with anglers and many other inland boat users. They’re also extremely easy to build, so to help anyone who wants to try, we’ve had a look online to see what…
What makes a boat stable in the water is it the keel
i want to make a model for a school project out of tinfoil and hot glue it together and were going to put pennies in and see if it floats is there too much wait?
i meant to say weight not wait
Leave a Reply Cancel reply
Your email address will not be published. Required fields are marked *
Save my name, email, and website in this browser for the next time I comment.

- [[html title]]
YOUR ULTIMATE RESOURCE FOR CUSTOM-PLOTTED SAIL KITS
Things to know, we've designed our sail kits to be easy to assemble., our sail kits are designed and plotted using state-of-the-art equipment., meet sail designer jeff frank, stay in the loop never miss sale announcements, how-to blogs, new product launches, helpful tutorials and more.
- $ 0.00 0 items
Build Your Own Boat!

Stitch & Glue Designs

The Flats River Skiff 12 is a light, compact and stable solo skiff to access shallow water.
- 2″ – 4″ draft
- 1 person max

The Flats River Skiff 14 is the big sister to the FRS-12 , a light weight 2 person solo style skiff.
- 4′2″ beam
- 3″ – 6″ draft @ 825 lbs
- 2 people max

The Flats River Skiff 15 is a flats style 2 person shallow water hunting & fishing boat.
- 15′ LOA
- 5’4″ beam
- 5″ – 7″ draft
- 3 people max

The Flats River Skiff 16 hits the sweet spot for a 3-4 person shallow water fishing boat.
- 16’7″ LOA
- 6’3″ beam
- 8″ – 10″ draft
- 4 people max

The Flats River Skiff 18 is the perfect bay and flats fishing boat.
- 18’6″ LOA
- 7’3″ beam
- 8″ – 11″ draft
- 5 people max
Cold Molded Designs
The CS-18 is a smaller version of our original CS-21 for those looking for a smaller boat with lower freeboard to inshore waters.
- Cruise 25-30mph

The CS-21 was inspired by the iconic Harkers Island style work boats. This center console design features unmistakable lines, a Carolina flared bow and a modified V bottom.
- 10″ – 12″ draft
- Cruise 30mph

The CB-17 is the sister design to the FRS-16. She stands out as a custom flats boat with Carolina flare and rounded transom.
- 17′ LOA
- Cruise 25mph

The C-25 is a North Carolina sport fishing boat in a trailerable center console layout. With Carolina flared bow, broken shear and tumblehome she is an iconic design.
- 28′ LOA (25’2″ hull)
- 8′6″ beam
- 16″ – 18″ draft
- 350hp single or twin 200hp max
- Cruise 30-35mph
More Info and Helpful Links
How to videos, plans & kits.
|
| |||
|
|
|
|
|
|
| plans (nearly 450 at present) and building manuals, CD’s and DVD’s. |
| ||
|
|
| ||
| covering plywood, strip plank and clinker ply construction as well as sail making. | |||
Click here for details of the Terms & Conditions, Use of our Plans, Back-up, SFDesign Philosophy etc
|
|
|
| |
| When you go to order a plan you will have a choice of two Buy Now Buttons - one for the Printed Plans (to be sent by post) and the other for the electronic PDF version of the plan, which will be sent to your email address.
| |
| (also a 28' version) | |
| . dayboat details. Launch added to the Classic Motor Cruisers page. and photos of the first launched. . plans. . by Paul Fisher have been put up in a new section on the Sailer, Steam/Electric Launch, Steam Launch and the added. clinker motor launch added to the Motor Cruisers 21' to 30' page. almost complete added. added. design with more beam and hull depth, plus a new design, a added, one of which is built in two halves. and motor yachts and a photo of the finished . open strip planked motor cruiser. added. plans and a set of drawings and sketches has been added as an option to the 16' Curlew Motor Punt to make it into the . and the . . canoe plans. ; ; ; and models. . |
| After a youth messing around in all sorts of boats on the Thames, I gained my degree - a BSc (Bachelor of Science) in Naval Architecture and Shipbuilding from Newcastle University in 1974. Straight after University l worked in the design office of McGruer & Co. Scotland for 4 years - famous for high performance racing /cruising yachts beautifully crafted in wood (cold moulded as well as conventional clinker and carvel). l then became Technical Manager at D.M. Russell Marine - formerly Jas. A. Silvers yard just up the road at Rosneath, for 5 years - famous for their motor yachts - this period found me sailing/cruising in all sorts of craft around the coast of the UK and regular racing in everything from Dragons to the IOR fleet on the Clyde.
| |
|
| |
|
| |
|
| |||
|
| |||
|
|
| ||
|
|
| ||
|
| |||
|
| |
Forget engineering; he didn’t even have carpentry experience, yet this determined California man single-handedly built a 100-foot-long superyacht in the front yard of his desert home. Now a luxury charter, the vessel was cut into seven pieces for sea trials and reassembled at the ocean.

You may also like

A California car dealership sells Tesla Model S with Bitcoins as payment

Investigation reveals that German taxpayers funded the construction of sanctioned Russian oligarch’s $500 million yacht – 470 feet long and spread across eight decks, it is the largest sailing yacht in the world. The masts of this lavish vessel alone are taller than Big Ben.

Loved by Michael Jordan this $72 million superyacht is a billionaire’s pet – The 230-feet vessel ‘Joy’ has a cinema, spa, a semi-open gym, and a basketball court.

A large $100,000 bill looms over the Manhattan, New York

After 18 grueling months, the crew of the abandoned Alfa Nero and its sister superyacht, the Luminosity—both allegedly owned by sanctioned billionaire Andrey Guryev—will receive their pre-sanction salaries.

Billionaire entrepreneur Kim Kardashian has just splurged $70 million on a gorgeous Malibu mansion. Take a look inside her new abode.

Longer than a football field, Feadship’s new Project 710 is one of the greenest superyachts ever built.

The BAC Mono Marine Edition; because every superyacht needs a supercar!

Burger Boat Co.’s 142-foot superyacht is a lesson in elegance and space utilization with a gigantic three-story atrium.
a broom leaning against a wooden wall
Download this free HD photo of dubna, moscow oblast, russia, and brown by Ivan Stepanov (@evil_bumblebee)
Browse premium related images on iStock | Save 20% with code UNSPLASH20
Related collections

IMAGES
VIDEO
COMMENTS
Buying a sailboat can be expensive, but building your own can save you money. So what are sailboats you can build from home?
Know how: Build Your Own Boat. There's nothing like a simple boat with a simple rig and the simple joy of having built her yourself... Not many events in life are as emotionally convoluted as when the plans for a sailboat arrive at the amateur builder's home. The plans flutter out on the dining table and quickly there arise intertwining ...
Every year, thousands of amateurs much like yourself build their own boats the proven Glen-L way. Many builders save 50% or more over the price of a factory-built boat.
Free Sailboat Plans for the backyard home builder, build your own wooden sailboat using these simple plywood designs.
Build your own sail boat yatch from 9 feet to 63 feet in length. Fully featured wooden boat plans for home construction in Plywood, Steel and Fibre Glass.
Our collection of sailboat kit designs from 8 to 31 feet. Strong, lightweight okoume plywood means strong, lightweight sailing craft. Most of our sailboats can be cartopped, all of them sail beautifully, and all of them are easy to build.
Boat plans to help you build your dream. Since our first plans were sold for home construction in 1938, over 100,000 boats have been built from our plans.
Boat Plans / Boat Kits / Boatbuilding Supplies & Gear If you want to build a boat, we have what you need. Chesapeake Light Craft is your source for boat kits, kayak kits, boat plans, and boatbuilding materials. Our original, award-winning boat designs include kayaks, canoes, rowing boats, dinghies, and sailboats.
Roberts boat plans & designs for the DIY home boat builder. Boat building designs and plans for steel, aluminium, fiberglass & wood/epoxy.
Optimist Sailboat Build: Building the Wood/Epoxy Optimist In 1947 a gentleman named Clark Mills designed a small sail boat for kids to learn to build and sail called the Optimist. This boat was designed to be built from 3 sheets of plywood, with basic woodworking abi…
Building an 11ft Plywood Boat from start to finish using the Stitch and Glue method. Pointing out mistakes and how to avoid them.BOAT PLANS: https://plywood...
Chris Comerie uses retirement to fulfil a teenage ambition of creating a home-built boat, resulting in a trailable gaff-slooped pocket cruiser
How to Build a Wood Sailboat: I've been wanting to combine my two favorite hobbies - woodworking and sailing for a long time, so I thought I'd build a boat. It's got classic lines and looks so dazzling in the sunshine that people constantly stop me at the boat ramp to ask me ab…
Check More Details. 4. Build a 7.5ft Boat with 2 Sheets of Plywood. Depending on what you hope to achieve - as well as your previous DIY and boat-building experience - your chances of success when trying to build your own boat can vary enormously. However, if what you hope to make is a modest boat of the kind you can take into a lake for a ...
We'll provide the materials and instructions you need to build a custom-made sail for your boat. Our kits come with everything you need to become a self-reliant sailor.
Build CROW, a unique 15' 8" Camp Cruising Sailboat built from cheap ply and lumber from the local building supply, made a very cool boat! Visit RoyDesignedTh...
Buy custom wooden boat plans and build a boat yourself. All Salt Boatworks plans include full size patterns and our How To videos provide thorough insights into the build process.
Boat plans and manuals for the home and DIY boat builder for canoes, dinghies, sailing and motor yachts and launches using wood epoxy, stitch and tape and Cedar strip plank construction.
However some like Clyde Stires, a resident of Perris a small town in Southern California take things literally to the next level. This determined genius single-handedly built not a boat or jet-ski but a massive 100-foot long superyacht in his frontyard. It took Clyde four long years from 1987 to 1991, to build the aluminium vessel.
If you've ever thought of making a homemade boat, you might be interested to learn that some home-grown creations have resulted in models that get actually get marketed, like the floating tiki bar called the Crusin' Tiki, and the BBQ Doughnut Boat we featured in Five Bizarre But Totally Awesome Boats. Boaters are dedicated folks who love trying new things on the water, and many of us enjoy ...
a small blue boat sitting on top of a lake Download this free HD photo of dubna, moscow oblast, russia, and medium format film by Ivan Stepanov (@evil_bumblebee)
Zillow has 38 photos of this $499,990 2 beds, 2 baths, 1,155 Square Feet single family home located at 651 C Ave, Boulder City, NV 89005 built in 1936. MLS #2616645.
a broom leaning against a wooden wall Download this free HD photo of dubna, moscow oblast, russia, and brown by Ivan Stepanov (@evil_bumblebee)
Things to Do in Dubna, Russia: See Tripadvisor's 1,937 traveler reviews and photos of Dubna tourist attractions. Find what to do today, this weekend, or in September. We have reviews of the best places to see in Dubna. Visit top-rated & must-see attractions.
Dubna (Russian: Дубна́, IPA: [dʊbˈna]) is a town in Moscow Oblast, Russia. It has a status of naukograd (i.e. town of science), being home to the Joint Institute for Nuclear Research, an international nuclear physics research center and one of the largest scientific foundations in the country.